
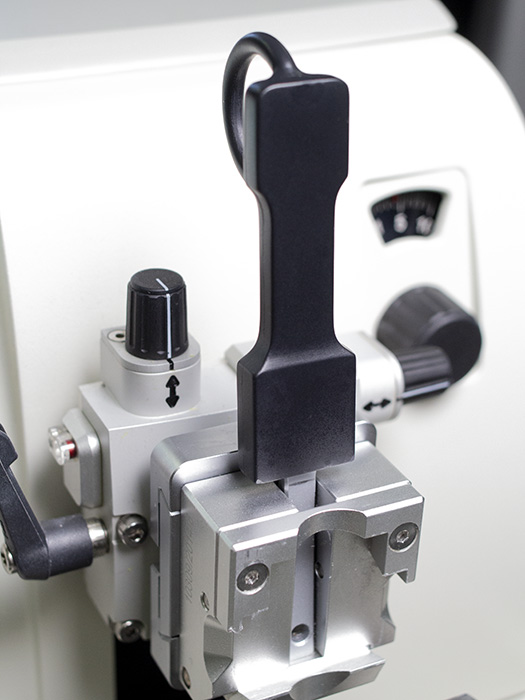
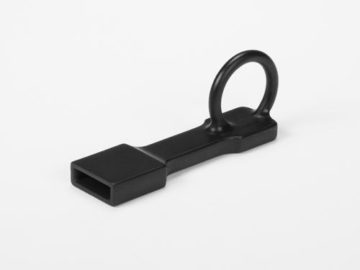
This ergonomic microtome block holder lever extension handle makes the repetitive process of changing out tissue blocks extremely easy and minimizes the fatigue on your fingers and wrist. It is an essential laboratory accessory for all microtomes that your histotechs will be forever grateful to use!
- Dimensions: 3 ½”(H) x 1″ (W) x 1 ½” (D) – Includes ring handle
- Made of a high impact strength urethane – Extremely Strong!
- Accommodates microtome block holder levers that are 5mm x 20mm in size
The CL Sturkey Gold disposable microtome blade edges are coated with a titanium nitride coating that adds durability, versatility, and longevity to the cutting edge. It is a high-performance disposable microtome blade, but with its extended life it’s also an economical choice.
GOLD DISPOSABLE MICROTOME BLADES ARE IDEAL FOR:
- Cutting hard tissue
- Bone sections
- Longevity of a disposable microtome blade
GOLD DISPOSABLE MICROTOME BLADES ARE AVAILABLE IN:
- Low Profile
- High Profile
Gold Disposable Microtome Blades are Made in the USA.
Red color counterstain for IHC-BCIP/NBT stains, in-situ probes, and special stains. Mountable with xylene based media or Innovex Probe Mount. No fading with time.
Fast Developing (5-10 minutes). Two components for Innovex Fast Red. Single solution for Permanent Innovex Brown (DAB like color) for alkaline phosphatase staining. Single solution for Permanent BCIP/NBT with no background or leeching out.

PERMANENT MOUNTING MEDIA FOR IN SITU STAINS AND IMMUNOFLUORESCENCE STAINS
The Probe Mount mounting media is suitable for mounting immunofluorescence stains, in situ stains counterstained with Nuclear Fast red and Red based special stains.
For coverslipping Immunofluorescence stains: PROBE MOUNT Mounting Media is a unique mounting media for coverslipping immunofluorescence stains. This mounting media is highly suitable for preserving immunofluorescence specimens stained with FITC, R-PE, Cy3, Cy5, Texas Red and other tandem fluorochromes.
For coverslipping specimens counterstained with Nuclear Fast Red: Red nuclear dyes such as Nuclear Fast Red are often used to stain or counterstain the nuclei in histological or cytological preparations. Counterstaining with Nuclear Fast Red is commonly practiced when staining for DNA or RNA probes for contrasted viewing of BCIP/NBT blue chromogen. Nuclear Fast Red stained specimens are best mounted with non-synthetic resinous mounting media that do not require alcohol and xylene treatment steps.
FEATURES OF THE PROBE MOUNT MOUNTING MEDIA:
- Fluid at room temperature and does not require warming.
- Eliminates need for alcohol dehydration and xylene clearing pre-steps.
- Sets quickly.
- Preservation of stained tissue sections and other biological slide specimens.
PROBE MOUNTING & DRYING PROTOCOL:
The following is a recommended technique for coverslipping slide specimens. Other techniques that achieve the same basic result are equally acceptable.
- Take the slides from the final wash (for best results water is quite suitable).
- Remove excess water by tapping the slides on a paper towel, for best results, blot most of the water or let slides air dry for 2-4 minutes.
- Place the slides down, face up on a flat surface and apply 2-3 drops of Probe Mount mounting media on the middle of the coverslip.
- Bring the slide up to the edge of the coverslip and invert the slide so that the mounting media touches the slide. Gently complete inversion.
- For immediate viewing, Quick-Set the coverslip by placing the mounted slides in an oven for the following times (10-15 min. at 37ºC) or let the slides sit at room temperature for 1-2 hours.
When mounting immunofluorescence stains, keep slides in dark and avoid exposure to light.
SECOND CHANCE COVERSLIPPING:
If for any reason you end up with an unsatisfactory mounted slide such as one with some air bubbles, remount slides as follows:
- Allow the coverslip to slip off the end of the slide by holding the slide at a vertical angle.
- Remove excess media as if it were excess water on a slide.
- Re-apply mounting media and coverslip.
- Mounted slides should be properly stored following the microscopic examination. Slides are best stored in the dark and free of dust.
COVERSLIP REMOVAL:
When desired, coverslips mounted with “PROBE MOUNT” mounting media may be removed by soaking the slides in warm water. The soaking time required depends on the age of the mounted slide and may vary from 10 minutes to overnight. After softening the mounting media, slowly and gently pull back on the corner of the coverslip until it releases. Then rinse off the remaining mounting media by agitating the unslipped slide in the warm water for a few moments.
Fast Developing (1-5 minutes). Only 2 components. “Good to the last drop”; left over mixed DAB solution stable for up to 3 weeks. Stains 1200 slides.
Blue cytoplasmic stain developed especially for counterstaining IHC nuclear stains of ER, PR, P53, PCNA, etc. Does not bind to nucleus. No masking of AEC or DAB stained nuclei occurs. Mountable with Innovex Probe Mount or xylene based mounting media.
Innovex Fc Receptor Blocker is a peptide based technology designed to block Fc Receptors present on all leukocytes (white blood cells), lymphomas, leukemias and melanomas. Fc receptors are also expressed on a majority of tumors. Blocking the Fc receptors is essential for accurate typing of lymphoid tumors.
APPLICATION/INTENDED USE OF FC RECEPTOR BLOCKER:
This reagent can be universally used to block all types of Fc receptors for all species’ cells including human, mouse and all animal species cells and tissues by a variety of immunoassays such as IHC, Immunofluorescence (IF) and Flow cytometry.
FC RECEPTOR BLOCKER FEATURES AND BENEFITS:
- Blocks Fc Receptors for both human and animal cells/tissues
- 30 minute incubation step at room temperature
- Eliminates false positive staining of white blood cells, lymphoid tissues, cytosmears (blood & bone marrow), melanoma tumors and other Fc expressing tumors
- Ensures accurate lymphoma and leukemia typing
- Eliminates negative control staining of lymphomas, lymphoid tissues, and blood and bone marrow smears
- Eliminates false positive staining for Kappa and Lambda staining
- Eliminates false positive staining of Reed Sternberg cells
STORAGE CONDITIONS:
Store in refrigerator at 2-8°C through the expiration date noted on the vial label.
PRODUCT FORMAT:
Working solution, no dilution or adjustments required.
INSTRUCTIONS FOR USE:
For Blocking Fc Receptors in Immunohistochemical and Immunofluorescence Specimens:
- Deparaffinize paraffin section slides or cut frozen sections, fix and rinse in water as usual.
- Quench endogenous peroxidase by immersion in 3% H2O2 (Only for Peroxidase-IHC staining).
- Cover sections or smears with 3-6 drops of Fc receptor block to achieve full specimen coverage.
- Incubate for 30 minutes at room temperature.
- Rinse with rinse buffer.
- Proceed with the remainder of IHC staining steps per lab protocol.
Innovex Fc Receptor Blocker must be used prior to use of any other blocker, e.g. serum or protein blocks.
Innovex Fc Receptor Blocker can be used in autostainers as a pre-treatment step prior to application of protein and/or serum blocking.
For Immunofluorescence labeling of tissues and cell preparations:
Deparaffinize paraffin section slides OR cut frozen sections, fix and rinse in water as usual.
- Cover tissue sections or cell preps with 3-6 drops of Fc Receptor Blocker to achieve full specimen coverage.
- Incubate for 30 minutes at room temperature.
- Rinse with PBS or DI water and proceed with application of fluorochrome-conjugated antibody (direct method) OR with the application of non-conjugated primary antibody followed by fluorochrome conjugated secondary antibody (indirect method)
Innovex Fc Receptor Blocker must be used prior to use of any other blocker, e.g. serum or protein blocks or IF Blockers.
For Flow Cytometry Blocking of Fc Receptors:
- Lyse or ficol blood as usual OR use whole blood.
- Add 150-300 micro liter of Fc Receptor Blocker per 1,000,000 cells.
- Incubate for 30 minutes on ice OR at room temperature.
- Wash twice in assay wash buffer.
- Proceed with antibody labeling.
Cyto-Q Immuno Diluent & Block is an antibody diluting, storage and blocking buffer ALL IN ONE. Dilute and refrigerate at 2-8°C for up to 4 years to prolongs antibody shelf life. Cyto-Q Immuno Diluent & Block increases antibody binding & allows higher antibody dilution for immunoassays. Antibodies remain wet on tissue for up to 36 hours.
APPLICATION/INTENDED USE OF CYTO-Q IMMUNO DILUENT & BLOCK:
Cyto-Q Immuno Diluent is intended for dilution and storage of concentrate antibodies.
CYTO-Q IMMUNO DILUENT & BLOCK FEATURES & BENEFITS:
-
- Prolongs antibody shelf life to 4 years in refrigerator
- Stabilizes antibodies in refrigerator
- No need to freeze antibodies, simply dilute and refrigerate
- Prolong shelf life of antibodies at -20 freezer to 10 years plus, no need to freeze antibodies at -70
- Increases antibody binding, high antibody dilution are obtained for immunoassays
- Simultaneously blocks non specific sites while the antibody binds to specific antigens
- Decreases and eradicates background for IHC and Immunoflourescence
- Eliminates the use of humidified chamber, antibodies remain wet on tissue for up to 36 hours at room temperature
STORAGE CONDITIONS:
Store in refrigerator at 2-8°C through expiration date noted on the vial.
PRODUCT FORMAT:
Working solution, NO dilution or adjustments required.
INSTRUCTIONS FOR USE:
-
- For lyophilized antibodies: Add recommended volume of Immuno Diluent & Block and store in refrigerator at 2-8°C for 4 years. For prolonged shelf life beyond 4 years, dilute in Immuno Diluent & Block and aliquot and freeze in -20°C freezer.
- For liquid concentrate antibodies: Dilute by dilution factor recommended for the immunoassay of interest. Diluted antibodies and Immuno Diluent & Block are stable in refrigerator for 4 years. For prolonged shelf life beyond 4 years, aliquot and freeze in -20°C freezer.
- For continuous use: Dilute antibodies in Cyto-Q Immuno Diluent & Block and store in refrigerator at 2-8°C. For extended storage over 4 years, aliquot in small volumes and freeze at -20°C.
NOTES:
For best results do NOT thaw and freeze antibodies more than once. Antibodies lose activity upon repeated freezing and thawing.
Innovex Background Buster is a peptide blocker that eradicates background staining for Mouse-On-Mouse IHC, ICC and immunofluorescence (IF), Human and Animal tissues IHC, ICC & IF staining in-situ Hybridization and Flow Cytometry and Immunoblotting. It is highly effective for quenching background fluorescence.
APPLICATION/INTENDED USE OF BACKGROUND BUSTER:
Background Buster is intended for eradicating non-specific binding and background in IHC, immunofluorescence labeling and in situ probe stains for both human and animal tissues.
BACKGROUND BUSTER FEATURES AND BENEFITS:
-
- Allows staining of identical species antibodies and tissue (e.g. mouse antibody on mouse tissue, rat-on-rat, rabbit-on-rabbit)
- Short 10-20 minute incubation step prior to applying primary antibody or in-situ probe at room temperature
- Delivers complete eradication of general background staining
- Replaces the use of normal serum, powdered milk, casein, and other blocking agents
- Excellent for both frozen and paraffin sections
STORAGE CONDITIONS:
Store in refrigerator at 2-8°C through the expiration date noted on the vial label.
PRODUCT FORMAT
Working solution (Ready-to-Use). No dilution or adjustments required.
INSTRUCTIONS FOR USE:
Specimen Preparation for IHC Staining:
For paraffin sections: Deparaffinize sections and rehydrate in water.
For frozen sections: Cut sections, dry and fix in cold acetone or the fixative of choice. Incubate in PBS for 3 minutes at room temperature.
For cytocentrifuge preparation: Prepare cytocentrifuge preparations of cell suspensions and observe the following instructions:
- When using peroxidase enzyme conjugate label (staining with DAB or AEC), quench tissue endogenous peroxidase activity by immersing slides in 3% H2O2 in DI water and incubate for 10 minutes. Rinse with water.
- Apply 2-4 drops of Background Buster to achieve specimen coverage.
- Incubate for 10 minutes at room temperature for human tissues. For indirect species antibody and ANIMAL TISSUES, incubate for 20 minutes prior to the application of the primary antibody. For identical species tissue and antibody such as Mouse-on-Mouse, Mouse-on-Rat, Rat-on-Rat, incubate for 30 minutes prior to application of the primary antibody. For excessive general background staining or background staining due to endogenous biotin, incubate for 30 minutes.
- Rinse with water and proceed with IHC staining or immunofluorescence labeling or in-situ probe staining by following the manufacturer’s instruction.
For removal of endogenous biotin, Innovex Background Buster can be used for blocking endogenous biotin in place of avidin block or egg white. Tissues that are rich in biotin include kidney, liver and spleen.
- Apply 2-3 drops of Innovex Background Buster to achieve specimen coverage and incubate for 30 minutes at room temperature for both human and animal tissues prior to the application of the primary antibody.
- Rinse in water.
- Proceed with enzyme immunostaining or immunofluorescence or in-situ probe staining by following the manufacturer’s instruction.
Background Buster removes all background generated by cross-reactivity of primary antibodies with animal tissues.
- Apply 2-3 drops of Background Buster to achieve specimen coverage prior to the application of the primary antibody.
- For indirect species antibody and tissue such as Mouse-on-Rabbit, incubate for 20 minutes prior to the application of the primary antibody. For identical species tissue and antibody such as Mouse-on-Mouse, Mouse-on-Rat, Rat-on-Rat, incubate for 30 minutes prior to the application of the primary antibody.
- Proceed with immunostaining per staining kit instruction.
For in-situ stains: Apply Background Buster post hybridization and prior to the application of conjugated secondary antibody. Incubate for 10 minutes.
For Immunofluorescence labeling of tissues and cytosmears: Following the specimen preparation:
- Treat sections or smears with enough number of drops (3 to 6) of Background Buster to achieve specimen coverage.
- Incubate for 10-15 minutes at room temperature.
- Rinse in appropriate wash buffer and proceed with application of fluorochrome-conjugated antibody (direct method) or with the application of non-conjugated primary antibody, followed by fluorochrome conjugated secondary antibody (indirect method).
For Flow cytometric test samples: Test specimen consisting of blood cells or tumor cells suspension are treated as follows:
- Incubate cell suspensions with Background Buster in a test tube or in a microtiter plate with 0.2 ml/106 cells.
- Incubate for 5-10 minutes.
- Wash with the appropriate assay wash buffer and proceed with application of the conjugated (direct method) or unconjugated primary antibody followed by fluorochrome conjugated secondary antibody (indirect method).
Innovex’s unique non-citrate formulation with built-in pH stabilizer provides optimal and gentle unmasking of antigens in the various heat methods (including high temp). Optimal pH remains constant regardless of temperature. Non-damaging to tissue morphology. Tissue does not slough off the slide. Shelf life 3 years. Store at 4°C.
An all purpose PBS for laboratory use. No preservatives. 20X concentrate, Store at 15-30°C. Shelf life 3 years.
5X Concentrate
(For amplifying AEC & DAB Stains.)
ADVANTAGE™ Mounting Media is formulated for permanently mounting (coverslipping) slides without the need for xylene and alcohol pre-treatment steps.
FEATURES OF ADVANTAGE™ MOUNTING MEDIA:
- Mount permanently and directly from water.
- Permanently preserves AEC, DAB, Fast Red & other immuno stains.
- No fading of chromogens or dyes.
- Fluid is at room temperature, no warming is necessary.
- No fume hood needed to mount.
- Sets in 5 minutes at room temperature, ready for microscopic examination.
- Permanently preserves IHC stains and special stains.
- Saves time, mounting time of less than 10 seconds per slide.
ADVANTAGE™ MOUNTING MEDIA APPLICATION:
Advantage™ is intended for the coverslipping stained biological specimen. It is intended to be applied with coverslips. It can also be used for making wet mounts.
ADVANTAGE™ MOUNTING MEDIA, MOUNTING & DRYING PROTOCOL:
The following is a recommended technique for coverslipping slide specimens. Other techniques that achieve the same basic result are equally acceptable.
- Take the slides from the final wash (for best results water is quite suitable).
- Remove excess water by air drying, maximum removal of water is recommended.
- Place the slides down, face up on a flat surface and apply 2-3 drops (or as needed) of Advantage mounting media on the lower edge of the coverslip.
- Bring the slide up to the edge of the coverslip and invert the slide so that the mounting media touches the slide. Gently complete inversion.
- For immediate viewing, Quick-Set the coverslip by placing the mounting slides in an oven for the following time: 5 minutes at 37º C or let the slides sit at room temperature for 10-15 minutes. IMPORTANT: Do not leave slides at 37º for more than one hour. Slides left longer than one hour at oven temperature may exhibit small bubble formations.
- Mounted slides should be properly stored following the microscopic examination. Slides are best stored in the dark and free of dust.
SECOND CHANCE COVERSLIPPING:
If for any reason you end up with an unsatisfactory mounted slide such as one with some air bubbles, remount slides as follows:
- Allow the coverslip to slip off the end of the slide by holding the slide at a slight vertical angle.
- Remove excess media as if it were excess water on a slide.
- Re-apply mounting media and coverslip.
- Mounted slides should be properly stored following the microscopic examination. Slides are best stored in the dark and free of dust.
COVERSLIP REMOVAL:
When desired, coverslips mounted with Advantage™ Mounting Media may be removed by soaking the slides in warm water. The length depends on the age of the mounted slide and may vary from 10 minutes to over-night. After softening the mounting media, slowly and gently pull back on the corner of the coverslip until it releases. Then rinse off the remaining mounting media by agitating the un-slipped slide in the warm water for a few moments.
![]()
SOLUTION:
| 250 ml | 500 ml | 1 Liter | |
| New Methylene Blue N Stain, Aqueous | Part 1270A | Part 1270B | Part 1270C |
APPLICATION:
Newcomer Supply New Methylene Blue N Stain, Aqueous provides a staining technique for reticulum of immature erythrocytes. Immature erythrocytes (reticulocytes) contain RNA which is lost as cells age. When New Methylene Blue N Stain, Aqueous is used to supravitally stain viable erythrocytes the RNA in young cells is precipitated and stained deep blue. The stained RNA appear as blue granules which may be connected into a reticulo-filamentous pattern.
METHOD:
Solutions: All solutions are manufactured by Newcomer Supply, Inc.
STAINING PROCEDURE:
- Filter New Methylene Blue N Stain, Aqueous prior to use.
- Collect appropriate blood sample for reticulocyte count, per laboratory protocol. Proceed with staining procedure as soon as possible after blood draw.
- Pre-label microscopic slide(s) with appropriate patient identifiers.
- Mix five drops of New Methylene Blue N Stain, Aqueous with five drops of whole blood; mix gently with a pipette.
- See Procedure Notes #1, #2 and #3.
- Incubate mixture at room temperature for 10-15 minutes.
- See Procedure Note #4.
- Thoroughly remix stain/blood suspension after incubation.
- See Procedure Note #5.
- Prepare wedge smear(s) on pre-labeled microscopic slide(s) with the remixed stain/blood suspension.
- Allow slide(s) to thoroughly air-dry.
- Evaluate reticulocyte count under oil immersion.
RESULTS:
| Reticulocytes | Pale blue with dark blue granular/reticular material |
| Red cells | Pale blue or blue-green |
PROCEDURE NOTES:
- A small test tube, vial or centrifuge tube can be used for mixing purposes.
- Smaller or larger amounts of stain and blood can be mixed as long as volumes are of equal proportions.
- Separate pipettes should be used for each solution and step to avoid any possibility of sample contamination.
- Incubating longer than 15 minutes may increase the possibility that mature erythrocytes will also be darkly stained.
- Reticulocytes have lower density than mature erythrocytes and will be near the top during incubation. Remixing prior to preparing smears allows for equal cell distribution.
REFERENCES:
- Bauer, John D. Clinical Laboratory Methods. 9th ed. St. Louis: Mosby, 1982. 195-198.
- Lillie, R. D., and Harold Fullmer. Histopathologic Technic and Practical Histochemistry. 4th ed. New York: McGraw-Hill, 1976. 752-753.
- McPherson, Richard and Matthew Pincus. Henry’s Clinical Diagnosis and Management by Laboratory Methods. 22nd ed. Philadelphia: Elsevier Saunders, 2011. 514, 544.
- Modifications developed by Newcomer Supply Laboratory.
![]()
SET INCLUDES:
| Part 1038A | ||
| Solution A: | Congo Red Stain 1%, Aqueous | 500 ml |
| Solution B: | Alkaline Alcohol | 500 ml |
Additionally Needed:
| Amyloid Animal Control Slides | Part 4031 |
| Xylene, ACS | Part 1445 |
| Alcohol, Ethyl Denatured, 100% | Part 10841 |
| Alcohol, Ethyl Denatured, 95% | Part 10842 |
| Hematoxylin Stain, Mayer Modified | Part 1202 |
| Coplin Jar, Plastic | Part 5184 (for microwave modification) |
For storage requirements and expiration date refer to individual bottle labels.
APPLICATION:
Newcomer Supply Congo Red Stain Set, Bennhold, Amyloid, with included microwave modification, is used for identifying extraneous protein deposits in amyloidosis, as well as minute amounts of amyloid. The use of polarizing lenses is an essential technique for visualizing amyloid positive areas and/or to confirm negativity.
METHOD:
Fixation: Formalin 10%, Phosphate Buffered (Part 1090)
Technique: Paraffin sections cut at 8-10 microns
Solutions: All solutions are manufactured by Newcomer Supply, Inc.
All Newcomer Supply Stain Sets are designed to be used with Coplin jars filled to 40 ml following the provided staining procedure. Some solutions in the set may contain extra volumes.
STAINING PROCEDURE:
- If necessary, heat dry tissue sections/slides in oven.
- Deparaffinize sections thoroughly in three changes of xylene, 3 minutes each. Hydrate through two changes each of 100% and 95% ethyl alcohols, 10 dips each. Wash well with distilled water.
- See Procedure Notes #1 and #2.
- Place slides in Solution A: Congo Red Stain 1%, Aqueous for 1 hour.
Microwave Modification: See Procedure Note #3.
- Place slides in a plastic Coplin jar containing Solution A: Congo Red Stain 1%, Aqueous and microwave at 70°C for 3 minutes.
- Rinse in two to three changes of tap water; rinse in distilled water.
- Differentiate in Solution B: Alkaline Alcohol, 5 to 30 seconds, agitating constantly until slide background is cleared of Solution A: Congo Red Stain 1%, Aqueous.
- Rinse in two to three changes of tap water; rinse in distilled water.
- Counterstain with Hematoxylin Stain, Mayer Modified (Part 1202), 3-5 minutes, depending on preference of nuclear stain intensity.
- Wash in running tap water for 5 to 10 minutes.
- Dehydrate in two changes each of 95% and 100% ethyl alcohol. Clear in three changes of xylene, 10 dips each; coverslip with compatible mounting medium.
RESULTS:
Light Field Microscopy:
| Amyloid | Pink to red |
| Nuclei | Blue |
Polarized Light:
| Amyloid fluorescence | Apple green |
PROCEDURE NOTES:
- Drain slides after each step to prevent solution carry over.
- Do not allow sections to dry out at any point during procedure.
- The suggested microwave procedure has been tested at Newcomer Supply. This procedure is a guideline and techniques should be developed for use in your laboratory.
- For optimal results sections should be cut at 8-10 microns. This will provide more intense staining and allow smaller amyloid deposits to be identified. Sections cut too thin may show faint staining and sections cut thicker than 8-10 microns may display yellow birefringence.
- If using a xylene substitute, closely follow the manufacturer’s recommendations for deparaffinization and clearing steps.
REFERENCES:
- Luna, Lee G. Histopathologic Methods and Color Atlas of Special Stains and Tissue Artifacts. Gaitheresburg, MD: American Histolabs, 1992. 366-367.
- Sheehan, Dezna C., and Barbara B. Hrapchak. Theory and Practice of Histotechnology. 2nd ed. St. Louis: Mosby, 1980. 177-178.
- Modifications developed by Newcomer Supply Laboratory.
![]()
SET INCLUDES:
| Part 1037A | Part 1037B | ||
| Solution A: | Sodium Hydroxide 1%, Aqueous | 25 ml | 50 ml |
| Solution B: | Congo Red Stain, Alcoholic | 250 ml | 500 ml |
Additionally Needed:
| Amyloid, Animal Control Slides | Part 4031 |
| Xylene, ACS | Part 1445 |
| Alcohol, Ethyl Denatured, 100% | Part 10841 |
| Alcohol, Ethyl Denatured, 95% | Part 10842 |
| Hematoxylin Stain, Harris Modified | Part 1201 |
For storage requirements and expiration date refer to individual bottle labels.
APPLICATION:
Newcomer Supply Congo Red Stain Set, Puchtler, Amyloid is used for identifying extraneous protein deposits in amyloidosis, as well as minutes amount of amyloid. The use of polarizing lenses is an essential technique for visualizing amyloid positive areas and/or to confirm negativity.
METHOD:
Fixation: Formalin 10%, Phosphate Buffered (Part 1090)
Technique: Paraffin sections cut at 8-10 microns
Solutions: All solutions are manufactured by Newcomer Supply, Inc.
All Newcomer Supply Stain Sets are designed to be used with Coplin jars filled to 40 ml following the provided staining procedure. Some solutions in the set may contain extra volumes.
STAINING PROCEDURE:
- If necessary, heat dry tissue sections/slides in oven.
- Prepare fresh Congo Red Working Stain Solution; mix well.
- Solution B: Congo Red Stain, Alcoholic 40 ml
- Solution A: Sodium Hydroxide 1%, Aqueous 0.4 ml
- See Procedure Note #1.
- Deparaffinize sections thoroughly in three changes of xylene, 3 minutes each. Hydrate through two changes each of 100% and 95% ethyl alcohols, 10 dips each. Wash well with distilled water.
- See Procedure Notes #2 and #3.
- Stain in Hematoxylin Stain, Harris Modified (Part 1201) for 30 seconds to 1 minute.
- Wash in running tap water for 1 minute; rinse in distilled water.
- Do not differentiate or use a bluing agent.
- Place in 95% ethyl alcohol; 1-2 dips.
- Stain in fresh Congo Red Working Stain Solution (Step #2) for 20-30 minutes.
- Extend up to 50 minutes for more intense stain results.
- Dehydrate quickly in two changes each of 95% and 100% ethyl alcohol; 10 dips each. Clear in three changes of xylene, 10 dips each; coverslip with compatible mounting medium.
RESULTS:
Light Field Microscopy:
| Amyloid | Pink to red |
| Nuclei | Blue |
Polarized Light:
| Amyloid fluorescence | Apple green |
PROCEDURE NOTES:
- If excess precipitate forms in Solution B: Congo Red Stain, filter the Congo Red Working Stain Solution prior to use.
- Drain slides after each step to prevent solution carry over.
- Do not allow sections to dry out at any point during procedure.
- For optimal results sections should be cut at 8 – 10 microns. This will provide more intense staining and allow smaller amyloid deposits to be identified. Sections that are too thin may show faint staining and sections that are thicker than 8-10 microns may display yellow birefringence.
- If using a xylene substitute, closely follow the manufacturer’s recommendations for deparaffinization and clearing steps.
REFERENCES:
- Carson, Freida L., and Christa Hladik Cappellano. Histotechnology: A Self-instructional Text. 4th ed. Chicago: ASCP Press, 2015. 154-155.
- Churukian, Charles. “Improved Puchtler’s Congo Red Method for Demonstrating Amyloid.” The Journal of Histotechnology 23.2 (2000): 139-141.
- Sheehan, Dezna C., and Barbara B. Hrapchak. Theory and Practice of Histotechnology. 2nd ed. St. Louis: Mosby, 1980. 177-178.
- Modifications developed by Newcomer Supply Laboratory.
CaviWipes1 Surface Disinfection Towelettes are a multi-purpose disinfectant/decontaminant wipe that can be used on hard, non-porous surfaces. CaviWipes1 are effective in killing of bacteria, viruses and fungi in 1 minute including TB, MDR A. baumannii, HIV-1, HCV and many more. When used as directed, the fragrance free CaviWipes1 Surface Disinfection Towelettes will effectively clean and disinfect surfaces and can help reduce the risk of cross contamination.
FEATURES AND BENEFITS OF THE CAVIWIPES1 SURFACE DISINFECTION TOWELETTES:
- Proven effective against SARS-C0V-2 on hard non-porous surfaces
- 1 minute contact time for virucidal, bactericidal (including TB) activity*
- 1 step cleaner and disinfectant**
- Ready to use, no dilution required
- Towelettes impregnated with CaviCide1 solution
- Fragrance-free
- Bleach-free
- Multi-purpose cleaner for everyday use
* Trichophyton interdigitale requires precleaning. Trichophyton interdigitale and Adenovirus require 3-minute contact time.
**Follow label instructions for use
QUALIFICATIONS:
CAVIWIPES1 SURFACE DISINFECTION TOWELETTES LIST OF USES:
- Ambulance equipment surfaces
- Animal care facilities
- Bathrooms
- Correctional facilities
- Daycare centers
- Dental offices
- Emergency medical settings
- Emergency vehicles
- Exterior surfaces of anesthesia machines and respiratory therapy equipment
- Health club facilities
- Hospitals
- Infant/child care equipment surfaces
- Interior and exterior surfaces of infant incubators, bassinets
- Isolation areas
- Laboratories
- Laundry rooms
- Neonatal units
- Nursing homes
- Operating rooms
- Ophthalmic and optometric facilities
- Outpatient surgical centers
- Oxygen hoods
- Schools
- Surgical centers
CAVIWIPES 1 SURFACE DISINFECTION TOWELETTE KILL CLAIMS:
1 Minute Efficacy Against
Mycobacterium
- Mycobacterium tuberculosis var: bovis (BCG) (TB)
Bacteria
- Burkholderia cepacia
- Enterobacter cloacae
- Klebsiella pneumoniae
- Pseudomonas aeruginosa
- Salmonella enterica
- Staphylococcus aureus
Pathogenic Fungi
- Candida albicans
Drug-resistant Bacteria
- Carbapenem-Resistant Klebsiella pneumoniae (CRKP)(CRE)
- ESBL Escherichia coli (ESBL E. coli)
- Methicillin Resistant Staphylococcus aureus (MRSA)
- Methicillin Resistant Staphylococcus epidermidis (MRSE)
- Multi-drug resistant (MDR) Acinetobacter baumannii
- Vancomycin Intermediate Staphylococcus aureus (VISA)
- Vancomycin Resistant Enterococcus faecalis (VRE)
Enveloped Viruses
- Hepatitis B Virus (HBV)
- Hepatitis C Virus (HCV)
- Herpes Simplex Virus Type 1
- Herpes Simplex Virus Type
- Human Coronavirus (not associated with Severe Acute Respiratory Syndrome or SARS)
- Human Immunodeficiency Virus (HIV-1)
- Influenza A Virus Strain A (H3N2 Virus)
- Measles virus
- SARS-CoV-2 (COVID-19 Virus)
3 Minute Efficacy Against
- Adenovirus Type 5*
Fungicide
- Trichophyton interdigitale*
*Trichophyton interdigitale requires precleaning. Trichophyton interdigitale and Adenovirus require 3-minute contact time.
.jpg)
CaviCide1 Surface Disinfection is a multi-purpose disinfectant/decontaminant cleaner to help reduce the risk of cross-contamination. It can be used on hard, non-porous surfaces. It joins the current family of CaviCide products including CaviCide and CaviWipes. The improvements found in this formulation is effective in killing 99.9% of bacteria, viruses and fungi in 1 minute including TB, Norovirus, A. baumannii, HIV -1, HBV, HCV and many more.
CAVICIDE1 SURFACE DISINFECTION:
-
- Proven effective against SARS-CoV-2 on hard non-porous surfaces
- 1-Minute contact time for viricidal, bactericidal (including TB) activity (Adenovirus requires 3-minute contact time)
- 1-Step cleaner and disinfectant
- Fragrance-Free
- Bleach-Free
- Multi-purpose cleaner for everyday use
QUALIFICATIONS:
CAVICIDE1 SURFACE DISINFECTION LIST OF USES:
-
- Ambulance equipment surfaces
- Animal care facilities
- Bathrooms
- Correctional facilities
- Daycare centers
- Dental offices
- Emergency medical settings
- Emergency vehicles
- Exterior surfaces of anesthesia machines and respiratory therapy equipment
- Health club facilities
- Hospitals
- Infant/child care equipment surfaces
- Interior and exterior surfaces of infant incubators, bassinets
- Isolation areas
- Laboratories
- Laundry rooms
- Neonatal units
- Nursing homes
- Operating rooms
- Ophthalmic and optometric facilities
- Outpatient surgical centers
- Oxygen hoods
- Schools
- Surgical centers
CAVICIDE1 SURFACE DISINFECTION KILL CLAIMS:
1 Minute Efficacy Against
Mycobacterium
-
- Mycobacterium tuberculosis var: bovis (BCG) (TB)
Bacteria
-
- Acinetobacter baumannii
- Burkholderia cepacia
- Enterobacter cloacae
- Klebsiella pneumoniae
- Pseudomonas aeruginosa
- Salmonella enterica
- Staphylococcus aureus
Drug-resistant Bacteria
-
- Carbapenem-Resistant Klebsiella pneumonia (CRKP)(CRE)
- ESBL Escherichia coli, ESBL E. coli
- Methicillin Resistant Staphylococcus aureus (MRSA)
- Methicillin Resistant Staphylococcus epidermidis (MRSE)
- Multi-drug resistant (MDR) Acinetobacter baumannii
- Vancomycin Intermediate Staphylococcus aureus (VISA)
- Vancomycin Resistant Enterococcus faecalis (VRE)
Enveloped Viruses
-
- Hepatitis B Virus (HBV)
- Hepatitis C Virus (HCV)
- Herpes Simplex Virus Type 1
- Herpes Simplex Virus Type 2
- Human Coronavirus (not associated with Severe Acute Respiratory Syndrome or SARS)
- Human Immunodeficiency Virus (HIV-1)
- Influenza A Virus Strain A (H3N2 Virus)
- SARS-CoV-2
Non-Enveloped Viruses
-
- Norovirus
- Rotavirus
Fungi
-
- Candida albicans
- Trichophyton interdigitale
3 Minute Efficacy Against
Non-Enveloped Viruses
-
- Adenovirus II (requires 3 minute contact time)
ALSO AVAILABLE AS CAVIWIPES1 – CLICK HERE
CaviWipes and CaviWipes1 canisters can be easily mounted to the wall with this bracket to make them more accessible and visible.
.jpg)
CaviCide surface disinfection is a convenient, ready-to-use, intermediate-level surface disinfection for use on most hard non-porous surfaces. It is effective against TB, HBV, viruses (hydrophilic and lipophilic), bacteria (including MRSA and VRE) and fungi. It is safe for all areas of the facility including NICU, operating rooms, isolation rooms, patient care areas and laboratories. When used as directed, it will also effectively clean and disinfect non-critical and semi-critical instrumentation.
CAVICIDE SURFACE DISINFECTION:
-
- Proven effective against SARS-CoV-2 on hard non-porous surfaces
- Effective against TB and MRSA in 3 minutes, and HIV-1, HCV, and HBV in 2 minutes
- Ready to use, no mixing, no measuring, no rinsing, just let it air dry.
- Disinfectant, cleaner, decontaminant, all in one
- May be used on with most medical device materials
- For use on hard, non-porous surface
QUALIFICATIONS:
CAVICIDE SURFACE DISINFECTION LIST OF USES:
-
- Ambulance equipment surfaces
- Animal care facilities
- Bathrooms
- Correctional facilities
- Daycare centers
- Dental offices
- Emergency medical settings
- Emergency vehicles
- Exterior surfaces of anesthesia machines and respiratory therapy equipment
- Health club facilities
- Hospitals
- Infant/child care equipment surfaces
- Interior and exterior surfaces of infant incubators, bassinets
- Isolation areas
- Laboratories
- Laundry rooms
- Neonatal units
- Nursing homes
- Operating rooms
- Ophthalmic and optometric facilities
- Outpatient surgical centers
- Oxygen hoods
- Schools
- Surgical centers
This product is not to be used as a terminal sterilant/high level disinfectant on any surface or instrument that (1) is introduced directly into the human body, either into or in contact with the bloodstream or normally sterile areas of the body, or (2) contacts intact mucous membranes but which does not ordinarily penetrate the blood barrier or otherwise enter normally sterile areas of the body. This product may be used to preclean or decontaminate critical or semi-critical medical devices prior to sterilization or high level disinfection. This product may be used to disinfect non-critical medical devices, which come in contact only with intact skin.
CAVICIDE SURFACE DISINFECTION KILL CLAIMS:
3 Minute Efficacy Against
Mycobacterium
-
-
- Mycobacterium tuberculosis var: bovis (BCG)
-
Bacteria
-
-
- Pseudomonas aeruginosa
- Salmonella enterica
- Staphylococcus aureus
-
Fungi
-
-
- Trichophyton mentagrophytes
-
2 Minute Efficacy Against
Multidrug-Resistant Bacteria
-
-
- Methicillin Resistant Staphylococcus aureus (MRSA)
- Staphylococcus aureus with reduced susceptibility to vancomycin
- Vancomycin Resistant Enterococcus faecalis (VRE)
-
Enveloped Viruses
-
-
- Hepatitis C Virus (HCV)
- Hepatitis B Virus (HBV)
- Herpes simplex virus (type 1)
- Herpes simplex virus (type 2)
- Human Coronavirus (not associated with Severe Acute Respiratory Syndrome or SARS)
- Human Immunodeficiency Virus (HIV-1)
- Influenza A2 Virus
- SARS-CoV-2
-
ALSO AVAILABLE AS CAVIWIPES – CLICK HERE
Click here for printable instructions ![]()
SPILL RESPONSE KIT COMPONENTS:
- The Specific Control Products Ordered
- Safety Goggles
- Gloves
- Waste Bags
- Broom & Pan
SPILL RESPONSE KIT USES:
| Medical Labs | Histopathology |
| Clinical Labs | Physicians |
| Hospitals | Dentists |
| Schools | Universities |
| X-Ray Labs | Industrial Labs |
| Research Labs | Pharmacies |
| Veterinarians | Shipping/Receiving/Storage |
SOLVENT HANDLER™
.jpg)
Solvent Handler is a free flowing oxygen scavenging granule developed to control hydrocarbon spills. When this virtually dust-free granule is applied, the spilled material is solidified, vapors are eliminated, and flammability risk is reduced. The resulting dry solid granules can easily be swept up, leaving little evidence of the spilled liquid.
Solvent Handler™ is very effective in controlling:
- Flammable Liquids
- Hydraulic Oils
- Brake Oils
- Chlorinated Solvents
- Motor Oils
- Residual flammable liquids or sludge left in containers or storage tanks
Directions for Solvent Handler:
-
- Consult SDS for the spilled material to become familiar with its chemical properties and safety and health requirements.
- Select and wear proper personal protective equipment for the spilled chemical.
- Evacuate area as necessary to ensure safety of personnel.
- Eliminate all sources of ignition and ensure that there is adequate ventilation available before applying product.
- Apply Solvent Handler™ to spill from the upwind side around its perimeter to dike the liquid, working from the outside of the spill toward the center. Completely blanket the spill, eliminating all wet areas.
- Agitate product on the spill area with non-sparking paddle or scrapper, adding additional Solvent Handler™ as needed to eliminate all wet areas.
- Check vapor elimination, using a vapor detection device.
- Add additional Solvent Handler™ product until all vapor is eliminated.
- Dispose of neutralized waste in accordance with Federal, State, and Local environmental regulations.
NOTE: Solvent Handler™ DOES NOT reduce toxicity. When this virtually dust-free granule is applied, the spilled material is solidified, vapors are eliminated, and flammability risk is reduced. If spilled material is toxic, the treated waste remains toxic and should be treated accordingly.
| DO Use on the Following: |
DO NOT Use on the following: |
| Acetone | Large volumes in enclosed area. Be extremely careful using Solvent Handler™ on solvents with low auto-ignition temperature like “Nitromethane”. |
| Alcohols | |
| Chloroform | |
| Diesel | |
| Ethyl Acetate | |
| Gasoline | |
| Methyl Ethyl Ketone | |
| Most All Halogens | |
| Most All Hydrocarbons | |
| NN Dimethylformamide | |
| Xylene | |
| 111 Trichlorethane |
POLYFORM-F™
.jpg)
A very unique granular material designed to destroy formaldehyde, formaldehyde-based fixative, glutaraldehyde and other aldehyde solutions, eliminating the harmful vapors in 2 to 3 minutes. The end product is a non-hazardous biodegradable polymer, making clean up and disposal safe and easy with not formaldehyde vapors.
Directions for PolyForm-F™ Formalin/Formaldehyde Neutralizer:
-
- Consult SDS for the spilled chemical solution, to become familiar with its chemical properties and health & safety requirements.
- Select and wear proper personal protective equipment as recommended or noted on the MSDS for the spilled chemical solution.
- Evacuate area as necessary to ensure safety of personnel.
- Eliminate all sources of ignition and ensure there is adequate ventilation in the area of the spill.
- Add PolyForm-F™ Formalin/Formaldehyde Neutralizer around the perimeter of the spill to dike the liquid and prevent spreading. From the upwind side, cover the entire area from edge to edge at a ratio of approximately one-to-one, completely covering the spill and taking care to avoid vapors and splashing.
- Once PolyForm-F™ Formalin/Formaldehyde Neutralizer is applied, DO NOT MIX, allow to stand for approximately 12-15 minutes.
- Cleanup spill residue by using a plastic dust-pan and disposable towels, then place the collected spill residue in adequate waste bag.
- After spill residue has been removed from spill area, wipe up the spill area with cold tap water, using a towel, sponge or mop.
- “Post-Cleanup” the spill area with mild detergent solution recommended by your facility for the final floor and/or counter cleanup.
- In most cases, the PolyForm-F™ Formalin/Formaldehyde Neutralizer treated spill residue may be disposed of as a non-hazardous waste.
- If the spilled solutions contain heavy metals, then the material must be handled as a potential hazardous waste.
- If human or animal tissue has been in contact with the spilled formalin, then the spill residue material may be handled as a potential bio-medical waste.
- Always dispose of all spill residue waste in accordance with users’ facility recommendations and follow all Federal, State and Local environmental regulations.
| DO Use on the Following: |
| Cidex |
| Cidex – OPA |
| Formaldehyde |
| Formaldehyde Based Embalming Solution |
| Formalin |
| Glutaraldehyde |
| Metracide |
| OmniCide |
| Wavacide |
| 10% Formalin |
Also:
- Bouins Fixative – Add Polyform-F™ to destroy formaldehyde. Neutralize pH with biocarbonate or caustic soda. This will convert picric acid to sodium picrate, which can be disposed of safely.
- B-5 Fixative – Contains heavy metals, which constitutes a hazardous waste.
For more information on the Polyform F product, click here.
ACID HANDLER™
.jpg)
“The first line of control for most accidental releases of corrosive materials.”
This unique flowable powder was developed to facilitate the rapid and immediate control of spilled corrosive materials by:
- Solidifying and neutralizing on contact.
- Immediately stopping the spread of hazardous chemicals.
- Reducing hazardous fumes and vapors.
- Reducing the corrosiveness of spilled materials, which reduces chemical attack on floors and other surfaces, as well as on the environment.
- Producing a controlled chemical reaction, rather than the usual violent reaction associated with the neutralization of strong corrosives.
- Eliminating the disposal problems typically associated with generic sorbents.
- Producing a dry powder which can be cleaned up and disposed of as a nonhazardous waste.
Directions for Acid Handler:
- Consult SDS of spilled material to become familiar with its chemical properties and safety and health requirements.
- Select and wear proper personal protective equipment for the spilled material.
- Evacuate area as necessary to ensure the safety of all personnel.
- Eliminate all sources of ignition and ensure that there is adequate ventilation before applying product.
- Apply Acid Handler™ to the spill area, working from the upwind side and start from the outside of spill and working toward the center. If the spilled liquid is running, then apply product downstream of the spill to form a dam.
- Carefully mix with a non-reactive paddle or shovel until all liquid is solidified.
- Determine level of neutralization by using a pH test kit.
- Let solidified/neutralized material cool prior to clean up.
- Follow final clean up procedures established by your facility or company.
- Dispose of neutralized waste in accordance with Federal, State and Local environmental regulations.
| DO Use on the Following Acids: |
DO NOT Use on the following: |
| Acetic Acid | Chlorine |
| Acetic Anhydride | Concentrated Hydrofluoric Acid |
| Acetyl Chloride | Hydrogen Peroxide |
| Aluminum Chloride | Iodic Acid |
| Chlorosulfonic Acid | Oxidizers |
| Chromic Acid Solutions-Chromium Waste Haz | Pentrafluoride (“Super-Acids”) |
| Citric Acid | Picric Acid |
| Dodecylbensylsulfonic Acid | Sodium Amide |
| Formic Acid | Sulfurous Fluoride Antimony |
| Glacial Acetic Acid | |
| Hydrochloric Acid | |
| Muriatic Acid | |
| Hydrofluosilic Acid | |
| Nitric Acid | |
| Perchloric Acid | |
| Phosphoric Acid | |
| Phosphoric Anhydride | |
| Phophorous Pentoxide | |
| Phophorous Trichloride | |
| Sulfonic Acid | |
| Sulfuric Acid | |
| 54% Hydrofluoric Acid Solution |
BASE CONTROL™
.jpg)
“The first line of control for most accidental releases of corrosive materials.”
This unique flowable powder was developed to facilitate the rapid and immediate control of spilled corrosive materials by:
- Solidifying and neutralizing on contact.
- Immediately stopping the spread of hazardous chemicals.
- Reducing hazardous fumes and vapors.
- Reducing the corrosiveness of spilled materials, which reduces chemical attack on floors and other surfaces, as well as on the environment.
- Producing a controlled chemical reaction, rather than the usual violent reaction associated with the neutralization of strong corrosives.
- Eliminating the disposal problems typically associated with generic sorbents.
- Producing a dry powder which can be cleaned up and disposed of as a nonhazardous waste.
Directions for Base Control:
- Consult SDS of spilled material to become familiar with its chemical properties and safety and health requirements.
- Select and wear proper personal protective equipment for the spilled material.
- Evacuate area as necesary to ensure the safety of all personnel.
- Eliminate all sources of ignition and ensure that there is adequate ventilation before applying product.
- Apply Base Control™ to the spill area, working from the upwind side and start from the outside of spill and working toward the center. If the spilled liquid is running, then apply product downstream of the spill to form a dam.
- Carefully mix with a non-reactive paddle or shovel until all liquid is solidified.
- Determine level of neutralization by using a pH test kit.
- Let solidified/neutralized material cool prior to clean up.
- Follow final clean up procedures established by your facility or company.
- Dispose of neutralized waste in accordance with Federal, State and Local environmental regulations.
| DO Use on the Following Bases: |
DO NOT Use on the following: |
| Ammonium Hydroxide = aqua ammonia | Chlorine |
| Anhydrous Ammonia | Hydrogen Peroxide |
| Monoethanolamine | Oxidizers |
| Morpholine | Sodium Amide |
| Potassium Hydroxide = caustic potash | Sodium Hypochloride |
| Triethylalamine | Sulfurous Fluoride |
| Sodium Hydroxide = caustic soda | |
| Sodium Metasilicate Solution | |
| Most Alkali Detergents |
* The lists given herein are general and do not necessarily include all the materials Acid Handler™, Polyform-F™, Base Control™, and Solvent Handler™ can or cannot be used on. If you would like an exotic species tested, or have questions as to application of the products, call Newcomer Supply or American Bio-Safety, Inc. We will try applying our products to your substance and determine a suitable procedure for spill situations.
CHLORINE CONTROL POWDER™
.jpg)
Chlorine Control Powder™ is a specially formulated powder designed for the destruction and control of various types of liquid chlorine spills and leaks. Chlorine Control Powder™ is manufactured in a dry form for easy application without mixing or dilution. Once applied, Chlorine Control Powder™ will:
- Neutralize the pH
- Convert all the chlorine to a nonhazardous material
- Eliminate harmful chlorine vapors
- Convert spill to a powder for easy disposal
Chlorine Control Powder™ is effective against:
- Industrial strength Sodium Hypochlorite
- Household strength Sodium Hypochlorite (Clorox)*
- Most forms of liquid chlorine solutions
- Calcium Hypochlorite solutions
Suggested Uses:
- Fire departments
- Haz-mat teams
- Water plants
- Industrial plants
- Commercial swimming pools
- Hospitals
- Laboratories
Directions for Chlorine Control Powder:
- Consult SDS of spilled material to become familiar with its chemical properties and safety and health requirements.
- Select and wear proper personal protective equipment, including suitable foot and respiratory protection for chlorine spills. (Rubber boots, gloves, goggles, gas mask, SCBA, ets.)
- Evacuate area as necessary to ensure the safety of all personnel.
- Eliminate all sources of ignition and ensure that there is adequate ventilation available before applying product.
- Apply Chlorine Control Powder™ to spill from the upwind side around its perimeter to dike the liquid, working from the outside toward the center, taking care to avoid vapors and splashing.
- Carefully mix with a non-reactive paddle or shovel until all liquid is solidified.
- Determine level of neutralization by using a chlorine test kit or strips.
- Check pH and chlorine concentration.
- Follow final clean up procedures established by your facility or company.
- Dispose of neutralized waste in accordance with Federal, State, and Local environmental regulations.
- Rinse and dispose of empty container after use.
*Clorox is a Registered Trademark of the Clorox Corporation
This spill kit is ideal for labs that either need to wall mount the spill kit or have mobile labs that require spill clean-up capabilities. It is economical, effective, compact and easy to use!
THE SPILL RESPONSE KIT CABINET INCLUDES:
- 5 – 32oz spill control bottles that are customizable*
- 5 glove & waste bag packs
- Goggles
- Broom & pan combo
*Standard Spill Bottles Offered in Kit:
- Acid Handler
- Base Handler
- Solvent Handler
- Chlorine Control Powder
- Polyform F (for Formalin/Formaldehyde)
For customized kits, state which 5 bottles you would like packaged in the cabinet with order. Limited to one Solvent Handler per kit. Add $10 for each additional Solvent Handler/kit
For a detailed overview of the 5 different options for spill kit bottles, click here.
FEATURES OF THE SPILL RESPONSE KIT CABINETS:
- Heavy duty yellow epoxy coated steel cabinet
- Designed for wall mounting
- Convenient carrying handle
- Removable shelf
- Secure door latch
SPILL RESPONSE KIT SPECIFICATIONS:
- Dimensions: 17″(H) x 15.5″(W) x 5.75″(D)
- Weight: 21 lbs.
Solvent Handler is a free flowing oxygen scavenging granule developed to control hydrocarbon spills. When this virtually dust-free granule is applied, the spilled material is solidified, vapors are eliminated, and flammability risk is reduced. The resulting dry solid granules can easily be swept up, leaving little evidence of the spilled liquid.
Solvent Handler™ is very effective in controlling:
- Flammable Liquids
- Hydraulic Oils
- Brake Oils
- Chlorinated Solvents
- Motor Oils
- Residual flammable liquids or sludge left in containers or storage tanks
Directions for Solvent Handler:
-
- Consult SDS for the spilled material to become familiar with its chemical properties and safety and health requirements.
- Select and wear proper personal protective equipment for the spilled chemical.
- Evacuate area as necessary to ensure safety of personnel.
- Eliminate all sources of ignition and ensure that there is adequate ventilation available before applying product.
- Apply Solvent Handler™ to spill from the upwind side around its perimeter to dike the liquid, working from the outside of the spill toward the center. Completely blanket the spill, eliminating all wet areas.
- Agitate product on the spill area with non-sparking paddle or scrapper, adding additional Solvent Handler™ as needed to eliminate all wet areas.
- Check vapor elimination, using a vapor detection device.
- Add additional Solvent Handler™ product until all vapor is eliminated.
- Dispose of neutralized waste in accordance with Federal, State, and Local environmental regulations.
NOTE: Solvent Handler™ DOES NOT reduce toxicity. When this virtually dust-free granule is applied, the spilled material is solidified, vapors are eliminated, and flammability risk is reduced. If spilled material is toxic, the treated waste remains toxic and should be treated accordingly.
| DO Use on the Following: |
DO NOT Use on the following: |
| Acetone | Large volumes in enclosed area. Be extremely careful using Solvent Handler™ on solvents with low auto-ignition temperature like “Nitromethane”. |
| Alcohols | |
| Chloroform | |
| Diesel | |
| Ethyl Acetate | |
| Gasoline | |
| Methyl Ethyl Ketone | |
| Most All Halogens | |
| Most All Hydrocarbons | |
| NN Dimethylformamide | |
| Xylene | |
| 111 Trichlorethane |

Click here for printable SafeCube information.jpg)
FEATURES OF THE SAFECUBE DISPENSER:
- Main cabinet can contain a spill up to 5 gallons
- Filling tray can contain a spill up to 1/2 liter
- Built-in alarm notifies personnel of any spills
- Filling tray holds up to 40 lbs. with no risk of tipping
- Non-slip rubber mat on bottom
- Internal sliding shelf easily positions cube for pouring and storage
- Simple and easy to use
THE SAFECUBE DISPESNSER IS IDEAL FOR USE IN:
- Operating Room and Labor & Delivery
- Ambulatory Surgery
- Histology and Pathology Laboratories
- Clinical and Research Laboratories
- College and University Laboratories
- Morgue and Autopsy Suites
Stay in Compliance with OSHA Reg. 1910.1048(J) & (J)(2)
1910.1048(j)
Housekeeping. For operations involving formaldehyde liquids or gas, the employer shall conduct a program to detect leaks and spills, including regular visual inspections.
1910.1048(j)(2)
In work areas where spillage may occur, the employer shall make provisions to contain the spill, to decontaminate the work area, and to dispose of the waste.
SPECIFICATIONS OF THE SAFECUBE DISPENSER:
-
- Dinensions: 20″ (Deep) x 18.5″ (Wide) x 17″ (High)
- Weight: 42 lbs.
Click here for SafeCube Dispenser Setup & Instructions
![]()
SOLUTION:
| 4 X 1 Gallon | |
| Slide Brite™ | Part ABSB-04 |
Additionally Needed:
| Alcohol, Ethyl Denatured, 70% | Part 10844 |
| Alcohol, Ethyl Denatured, 95% | Part 10842 |
| Alcohol, Ethyl Denatured, 100% | Part 10841 |
| Choice Mounting Medium | Part 1032 |
For storage requirements and expiration date refer to individual bottle labels.
APPLICATION:
Newcomer Supply Slide Brite™ Xylene Substitute is classified as an aliphatic hydrocarbon that provides a safe alternative to xylene, reduces risks and improves personnel safety in the laboratory. Benefits of Slide Brite™ include:
-
-
- Odorless, non-hazardous, non-irritating and fast drying.
- Gentle on tissue and enhanced nuclear detail.
- No tissue brittleness, shrinkage or adverse morphologic changes.
- Compatible with IHC staining.
- Does not require hazardous/flammable storage.
- Flash point of 61°C/142°F (29°C/84°F flash point of xylene)
- No vapor monitoring.
- Compatible on tissue processors and staining systems.
-
METHOD:
Fixation: Formalin 10%, Phosphate Buffered (Part 1090)
Technique: Paraffin, frozen sections, smears
PROCESSING PROCEDURE:
-
- Refer to Slide Brite™ Tissue Processing Schedule below.
- Use three Slide Brite™ clearing stations, 60 minutes each.
-
- For two clearing stations, allow 90 minutes per station.
-
- Rotate, filter and/or replace Slide Brite™ stations daily or after processing approximately 1000 blocks.
- Test and optimize Slide Brite™ as a clearing agent in tissue processing schedules prior to standard use.
STAINING PROCEDURE:
-
- Refer to Slide Brite™ Staining Procedure below.
- For best deparaffinization results, place warm slides directly from dryer/oven into Slide Brite™.
- Deparaffinize warm slides thoroughly in three changes of Slide Brite™, 3 minutes each. Hydrate through two changes each of 100% and 95% ethyl alcohols, 10 dips each. Wash well with distilled water.
-
- See Procedure Notes #1, #2 and #3.
-
- Proceed with staining protocol.
- Dehydrate in two changes of 95% and three changes of 100% ethyl alcohol. Clear in four changes of Slide Brite™.
- Coverslip with Choice Mounting Medium (Part 1032).
-
- See Procedure Note #4.
-
- Test and optimize Slide Brite™ in staining procedures and automated staining systems prior to standard use.
PROCEDURE NOTES:
-
- Deparaffinization and clearing steps may require longer timings then xylene.
- Slide Brite™ requires more frequent changes compared to xylene.
- Any water contamination will layer on top of Slide Brite™.
- Test Slide Brite™ compatibility with other mounting mediums prior to use.
-
- If mounting medium displays separation or is not readily miscible, it is incompatible with Slide Brite™.
-
- Slide Brite™ is not recommended for automated coverslippers.
- Slide Brite™ will not remove adhered coverslips as well as xylene.
- Refer to manufacturer’s specifications on the use of Slide Brite™ on all instrumentation.
REFERENCES:
-
- Dapson, Janet Crookham, and Richard W. Dapson. Hazardous Materials in the Histopathology Laboratory: Regulations, Risks, Handling and Disposal. 4th Battle Creek, MI: Anatech, 2005. 150-155, 235.
- Wynnchuk, Maria. “Evaluation of Xylene Substitutes for Paraffin Tissue Processing.” The Journal of Histotechnology2 (1994): 143-149.
- Modifications developed by Newcomer Supply Laboratory.
Slide Brite™ Routine Tissue Processing Schedule
| Solution/Reagent | Heat | Vacuum | Time | |
| 1 | Formalin 10%, Phosphate Buffered | Off | Off | 90 Minutes |
| 2 | Formalin 10%, Phosphate Buffered | Off | Off | 90 Minutes |
| 3 | 70% Alcohol, Ethyl Denatured | Off | Off | 30 Minutes |
| 4 | 95% Alcohol, Ethyl Denatured | Off | Off | 40 Minutes |
| 5 | 100% Alcohol, Ethyl Denatured | Off | 15 mm Hg | 50 Minutes |
| 6 | 100% Alcohol, Ethyl Denatured | Off | 15 mm Hg | 40 Minutes |
| 7 | 100% Alcohol, Ethyl Denatured | Off | 15 mm Hg | 40 Minutes |
| 8 | Slide Brite™ | Off/On 38°C | 15 mm Hg | 60 Minutes |
| 9 | Slide Brite™ | Off/On 38°C | 15 mm Hg | 60 Minutes |
| 10 | Slide Brite™ | Off/On 38°C | 15 mm Hg | 60 Minutes |
| 11 | Paraffin | 60°C | 15 mm Hg | 120 Minutes |
| 12 | Paraffin | 60°C | 15 mm Hg | 60 Minutes |
Slide Brite™ Routine Tissue Processing Notes:
-
- When using only two clearing stations, increase time from 60 minutes to 90 minutes per station (Steps #8 to #10).
- Rotate, filter and/or replace Slide Brite™ solutions daily or after processing approximately 1000 blocks.
Slide Brite™ Staining Procedure
| Step | Solution/Reagent | Time |
| 1 | Slide Dryer/Oven 58°C-60°C | |
| 2 | Slide Brite™ | 3 Minutes |
| 3 | Slide Brite™ | 3 Minutes |
| 4 | Slide Brite™ | 3 Minutes |
| 5 | 100% Alcohol, Ethyl Denatured | 30 Seconds/10 Dips |
| 6 | 100% Alcohol, Ethyl Denatured | 30 Seconds/10 Dips |
| 7 | 95% Alcohol, Ethyl Denatured | 30 Seconds/10 Dips |
| 8 | 95% Alcohol, Ethyl Denatured | 30 Seconds/10 Dips |
| 9 | Distilled Water Rinse | 30 Seconds Minimum |
| 10 | Proceed with Staining Protocol. | |
| 11 | 95% Alcohol, Ethyl Denatured | 30 Seconds/10 Dips |
| 12 | 95% Alcohol, Ethyl Denatured | 30 Seconds/10 Dips |
| 13 | 100% Alcohol, Ethyl Denatured | 30 Seconds/10 Dips |
| 14 | 100% Alcohol, Ethyl Denatured | 1 Minute |
| 15 | 100% Alcohol, Ethyl Denatured | 1 Minute |
| 16 | Slide Brite™ Clearing Agent | 1 Minute |
| 17 | Slide Brite™ Clearing Agent | 1 Minute |
| 18 | Slide Brite™ Clearing Agent | 2 Minutes |
| 19 | Slide Brite™ Clearing Agent | 2 Minutes |
| 20 | Coverslip with Choice Mounting Medium |
Slide Brite™ Staining Procedure Notes:
-
- For best deparaffinization results, place warm slides directly from dryer/oven into Slide Brite™ (Step #2).
- Choice Mounting Medium (Part 1032) is the recommended mounting medium with Slide Brite™.
![]()
SOLUTION:
| 500 cc Bottle (12/cs) | 500 cc Bottle (32/cs) | |
| Form–Zero™ Formalin Neutralizer | Part ABFZ550-12 | Part ABFZ550-32 |
Additionally Needed:
| Form-Zero™ Waste Collection Container, 1 Gallon | Part ABFZ-1 |
| Form-Zero™ Waste Collection Container, 2.5 Gallon | Part ABFZ-25 |
| Funnel with Tissue Screen | Part ABFX-FUN |
| Form-Zero™ Test Strips (100 strips/tube) | Part ABFZ-TEST |
For storage requirements and expiration date refer to individual product labels.
APPLICATION:
Newcomer Supply Form–Zero™ Formalin Neutralizer is a unique powdered reagent blend of various sulfur-containing inorganic salts. Form–Zero™ readily dissolves in aqueous solutions and subsequently functions as a chemical reducing agent to quickly neutralize formalin and glutaraldehyde for sink disposal. One 500 cc bottle of Form–Zero™ will neutralize one gallon/four liters of 10% formalin or one gallon/four liters of 4% glutaraldehyde. Benefits include:
-
-
- No pH adjustment of solutions is required.
- One gallon/four liters of formalin or glutaraldehyde can be neutralized in 20-25 minutes to non-hazardous disposable solutions.
- Neutralized aldehyde products can be safely discharged to sewer and waste water treatment systems.
- No drain clogging polymers are created.
-
NEUTRALIZING PROCEDURE:
-
- Collect acceptable concentrations of aldehyde waste in designated and well labeled Form-Zero™ Waste Collection Container, 1 Gallon or 2.5 Gallon (ABFZ-1 or ABFZ-25).
-
- See Procedure Notes #1 and #2.
- The use of Funnel with Tissue Screen (ABFX-FUN) is recommended to avoid extraneous tissue debris accumulating in aldehyde waste solutions.
-
- Add entire contents of one 500 cc Form–Zero™ bottle to each gallon (128 fluid ounces) or each four liters of aldehyde waste.
-
- Neutralization applications are for one Form–Zero™ bottle for each gallon/4 liters of aldehyde waste.
- Partial bottles of Form–Zero™ cannot be used for smaller treatments.
-
- Securely tighten lid on the collection container; agitate container to thoroughly mix powder and solution.
-
- Do not add additional solution once Form–Zero™ powder has been added and mixed in collection container.
-
- Continue agitation until Form–Zero™ powdered reagent blend completely dissolves.
- Allow mixed solution to stand for 20-25 minutes for neutralization reaction to be fully complete.
-
- See Procedure Note #3.
-
- Test treated solution with Form-Zero™ Test Strips (ABFZ-TEST) to confirm completion of neutralization reaction.
-
- See Procedure Note #4.
-
- Pour neutralized non-hazardous aldehyde waste product into sanitary sewer and flush with cold running tap water.
- Rinse collection container and clean with cold tap water before reuse.
- Collect acceptable concentrations of aldehyde waste in designated and well labeled Form-Zero™ Waste Collection Container, 1 Gallon or 2.5 Gallon (ABFZ-1 or ABFZ-25).
PROCEDURE NOTES:
-
- 10% formalin (4% formaldehyde) and 4% glutaraldehyde are the highest concentrations that can be neutralized.
- Maintain separate, well labeled collection containers for waste formalin and waste glutaraldehyde solutions for best neutralization results.
- There is no additional benefit or adverse effect if neutralization reaction proceeds for longer than 25 minutes.
- To use Form-Zero™ Test Strips:
-
- Remove only the test strips needed, taking care not to touch the test field.
- Close container immediately after removing test strips to avoid any contamination.
- Dip test strip into neutralized sample for 1 second and shake off excess liquid; wait 20 seconds.
- Compare test field with color scale on test strip container.
- Test field will turn salmon-pink when formaldehyde is completely neutralized.
- Salmon-pink reaction indicates presence of sulfite ions, which confirms absence of formaldehyde.
-
- Confirm disposal methods with local and state regulations.
REFERENCES:
-
- Bancroft, John D., and Marilyn Gamble. Theory and Practice of Histological Techniques. 6th ed. Oxford: Churchill Livingstone Elsevier, 2008. 22-23, 27.
- Dapson, Janet Crookham, and Richard W. Dapson. Hazardous Materials in the Histopathology Laboratory: Regulations, Risks, Handling and Disposal. 4th Battle Creek, MI: Anatech, 2005. 181-186.
- Form–Zero™ Aquatic Bio-Assay Results and Summary.
- Modifications developed by Newcomer Supply Laboratory.
2.5 Gallon Waste Collection Container Pre-Labeled for FORM-ZERO (Instructions for use on label)
1 Gallon Waste Collection Container Pre-Labeled for FORM-ZERO (Instructions for use on label)
For determining the completion of the reaction of the treated waste formalin with Formalex Green. Once treated solution is at or above pH 5.5 it can be safely disposed.
32 oz. graduated dispenser container for accurately dispensing Formalex Green solution.
2.5 Gallon Waste Collection Container Pre-Labeled for Formalex Green
(Instructions for use on label)
1 Gallon Waste Collection Container Pre-Labeled for Formalex Green (Instructions for use on label)
Recommended to avoid having any extraneous tissue debris from accumulating in the aldehyde waste solution.
![]()
SOLUTION:
| 1 Gal Cube | 2.5 Gal Cube | 5 Gal Cube | 30 Gal Drum | 55 Gal Drum | |
| Formalex® “GREEN” Formalin Neutralizer | Part ABFX-01 | Part ABFX-250 | Part ABFX-05 | Part ABFX-30 | Part ABFX-55 |
Additionally Needed:
| Formalex® Green Waste Collection Container, 1 Gallon | Part ABFXG-1 |
| Formalex® Green Waste Collection Container, 2.5 Gallon | Part ABFXG-25 |
| Funnel with Tissue Screen | Part ABFX-FUN |
| Formalex® Green Graduated Dispenser, 32 Ounce | Part ABFXG-GD |
| Formalex® Green pH Test Strips (100 strips/pack) | Part ABFXG-PH |
For storage requirements and expiration date refer to individual product labels.
APPLICATION:
Newcomer Supply Formalex® “GREEN” Formalin Neutralizer is a multi-component, aqueous formulation which utilizes an organo-nitrogen based chemistry to effectively neutralize formalin waste products for sink disposal. 32 ounces of Formalex® “GREEN” will neutralize one gallon of 10% formalin or one gallon of 4% glutaraldehyde. Benefits include:
-
-
- No pH adjustment of solutions is required.
- Does not contain phosphates.
- Non-vapor forming.
- Formalin or glutaraldehyde can be neutralized in 4 hours to non-hazardous disposable solutions.
- Neutralized aldehyde products can be safely discharged to sewer and waste water treatment systems.
- No sludgy residue.
-
Formalex® “GREEN” recommended accessories to assist and complete the neutralization process.
-
-
- 1 Gallon or 2.5 Gallon Waste Collection Container
- Funnel with Tissue Screen
- 32 Ounce Graduated Dispenser
- pH Test Strips
-
NEUTRALIZING PROCEDURE:
-
- Collect acceptable concentrations of aldehyde waste in designated well labeled Formalex® Green Waste Collection Container, 1 Gallon or 2.5 Gallon (ABFXG-1, ABFXG-25).
-
- See Procedure Notes #1 and #2.
- Use of Funnel with Tissue Screen (ABFX-FUN) is recommended to avoid extraneous tissue debris accumulating in aldehyde waste solutions.
-
- Add 32 fluid ounces of Formalex® “GREEN” to each gallon (128 fluid ounces) of aldehyde waste. Or add 1 liter of Formalex® “GREEN” to 4 liters of aldehyde waste.
-
- Use Formalex® Green 32 Ounce Graduated Dispenser (ABFXG-GD) for convenient measuring.
- See below for treatment calculation tables.
-
- Securely tighten lid on collection container; agitate container to thoroughly mix solutions.
-
- Do not add additional solution to collection container once neutralization process has started.
-
- Allow mixed solution to stand for a minimum of 4 hours.
-
- See Procedure Note #3.
-
- Prior to re-opening, re-agitate container to thoroughly re-mix solution to decrease exposure to potential headspace vapor.
- Test treated solution with Formalex® Green pH Test Strips (ABFXG-PH) to determine completion of neutralization reaction.
-
- Reaction is complete with a pH reading at or above 5.5.
-
- Pour neutralized non-hazardous aldehyde waste product into sanitary sewer.
- Rinse collection container and clean with cold tap water before reuse.
- Collect acceptable concentrations of aldehyde waste in designated well labeled Formalex® Green Waste Collection Container, 1 Gallon or 2.5 Gallon (ABFXG-1, ABFXG-25).
PROCEDURE NOTES:
-
- 10% formalin (4% formaldehyde) and 4% glutaraldehyde are the highest concentrations that can be neutralized.
-
- Formalex® “GREEN” should never be used to directly treat concentrated 37% formaldehyde for sanitary sewer disposal.
-
- Maintain separate, well labeled collection containers for waste formalin and waste glutaraldehyde for best neutralization results.
- To attain the lowest formalin residual, allow treated solutions to stand overnight or approximately 8-12 hours.
- Confirm disposal methods with local and state regulations.
- 10% formalin (4% formaldehyde) and 4% glutaraldehyde are the highest concentrations that can be neutralized.
REFERENCES:
-
- Bancroft, John D., and Marilyn Gamble. Theory and Practice of Histological Techniques. 6th ed. Oxford: Churchill Livingstone Elsevier, 2008. 22-23, 27.
- Dapson, Janet Crookham, and Richard W. Dapson. Hazardous Materials in the Histopathology Laboratory: Regulations, Risks, Handling and Disposal. 4th Battle Creek, MI: Anatech, 2005. 181-186.
- Modifications developed by Newcomer Supply Laboratory.
CALCULATING HOW MUCH FORMALEX GREEN YOU NEED:
CAUTION STATEMENT AND SPECIAL NOTES:
- Always wear chemical resistant gloves and eye protection when handling chemicals.
- Follow all institutional and personnel safety guidelines when handling formalin solutions.
- Read Formalex® Green Safety Data Sheet prior to use.
- Formalex® Green should NEVER be used to treat 37% formaldehyde for sewer disposal.
- Do not mix with chlorine type bleaches.
- Follow all local, state and federal laws and regulations regarding formalin solutions.
The FAN Pad-GL (Formalin Absorbing Neutralizing Pad) is a super absorbent pad, specially treated with Formalex and designed for the ultimate destruction of formaldehyde, 10% formalin and glutaraldehyde solutions. Absorbs and neutralizes these aldehyde solutions destroying their harmful vapors.
FAN PAD-GL MINI:
- Great for cleaning up small dribbles or spills on counter tops
- Ideal for grossing small tissues, e.g. cysts and tonsils
- Working Surface: 11″ x 10″
- Absorbs up to 20ml of 10% Formalin
- 6 rolls/case (330 total sheets)
FAN PAD-GL SMALL:
- Ideal for grossing medium size tissues, e.g. gall bladders and appendix
- Line shelves, storage containers and transport coolers to absorb and neutralize formalin & fumes
- Working Surface: 6″ x 14″
- Absorbs up to 200ml of 10% Formalin
- 48 pads/case
FAN PAD-GL LARGE:
- Ideal for the BIG UGLIES; formalin soaked tissues, e.g. uterus, breast and colon
- Line shelves, storage containers and transport coolers to absorb and neutralize formalin & fumes
- Working Surface: 9″ x 21″
- Absorbs up to 300 ml of 10% Formalin
- 30 pads/case
A two-year study performed by NASA found FAN PAD-GL™ to be the safest, most effective method of controlling the air quality associated with the analysis of formalin fixed specimen on the 1998 Columbia Shuttle STS-90 NEUROLAB.
FAN PAD-GL™ LIST OF USES:
- Histology
- Pathology
- Dermatology
- Specimen Transport
- Specimen Storage
- Biology
- Anatomy
- Autopsy
- Morgue
- Endoscopy
- GI Labs
- Operating Room
- Labor & Delivery
- Research Labs
- Health Science Labs
BENEFITS OF USING FAN PADS:
- Effective moist or dry
- Provide excellent vapor control anywhere formalin or glutaraldehyde is used or stored
- No more plugging your nose in disgust
- No more smelly garbage cans
- Safely neutralizes the formalin as you wipe it up
- Reduces formalin odor when grossing directly on the pad
- No more profanity when a spill happens (well, maybe a little)
- Safe to dispose of in regular garbage bags
- No more smelly counters
- Low cost per sheet
.jpg)
The FAN Pad-GL Elite ™ (Formalin Absorbing Neutralizing Pad) with laminate coating, absorbs and neutralizes formalin, destroying harmful vapors while dissecting tissue.
FAN PAD-GL ELITE ™ BENEFITS:
- Permeable non-woven blue laminate work surface
- Blue background for excellent tissue contrast
- Non-stick work surface that is light weight and strong
- Exceptional knife suppression while dissecting tissue
- Soft enough to reduce wear on dissecting blades
- Pads convert formaldehyde and other aldehydes to a non-hazardous polymer
FAN PAD-GL ELITE ™LIST OF USES:
- Specimen transport carts, boxes and coolers
- Specimen/Biopsy cassette transfers
- Surgery
- Labor & Delivery
- Specimen storage areas
- Autopsy
- GI Lab & Endoscopy
ABSORBING/NEUTRALIZING CAPACITY OF THE FAN PAD-GL ELITE™:
- 8″ x 11″ – will abosrb & neutralize up to 100ml of 10% formalin
- 11″ x 15″ – will absorb & neutralize up to 200ml of 10% formalin
Chlorine Control Powder™ is a specially formulated powder designed for the destruction and control of various types of liquid chlorine spills and leaks. Chlorine Control Powder™ is manufactured in a dry form for easy application without mixing or dilution. Once applied, Chlorine Control Powder™ will:
- Neutralize the pH
- Convert all the chlorine to a nonhazardous material
- Eliminate harmful chlorine vapors
- Convert spill to a powder for easy disposal
Chlorine Control Powder™ is effective against:
- Industrial strength Sodium Hypochlorite
- Household strength Sodium Hypochlorite (Clorox)*
- Most forms of liquid chlorine solutions
- Calcium Hypochlorite solutions
Suggested Uses:
- Fire departments
- Haz-mat teams
- Water plants
- Industrial plants
- Commercial swimming pools
- Hospitals
- Laboratories
Directions for Chlorine Control Powder:
- Consult SDS of spilled material to become familiar with its chemical properties and safety and health requirements.
- Select and wear proper personal protective equipment, including suitable foot and respiratory protection for chlorine spills. (Rubber boots, gloves, goggles, gas mask, SCBA, ets.)
- Evacuate area as necessary to ensure the safety of all personnel.
- Eliminate all sources of ignition and ensure that there is adequate ventilation available before applying product.
- Apply Chlorine Control Powder™ to spill from the upwind side around its perimeter to dike the liquid, working from the outside toward the center, taking care to avoid vapors and splashing.
- Carefully mix with a non-reactive paddle or shovel until all liquid is solidified.
- Determine level of neutralization by using a chlorine test kit or strips.
- Check pH and chlorine concentration.
- Follow final clean up procedures established by your facility or company.
- Dispose of neutralized waste in accordance with Federal, State, and Local environmental regulations.
- Rinse and dispose of empty container after use.
*Clorox is a Registered Trademark of the Clorox Corporation
- Heavy duty plastic tray
- 7 – 2oz. bottles
- Dye colors: Black, Blue, Green, Red, Yellow, Orange, Violet
15 pre-filled dispensers in convenient carton. 4ml dye/dispenser.
The Tissue Microarray premade paraffin blocks are for constructing tissue arrays without the need of specialized equipment. Simply punch the donor tissue cores and insert them into the premade paraffin recipient block.
- Blocks made with Leica Paraplast X-tra paraffin.
- Embedding cassette is Simport M480-4.
- Packaging: Blocks packaged in 6 place plastic mailer made to hold premade blocks, punches are packed in safe, tamper-evident ziplock resealable bags.
.jpg)
INSTRUCTIONS FOR USE:
| 1 | .png) |
Extract the marked tissue from the donor block by using the appropriate tissue punch.
a. Place the donor block on a horizontal and flat surface. b. Hold the tissue punch in your hand perpendicularly to the marked position of the donor block. c. Slowly insert the tissue punch into the donor block at the proper depth of 5mm. Don’t insert it too quickly and too deep to prevent damaging the donor block and the tissue punch. |
| 2 | .png) |
By slowly pushing on the tissue punch plunger, deliver the extracted tissue into the corresponding hole of the recipient block. Then, gently push in all the tissue cores to ensure evenness for microtomy. |
| 3 | .jpg) |
Place the recipient block on a glass slide (facing down) and incubate the block at 37°C to 45°C for 3 hours up to overnight. The delivered cores will adhere to their respective holes in the recipient block. Do not pull the slide from the TMA block. |
| 4 | With the recipient block still warm and tacky, heat another slide in an oven to around 70°C for approximately 10 minutes. Then, place it under the slide that is already stuck to the Array block. The Array block surface should quickly turn to liquid. Move the two slides around on the Array block to push any surface air bubbles away and to flatten the Array block surface. | |
| 5 | Now, remove second slide and place Array block with original slide (slide down) on counter for 10 minutes in order to cool down. Once Array block is at room temperature, place it with the slide on an ice tray (no water) to cool for 20 minutes. Slide should remove easily from Array block which will now be ready for cutting. | |
Notes:
- The tissue punches are not intended for use directly on patients. For lab/research purposes only.
- If some of the mold cores are not needed, simply fill unwanted holes in the paraffin Array block with blank paraffin cores.
Another user friendly approach to IHC staining. This tray is also suitable not only for routine staining requiring a humid chamber but is also ideal for Hematology, Cytology and Microbiology laboratories. Manipulation is made safe and easy by using only one hand.
The Simport StainTray™ has a black base made of tough ABS plastic withstanding a wide range of chemicals ( Avoid chlorinated hydrocarbons ). It will accept up to 10 slides on four plastic rails covered with a polymer strip to perfectly hold slides even if tray is held at an angle. When humidity is needed, wells between rails will hold up to one ml of water securely without splashing. Middle wells will hold up to 2 ml each. Rails are raised not only to avoid water touching the slides but to make them more easily retrievable. The base will also hold excess stain solution dripping from the slides. Four rubber feet ensure greater base stability. Units are stackable for space saving purposes.
- Dimensions with cover: 24 x 24 x 4.5cm (H)
- Do Not Use with Acetone & Avoid Chlorinated Hydrocarbons
- Not Autoclavable
FEATURES OF THE SIMPORT STAINTRAY 10 PLACE:
- Black base made of tough ABS plastic.
- Accepts up to 10 slides on four plastic rails.
- Rails covered with a red polymer strip to hold slides even if tray is held at an angle.
- Wells will hold up to 2 ml each.
- Four rubber feet ensure greater base stability. Units are stackable for space saving purposes.
- Drain plug can be removed to empty the StainTray.
SIMPORT STAINTRAY 10 PLACE UNITS AVAILABLE WITH:
- Clear Lids – allowing for visual examination. Made of PETG with a temperature range of -20°C to +60°C.
- Black Lids – for fluorescent work. Made of ABS with a temperature range of -80° C to + 80°C.
Another user friendly approach to IHC staining. This tray is also suitable not only for routine staining requiring a humid chamber but is also ideal for Hematology, Cytology and Microbiology laboratories. Manipulation is made safe and easy by using only one hand.
The Simport StainTray™ has a black base made of tough ABS plastic withstanding a wide range of chemicals ( Avoid chlorinated hydrocarbons ). It will accept up to 30 slides on six plastic rails covered with a polymer strip to perfectly hold slides even if tray is held at an angle. When humidity is needed, wells between rails will hold up to one ml of water securely without splashing. Middle wells will hold up to 2 ml each. Rails are raised not only to avoid water touching the slides but to make them more easily retrievable. The base will also hold excess stain solution dripping from the slides. Four rubber feet ensure greater base stability. Units are stackable for space saving purposes.
- Dimensions: 38.4 x 32.9 x 4.5 cm (H)
- Do Not Use with Acetone & Avoid Chlorinated Hydrocarbons
- Not Autoclavable
Features of the Simport StainTray 30 Place:
- Black base made of tough ABS plastic.
- Accepts up to 30 slides on six plastic rails.
- Rails covered with a red polymer strip to hold slides even if tray is held at an angle.
- Wells will hold up to 2 ml each.
- Four rubber feet ensure greater base stability. Units are stackable for space saving purposes.
- Drain plug can be removed to empty the StainTray.
Simport StainTray 30 Place Units available with:
- Clear Lids – allowing for visual examination. Made of PETG with a temperature range of -20°C to +60°C.
- Black Lids – for fluorescent work. Made of ABS with a temperature range of -80°C to +80°C.
Another user friendly approach to IHC staining. This tray is also suitable not only for routine staining requiring a humid chamber but is also ideal for Hematology, Cytology and Microbiology laboratories. Manipulation is made safe and easy by using only one hand.
The Simport StainTray™ has a black base made of tough ABS plastic withstanding a wide range of chemicals ( Avoid chlorinated hydrocarbons ). It will accept up to 20 slides on four plastic rails covered with a polymer strip to perfectly hold slides even if tray is held at an angle. When humidity is needed, wells between rails will hold up to one ml of water securely without splashing. Middle wells will hold up to 2 ml each. Rails are raised not only to avoid water touching the slides but to make them more easily retrievable. The base will also hold excess stain solution dripping from the slides. Four rubber feet ensure greater base stability. Units are stackable for space saving purposes.
- Dimensions: 38 x 24 x 4.5 cm (H)
- Do Not Use with Acetone & Avoid Chlorinated Hydrocarbons
- Not Autoclavable
FEATURES OF THE SIMPORT STAINTRAY 20 PLACE:
- Black base made of tough ABS plastic.
- Accepts up to 20 slides on four plastic rails.
- Rails covered with a red polymer strip to hold slides even if tray is held at an angle.
- Wells will hold up to 2 ml each.
- Four rubber feet ensure greater base stability. Units are stackable for space saving purposes.
- Drain plug can be removed to empty the StainTray.
SIMPORT STAINTRAY 20 PLACE UNITS AVAILABLE WITH:
- Clear Lids – allowing for visual examination. Made of PETG with a temperature range of -20°C to +60°C.
- Black Lids – for fluorescent work. Made of ABS with a temperature range of -80°C to +80°C.
The Slide Staining Tray / Moisture Chamber is perfect for keeping your slides well separated, maintaining moisture, and watching the reaction. Stackable, heavy duty plastic construction. The clear slide staining tray chamber allows easy visualization of the reaction and the black slide staining tray is effective for light sensitive chemistry.
SLIDE STAINING TRAY / MOISTURE CHAMBER FEATURES:
- Divided into 10 individual compartments (½” empty space between compartments)
- Eight barrier dividers are placed into empty spaces between compartments when lid is closed for complete isolation.
- Slides are placed on 4 pedestal posts to raise the surface above the water below
- Chamber is made of heavy-duty polystyrene
- Air tight to keep moisture in
- Chambers are stackable
- Available in clear and black
DIMENSIONS:
-
- 8 ¼” x 7″ x 1 ¼”
TEMPERATURE RATING:
-
- -10°C to 70°C
Available in 15, 40 and 78 slide capacity.
- Made from chemical-resistant polyethylene
- Solid, strong construction
- Rubber feet for bench top stability
Never change a blade again! Disposable & sterile, one-handed easy “slide & click” design eliminates the need to remove the scalpel blade and effectively reduces the risk of an exposure incident. Convenient “ruler handle” built in.
Each blade is individually packaged & sterile!
A molded plastic tray liner that allows for easy clean-up and disposal of the paraffin that is melted off the tissue blocks.
For Patient Control tissue on the same slide.
Dimensions: 25 x 25 x 1.0 mm
Approximately 72 slides/box
The Unisette Biopsy Cassettes in QuickLoad Taped Stacks are taped cassettes to be used with Leica and Sakura Ink Jet printers. The cassettes are similar to Unisette Tissue Cassettes but are specially designed to hold biopsy specimens. Made from acetal, they keep specimens safely submerged and are resistant to the chemical reaction of most solvents used in histology laboratories.
PACKAGING OF THE UNISETTE BIOPSY TISSUE & EMBEDDING CASSETTES IN QUICKLOAD TAPED STACKS:
- 40 cassettes/stack; 25 stacks/case; 1,000 cassettes/case.
UNISETTE BIOPSY TISSUE PROCESSING & EMBEDDING CASSETTES IN QUICKLOAD TAPED STACKS:
- Designed for biopsy specimens.
- 1 millimeter openings maximize fluid exchange and ensure proper drainage.
- The lids are attached in an open position for easy filling, but can be opened or closed as often as necessary.
- One piece snap latch and hinge lock prevents early separation of base and lid and allows one-hand operation.
- The anterior writing area is at a 35° angle.
- Cassettes also available without QuickLoad Taped Stacks (Part 5125).
The Unisette in QuickLoad Taped Stacks is suited for the Leica and Sakura ink jet printers. Made from acetal they keep specimens safely submerged and are resistant to the chemical action of most solvents used in histology laboratories.
PACKAGING OF THE UNISETTE TISSUE & EMBEDDING CASSETTES IN QUICKLOAD TAPED STACKS:
- 40 cassettes/stack; 25 stacks/case; 1,000 cassettes/case.
UNISETTE TISSUE & EMBEDDING CASSETTES IN QUICKLOAD TAPED STACKS:
- The efficient flow-through slots maximize fluid exchange and ensure proper drainage.
- Lids are attached in an open position for easy filling, but can be opened or closed as often as necessary and will always relock securely.
- One-piece snap-latch and hinge-lock design prevents early separation of base and lid and allows one-hand operation.
- Anterior writing area is at a 35° angle.
- Cassettes also available without QuickLoad Taped Stacks (Part 5124).
These Swingsette tissue cassettes are suitable for hoppers accepting plastic sleeves such as Thermo Fisher printers. They load in cassette labeling instruments in one simple operation! The transparent sleeve allows viewing of the Swingsette tissue cassettes in order to confirm there are no tissue cassette jams in the sleeve during the printing process. Molded from acetal, these cassettes keep specimens safely submerged in liquid and are resistant to the chemical action of most histological solvents.
PACKAGING OF THE SWINGESETTE TISSUE CASSETTES IN QUICKLOAD SLEEVES:
- 75 cassettes/sleeve; 10 sleeves/case; 750 cassettes/case and 10 bags of 75 lids.
SWINGSETTE TISSUE CASSETTES IN QUICKLOAD SLEEVES:
- Convenient plastic dispensing sleeve compatible with Thermo Fisher printers.
- Made of acetal.
- Efficient flow-through slots maximize fluid exchange and ensure proper drainage.
- Special hinge allows cassettes to be opened and closed as often as necessary.
- Large tab for convenient and easy opening of lid.
- Cover packaged separately and can be removed and re-inserted easily without losing specimen.
- The anterior writing area is at a 45° angle.
- Cassettes also available without QuickLoad sleeves (Part 5130).
These Swingsette Biopsy tissue cassettes are suitable for hoppers accepting plastic sleeves such as Thermo Fisher printers. They load in cassette labeling instruments in one simple operation! The transparent sleeve allows viewing of the Swingsette tissue cassettes in order to confirm there are no tissue cassette jams in the sleeve during the printing process. Molded from acetal, these cassettes keep specimens safely submerged in liquid and are resistant to the chemical action of most histological solvents.
PACKAGING OF THE SWINGSETTE BIOPSY TISSUE CASSETTES IN QUICKLOAD SLEEVES:
- 75 cassettes/sleeve; 10 sleeves/case; 750 cassettes/case and 10 bags of 75 lids.
SWINGSETTE BIOPSY TISSUE CASSETTES IN QUICKLOAD SLEEVES:
- Designed to hold biopsy specimens.
- Made of acetal.
- 1mm square openings to maximize fluid exchange.
- Large tab for convenient and easy opening.
- Easy to assemble disposable cover with special hinge.
- Covers packaged separately.
- Anterior writing surface is at a 45° angle.
- Cassettes also available without QuickLoad sleeves (Part 51301).
Molded from acetal, these Unisette Biopsy Processing & Embedding Cassettes keep specimens safely submerged in liquid and are resistant to the chemical action of histological solvents.
PACKAGING OF THE UNISETTE BIOPSY PROCESSING & EMBEDDING CASSETTES:
- 500 cassettes/box, 1,500 cassettes/case.
UNISETTE BIOPSY PROCESSING & EMEBEDDING CASSETTES:
- Specially designed to hold biopsy specimens during the embedding process.
- 1 mm square openings to maximize fluid exchange and ensure proper drainage.
- One-piece integral lid eliminates the need for separate steel lids.
- Snap-latch and hinge-lock design of the Unisette Biopsy Processing & Embedding Cassettes prevent early separation of base and lid and allows for one-hand operation.
- Lids can be opened and closed as often as necessary and they always relock securely without danger of specimen loss.
- Large labeling areas are located on two sides of the cassettes.
- Anterior writing area is at a 35° angle.
- Compatible with Leica and Sakura printers.
Molded from acetal, these Unisette Tissue Processing & Embedding Cassettes keep specimens safely submerged in liquid and are resistant to the chemical action of most histological solvents.
Packaging of the Unisette Tissue Processing & Embedding Cassettes:
- 500 cassettes/box, 1,500 cassettes/case.
Unisette Tissue Processing & Embedding Cassettes:
- Efficient flow-through slots maximize fluid exchange and ensure proper drainage.
- One-piece integral lid eliminates the need for separate steel lids.
- Snap-latch and hinge-lock design of the Unisette Tissue Processing & Embedding Cassettes prevent early separation of base and lid and allows for one-hand operation.
- Lids can be opened and closed as often as necessary and they always relock securely without danger of specimen loss.
- Large labeling areas are located on two sides of the cassettes.
- Anterior writing area is at a 35° angle.
- Compatible with Leica and Sakura printers.
The Macrosette Tissue Processing & Embedding Cassettes are disposable plastic cassettes specially designed to hold larger tissue specimens during the tissue processing and embedding procedure, as well as easily fit into a standard cassette storage cabinet.
PACKAGING OF THE MACROSETTE TISSUE PROCESSING & EMBEDDING CASSETTES:
- 250 cassettes/box; 750 cassettes/case with covers assembled.
MACROSETTE TISSUE PROCESSING & EMBEDDING CASSETTES:
- Same footprint as the Histosette but twice as high.
- Attached one-piece integral lid eliminates the need for separate steel lids.
- Lids can be opened and closed as often as necessary and they always relock securely without danger of specimen loss.
- Large labeling areas are located on three sides of the Macrosette Tissue Processing & Embedding cassettes for your convenience.
- Only available in white.
DIMENSIONS OF THE MACROSETTE TISSUE PROCESSING & EMBEDDING CASSETTES:
- 1 9/16″ x 1 1/8″ x 1/2″ H
These pads are used to hold biopsies in place and prevent them from being lost during processing. They are made of a polyester urethane foam which is always verified for consistency throughout to achieve optimum solvent flow. This pad will fit the majority of tissue cassettes for this purpose. Will resist temps. from -40°C to 121°C.
Disposable, deep mold. Inexpensive enough to discard after use or strong enough to be reused. Designed to facilitate easy block release.
CLICK HERE for MOLD RELEASE, in Reagents Chemicals & Buffers Section.
MICROSCOPE GLASS COVER SLIPS PACKAGING:
- Each case comes with 10 one ounce boxes
- Each box shrink sealed with desiccant
QUALITY GLASS COVER SLIPS WITHOUT THE COST!
Available in the following sizes:
- 18 x 18 mm
- 22 x 22 mm
- 24 x 24 mm
- 24 x 40 mm
- 24 x 50 mm
- 24 x 60 mm
Easy to use timer/stopwatch with 4 independent timing channels with visual & audible alarms. Readout on 6-digit LCD. Spring clip, magnet & flip stand. Includes battery. Measures 61 x 71 x 25mm.
The plastic Tissue Block Modular Storage Drawers provide permanent storage and identification of embedding cassettes and rings.
- Each drawer holds up to 250 cassettes or 165 embedding rings
- Stackable with interlocking ridges on top and bottom
- Made of high impact resistant plastic
- Dimensions: 15 7/8″ x 9 1/8″ x 2 1/8″
- Identification labels included
A durable plastic slide staining tray that is priced to be disposable, but can be used more than once!
FEATURES OF THE DISPOSABLE SLIDE STAINING TRAYS:
-
- Stain, rinse, and dry slides on a single working tray
- A clean and fresh working surface area every time
- Dark lid protects slides for light-sensitive applications
- Compact size and recessed handles for easy transport from work area to sink
- Disposable
SPECIFICATIONS:
-
- Made from a polypropylene and polyethylene blend for stability
- Color: Black
- Up to eight slides fit comfortably onto the base
- Deep well holds up to 38 ml
- 2 convenient pour spouts for quick disposal of unwanted liquid waste
- 12 x 5 x 1.2 in (30.5 x 12.7 x 3 cm)
INCLUDES:
-
- 4 Black Base/Trays
- 1 Black Lid
.jpg)
Tissue-Plus® OCT (Optimal Cutting Temperature) Compound formula has been used extensively in labs since 1999 as an embedding medium for frozen tissue specimens. Compares to Sakura Tissue-Tek OCT.
TISSUE-PLUS OCT SPECIFICATIONS:
- Clear, colorless solution free of particles.
- Provides a stable specimen matrix and superior section quality at cryostat temperatures from -10°C and below.
- Leaves no residue on slides, eliminating undesirable background staining.
- Will not dull cryostat blades.
- Does not separate like some other freezing compounds.
- Provides a consistent sectioning substrate from the first use to the last.
- Convenient 4 oz. spout plastic container.
Black, fine-tip ink pen designed for histo and cyto labs. Writes without smearing on both frosted and plain glass slides along with plastic cassettes. Works well with high pH citrate buffer HIER. Dries quickly.
A microscope slide box for slides larger than 3″ x 2″.
- Sturdy ABS material
- Soft cork lining in bottom
- Identification card on inside lid
- Stackable with other boxes
Each envelope contains a stainless steel 4″ forcep, a plastic handled scalpel with a #11 blade & a pointed scissors. Avoid washing & exposure to infectious disease by simply disposing of them after use.
Ultra fine-tip, black ink pen that writes and dries quickly. Works on frosted slides and plastic cassettes. Aqueous based ink. Withstands histo & cyto stains and chemistries. Keeps working and gets the job done. A lot of pen for the buck!
![]()
SOLUTION:
| 100 ml | |
| Crystal Violet Stain, Lieb, Alcoholic | Part 10421A |
Additionally Needed:
| Amyloid, Animal Control Slides | Part 4031 |
| Xylene, ACS | Part 1445 |
| Alcohol, Ethyl Denatured, 100% | Part 10841 |
| Alcohol, Ethyl Denatured, 95% | Part 10842 |
For storage requirements and expiration date refer to individual bottle labels.
APPLICATION:
Newcomer Supply Crystal Violet Stain, Lieb, Alcoholic is used to provide a rapid screening method for amyloid deposits in tissue sections. This procedure has low sensitivity and should only be considered as an amyloid screening technique and not an amyloid specific stain.
METHOD:
Fixation: Formalin 10%, Phosphate Buffered (Part 1090)
Technique: Paraffin sections cut at 10-12 microns
- See Procedure Note #1.
Solutions: All solutions are manufactured by Newcomer Supply, Inc.
STAINING PROCEDURE:
- If necessary, heat dry tissue sections/slides in oven.
- Deparaffinize sections thoroughly in three changes of xylene, 3 minutes each. Hydrate through two changes each of 100% and 95% ethyl alcohols, 10 dips each. Wash well with distilled water.
- See Procedure Note #2.
- Stain sections in Crystal Violet Stain, Lieb, Alcoholic for 10 minutes.
- Rinse well in tap water.
- Blot water from slides; allow slides/sections to air-dry in a vertical position.
- Coverslip air-dried sections with compatible mounting medium.
- See Procedure Note #3.
RESULTS:
| Amyloid | Purple/violet |
| Background | Purple/blue |
PROCEDURE NOTES:
- For optimal results cut sections at 10-12 microns to provide better definition and more intense amyloid staining.
- Drain slides after each step to prevent solution carry over.
- Avoid the use of aqueous based mounting mediums which will cause bleeding/diffusion of the stain from the tissue section.
- If using a xylene substitute, closely follow the manufacturer’s recommendations for deparaffinization step.
REFERENCES:
- Carson, Freida L., and Christa Hladik. Histotechnology: A Self-Instructional Text. 3rd ed. Chicago, Ill.: American Society of Clinical Pathologists, 2009. 154-155.
- Lieb, E. “Permanent Stain for Amyloid.” American Journal of Clinical Pathology 17 (1947). 413-414.
- Luna, Lee G. Manual of Histologic Staining Methods of the Armed Forces Institute of Pathology. 3rd ed. New York: Blakiston Division, McGraw-Hill, 1968.154.
- Sheehan, Dezna C., and Barbara B. Hrapchak. Theory and Practice of Histotechnology. 2nd ed. St. Louis: Mosby, 1980. 177.
- Modifications developed by Newcomer Supply Laboratory.
![]()
GRAM, HUCKER-TWORT STAIN KIT INCLUDES:
| Part 9125A | ||
| Solution A: | Crystal Violet-Oxalate Stain, Alcoholic | 250 ml |
| Solution B: | Iodine, Lugol’s, Aqueous | 250 ml |
| Solution C: | Neutral Red Stain 1%, Alcoholic | 125 ml |
| Solution D: | Fast Green Stain 1%, Alcoholic | 50 ml |
COMPLIMENTARY POSITIVE CONTROL SLIDES: Enclosed are two complimentary unstained positive control slides for the initial verification of staining techniques and reagents. Verification must be documented by running one Newcomer Supply complimentary positive control slide along with your current positive control slide for the first run. Retain the second complimentary control slide for further troubleshooting, if needed.
Individual stain solutions and additional control slides may be available for purchase under separate part numbers.
Additionally Needed:
| Xylene, ACS | Part 1445 |
| Alcohol, Ethyl Denatured, 100% | Part 10841 |
| Alcohol, Ethyl Denatured, 95% | Part 10842 |
| Acetone, ACS | Part 10014 |
For storage requirements and expiration date refer to individual bottle labels.
APPLICATION:
Newcomer Supply Gram, Hucker-Twort Stain Kit is a simple, rapid procedure for staining gram-positive and gram-negative bacteria without picric acid. The Twort Stain combines Neutral Red and Fast Green, for clear detection of red gram-negative bacteria with a green counterstain.
METHOD:
Fixation: Formalin 10%, Phosphate Buffered (Part 1090)
Technique: Paraffin sections cut at 4 microns
Solutions: All solutions are manufactured by Newcomer Supply, Inc.
All Newcomer Supply Stain Kits are designed to be used with Coplin jars filled to 40 ml following the provided staining procedure. Some solutions in the kit may contain extra volumes.
PRESTAINING PREPARATION:
-
- If necessary, heat dry tissue sections/slides in oven.
- Filter Solution A: Crystal Violet-Oxalate Stain, Alcoholic with high quality filter paper.
STAINING PROCEDURE:
-
- Deparaffinize sections thoroughly in three changes of xylene, 3 minutes each. Hydrate through two changes each of 100% and 95% ethyl alcohols, 10 dips each. Wash well with distilled water.
-
- See Procedure Note #1.
-
- Stain in freshly filtered Solution A: Crystal Violet-Oxalate Stain, Alcoholic (Step #2) for 30 seconds.
- Rinse quickly in distilled water.
- Mordant in Solution B: Iodine, Lugol’s, Aqueous for 20 seconds.
- Rinse quickly in distilled water.
- Decolorize individually with Acetone, ACS (Part 10014); 2 quick dips.
-
- Or until tissue remains light gray.
-
- Rinse quickly in distilled water.
- Prepare fresh Twort Stain; combine and mix well.
-
- Solution C: Neutral Red Stain 1%, Alcoholic 9 ml
- Solution D: Fast Green Stain 1%, Alcoholic 3 ml
- Distilled Water 30 ml
- Use within 30 minutes.
-
- Stain in fresh Twort Stain for 2 minutes.
- Rinse quickly in distilled water; carefully blot dry.
- Agitate slides quickly in clean Acetone, ACS to remove excess stain and dehydrate; do not use any alcohols.
-
- The use of alcohol will remove Neutral Red.
-
- Clear in three changes of xylene, 10 dips each; coverslip with compatible mounting medium.
- Deparaffinize sections thoroughly in three changes of xylene, 3 minutes each. Hydrate through two changes each of 100% and 95% ethyl alcohols, 10 dips each. Wash well with distilled water.
RESULTS:
| Gram-positive bacteria | Dark blue |
| Gram-negative bacteria | Red |
| Cytoplasm and red blood cells | Shades of green |
| Nuclei | Red |
PROCEDURE NOTES:
-
- Drain slides after each step to prevent solution carry over.
- If using a xylene substitute, closely follow the manufacturer’s recommendations for deparaffinization and clearing steps.
REFERENCES:
-
- Bancroft, John D., and Alan Stevens. Theory and Practice of Histological Techniques. 3rd ed. Edinburgh: Churchill Livingstone, 1990. 290-292.
- Culling, C.F.A. Handbook of Histopathological and Histochemical Techniques. 3rd ed. London: Butterworth, 1974. 393-395.
- Twort, F.W., “An Improved Neutral Red, Light Green Double Staining for Animal Parasites, Microorganisms and Tissues”. Journal of State Medicine (1924). 351.
- Modifications developed by Newcomer Supply Laboratory.
![]()
SOLUTION:
| 500 ml | 1 Liter | |
| Phosphotungstic Acid Hematoxylin (PTAH) Stain | Part 1334A | Part 1334B |
Additionally Needed:
| Phosphotungstic Acid Hematoxylin (PTAH) Control Slides | Part 4565 |
| Xylene, ACS | Part 1445 |
| Alcohol, Ethyl Denatured, 100% | Part 10841 |
| Alcohol, Ethyl Denatured, 95% | Part 10842 |
| Zenker Fixative, Modified, Zinc Chloride | Part 1461 |
| Acetic Acid, Glacial, ACS | Part 10010 |
| Potassium Permanganate 0.25%, Aqueous | Part 133931 |
| Oxalic Acid 5%, Aqueous | Part 1293 |
| Coplin Jar, Plastic | Part 5184 (for microwave modification) |
For storage requirements and expiration date refer to individual product labels.
APPLICATION:
The Newcomer Supply Phosphotungstic Acid Hematoxylin (PTAH), Stain procedure, with included microwave modification, is used for the demonstration of collagen, muscle striations and central nervous system (CNS) structures.
METHOD:
Fixation: Formalin 10%, Phosphate Buffered (Part 1090)
Technique: Paraffin sections cut at 4 microns
Solutions: All solutions are manufactured by Newcomer Supply, Inc.
All Newcomer Supply stain procedures are designed to be used with Coplin jars filled to 40 ml following the provided staining procedure.
PRESTAINING PREPARATION:
- If necessary, heat dry tissue sections/slides in oven.
- Prepare Zenker Fixative Working Solution; combine and mix well.
Zenker Fixative, Modified, Zinc Chloride (Part 1461) 38 ml
Acetic Acid, Glacial, ACS (Part 10010) 2 ml
STAINING PROCEDURE:
- Deparaffinize sections thoroughly in three changes of xylene, 3 minutes each. Hydrate through two changes each of 100% and 95% ethyl alcohols, 10 dips each. Wash well with distilled water.
- See Procedure Notes #1 and #2.
- Fix in Zenker Fixative Working Solution (Step #2) at 56°C for 3 hours.
Microwave Modification: See Procedure Note #3.
- Place slides in a plastic Coplin jar containing prepared Zenker Fixative Working Solution and microwave for 5 minutes at 60°C.
- Wash well in three changes of tap water; rinse in distilled water.
- Place in Potassium Permanganate 0.25%, Aqueous (Part 133931) for 10 minutes.
- Wash in three changes of tap water; rinse in distilled water.
- Place in Oxalic Acid 5%, Aqueous (Part 1293) for 10 minutes.
- Wash in three changes of tap water; rinse in distilled water.
- Place in PTAH Stain for 12-24 hours at room temperature, or 2 hours at 56°C.
- See Procedure Note #4.
Microwave Modification:
- Place slides in a plastic Coplin jar containing PTAH Stain and microwave for 7 minutes at 70°C.
- Dehydrate quickly in two changes each of 95% and 100% ethyl alcohol. Clear in three changes of xylene, 10 dips each; coverslip with compatible mounting medium.
- Dehydrate quickly as alcohol may extract stain from sections.
RESULTS:
| Collagen, cartilage, elastic fibers | Deep reddish brown |
| Muscle striations, fibrin, keratin | Dark blue |
| Glia fibers | Dark blue |
| Myelin | Lighter blue |
| Neurons | Salmon/pink |
| Nuclei | Blue |
PROCEDURE NOTES:
- Drain slides after each step to prevent solution carry over.
- Do not allow sections to dry out at any point during procedure.
- The suggested microwave procedure has been tested at Newcomer Supply. This procedure is a guideline and techniques should be developed for use in your laboratory.
- Newcomer Supply PTAH Stain formula is twice as strong as the original Mallory formulation; adjust staining time according to preference of intensity. Suggested staining time at 37°C is 18 hours.
- If using a xylene substitute, closely follow the manufacturer’s recommendations for deparaffinization and clearing steps.
REFERENCES:
- Bancroft, John D., and Marilyn Gamble. Theory and Practice of Histological Techniques. 6th ed. Oxford: Churchill Livingstone Elsevier, 2008.130-131.
- Carson, Freida L., and Christa Hladik Cappellano. Histotechnology: A Self-Instructional Text. 4th ed. Chicago: ASCP Press, 2015. 178-180, 201-202.
- Sheehan, Dezna C., and Barbara B. Hrapchak. Theory and Practice of Histotechnology. 2nd ed. St. Louis: Mosby, 1980. 193-194.
- Modifications developed by Newcomer Supply Laboratory.
![]()
SOLUTION:
| 250 ml | 500 ml | |
| Oil Red O Stain, Isopropanol | Part 1277A | Part 1277B |
Additionally Needed:
| Alcohol, Isopropyl ACS, 100% | Part 12094 |
| Formalin 10%, Phosphate Buffered | Part 1090 |
| Hematoxylin Stain, Mayer Modified | Part 1202 |
| Lithium Carbonate, Saturated Aqueous | Part 12215 |
| Mount-Quick Aqueous Mounting Medium | Part 6271A |
For storage requirements and expiration date refer to individual bottle labels.
APPLICATION:
Newcomer Supply Oil Red O Stain, Isopropanol procedure, classified as a physical staining method, is used for identification of fat/lipid in frozen sections.
METHOD:
Fixation: Fresh tissue or formalin fixed unprocessed tissue
-
- See Procedure Note #1.
Technique: Frozen sections cut at 8-10 microns on adhesive slides
Solutions: All solutions are manufactured by Newcomer Supply, Inc.
All Newcomer Supply stain procedures are designed to be used with Coplin jars filled to 40 ml following the provided staining procedure.
PRESTAINING PREPARATION:
- Prepare fresh Working Oil Red O Isopropanol Solution; combine and mix well.
- Oil Red O Stain, Isopropanol 30 ml
- Distilled Water 20 ml
- Cover solution; allow to stand at room temperature for 10 minutes; filter prior to use.
- Solution is stable for 1-2 hours.
- Prepare Alcohol, Isopropanol, 60%:
- Alcohol, Isopropyl ACS, 100% 60 ml
- Distilled Water 40 ml
- See Procedure Note #2.
STAINING PROCEDURE:
- Fix frozen section slides in Formalin 10%, Phosphate Buffered for 1 minute.
- See Procedure Note #3.
- Rinse sections carefully in two changes of distilled water.
- Rinse in Alcohol Isopropyl, 60% (Step #2).
- Stain in filtered Working Oil Red O Isopropanol Solution (Step #1) for 10 to 15 minutes.
- Rinse in fresh Alcohol Isopropyl, 60% (Step #2).
- Wash thoroughly in distilled water.
- Counterstain with Hematoxylin Stain, Mayer Modified for 2-3 minutes.
- Wash gently in several changes of tap water.
- Blue in Lithium Carbonate, Saturated Aqueous; 5 to 10 dips.
- Wash gently in several changes of tap water.
- Blot excess water from slide; coverslip with Mount-Quick Aqueous Mounting Medium.
- See Procedure Note #4.
RESULTS:
| Fat | Bright red |
| Nuclei | Blue to dark blue |
PROCEDURE NOTES:
- To freeze formalin fixed unprocessed tissue:
- Place specimen in tissue cassette, wash in running water for 5 minutes.
- Remove tissue from cassette; blot well, removing all excess water from tissue.
- Freeze tissue according to your laboratory protocol.
- Isopropyl alcohol must be used; do not substitute another grade of alcohol.
- Frozen formalin fixed tissue does not require additional formalin fixation.
- Use minimal pressure when applying coverslip or fat/lipid staining may be disturbed. To remove trapped air bubbles or to recoverslip;
- Soak slide in warm water until coverslip is easily removed.
- Blot excess water from slide.
- Remount with new coverslip and Aqueous Mounting Medium.
REFERENCES:
- Carson, Freida L., and Christa Hladik. Histotechnology: A Self-Instructional Text. 3rd ed. Chicago, Ill.: American Society of Clinical Pathologists, 2009. 184-186.
- Lillie, R. D., and Harold Fullmer. Histopathologic Technic and Practical Histochemistry. 4th ed. New York: McGraw-Hill, 1976. 567.
- Sheehan, Dezna C., and Barbara B. Hrapchak. Theory and Practice of Histotechnology. 2nd ed. St. Louis: Mosby, 1980. 205.
- Modifications developed by Newcomer Supply Laboratory.
![]()
Tech Memo 1: Crystal Violet-Oxalate Stain, Alcoholic for Brown-Brenn Gram Stain
SOLUTION:
| 250 ml | 500 ml | |
| Crystal Violet-Oxalate Stain, Alcoholic | Part 10422A | Part 10422B |
Additionally Needed:
| Gram, Multi-Tissue, Artificial Control Slides OR Gram+ & Gram- Bacteria, Artificial Control Slides |
Part 4256 OR Part 4255 |
| Xylene, ACS | Part 1445 |
| Alcohol, Ethyl Denatured, 100% | Part 10841 |
| Alcohol, Ethyl Denatured, 95% | Part 10842 |
| Iodine, Gram, Aqueous | Part 1140 |
| Acetone-Alcohol 1:1 | Part 10016 |
| Basic Fuchsin Stain 0.25%, Aqueous | Part 1011 |
| Acetone, ACS | Part 10014 |
| Picric Acid-Acetone 0.1% | Part 1335 |
| Acetone-Xylene 1:1 | Part 10015 |
For storage requirements and expiration date refer to individual bottle labels.
APPLICATION:
Newcomer Supply Gram Stain, Brown-Brenn is the traditional method used for differential staining of gram-positive and gram-negative bacteria in tissue sections, cultures and smears.
METHOD:
Fixation: Formalin 10%, Phosphate Buffered (Part 1090)
Technique: Paraffin sections cut at 4 microns and cultures/smears.
- See Procedure Note #1.
Solutions: All solutions are manufactured by Newcomer Supply, Inc.
All Newcomer Supply stain procedures are designed to be used with Coplin jars filled to 40 ml following the provided staining procedure.
PRESTAINING PREPARATION:
- If necessary, heat dry tissue sections/slides in oven.
- Filter Crystal Violet-Oxalate Stain, Alcoholic with high quality filter paper.
STAINING PROCEDURE:
- Deparaffinize sections thoroughly in three changes of xylene, 3 minutes each. Hydrate through two changes each of 100% and 95% ethyl alcohols, 10 dips each. Wash well with distilled water.
- See Procedure Notes #2 and #3.
- Stain in freshly filtered Crystal Violet-Oxalate Stain, Alcoholic for 30 seconds.
- Rinse well in several changes of distilled water.
- Mordant in Iodine, Gram, Aqueous (Part 1140) for 1 minute.
- Rinse in distilled water; blot excess water from slide, but not from the tissue section.
- Decolorize one slide at a time by dipping in Acetone-Alcohol 1:1 (Part 10016) until blue color stops running. Approximately 1-3 dips.
- Counterstain in Basic Fuchsin Stain 0.25%, Aqueous (Part 1011) for 3 minutes.
- Rinse in distilled water; blot excess water from slide, but not from the tissue section.
- Proceed with Steps #11 to #14 one slide at a time.
- Dip once in Acetone (Part 10014).
- Dip in Picric Acid-Acetone 0.1% (Part 1335) until sections have a yellowish-pink color, 3-10 dips. Agitate slides until desired intensity is achieved.
- Dip in Acetone-Xylene 1:1 (Part 10015), 5-10 dips.
- Check control microscopically for proper differentiation.
- Repeat Step #12 if additional differentiation is needed.
- Clear in three changes of xylene, 10 dips each; coverslip with compatible mounting medium.
RESULTS:
| Gram-positive bacteria | Blue |
| Gram-negative bacteria | Red |
| Nuclei | Red |
| Background tissue | Yellow |
PROCEDURE NOTES:
- For cultures/smears: Prepare within an accepted time frame a well-made culture/smear per laboratory protocol with a focus on uniform cell distribution. Timings offered in this protocol are based on paraffin sections and may need to be altered for optimal culture/smear staining.
- Drain slides after each step to prevent solution carry over.
- Do not allow sections to dry out at any point during procedure.
- If using a xylene substitute, closely follow the manufacturer’s recommendations for deparaffinization and clearing steps.
REFERENCES:
- Bancroft, John D., and Marilyn Gamble. Theory and Practice of Histological Techniques. 6th ed. Oxford: Churchill Livingstone Elsevier, 2008. 312-313.
- Brown, J.H., and L. Brenn. “A Method for the Differential Staining of Gram Positive and Gram Negative Bacteria in Tissue Sections”. Bulletin of The Johns Hopkins 48.2 (1931): 69-73.
- Luna, Lee G. Histopathologic Methods and Color Atlas of Special Stains and Tissue Artifacts. Gaitheresburg, MD: American Histolabs, 1992. 188-189.
- Modifications developed by Newcomer Supply Laboratory.
Tech Memo 2: Crystal Violet-Oxalate Stain, Alcoholic for Hucker-Twort Gram Stain
SOLUTION:
| 250 ml | 500 ml | |
| Crystal Violet-Oxalate Stain, Alcoholic | Part 10422A | Part 10422B |
Additionally Needed:
| Gram, Multi-Tissue, Artificial Control Slides OR Gram+ & Gram- Bacteria, Artificial Control Slides |
Part 4256 OR Part 4255 |
| Xylene, ACS | Part 1445 |
| Alcohol, Ethyl Denatured, 100% | Part 10841 |
| Alcohol, Ethyl Denatured, 95% | Part 10842 |
| Iodine, Weigert & Lugol, Aqueous | Part 12092 |
| Acetone, ACS | Part 10014 |
| Twort’s Gram Stain Set Solution A: Neutral Red Stain 1%, Alcoholic Solution B: Fast Green Stain 1%, Alcoholic |
Part 14034 |
For storage requirements and expiration date refer to individual product labels.
APPLICATION:
Newcomer Supply Gram Stain, Hucker-Twort is a rapid and simple procedure that stains gram-positive and gram-negative bacteria without the use of picric acid. The Fast Green secondary counterstain provides the green background for clear detection of any red gram-negative bacteria present.
METHOD:
Fixation: Formalin 10%, Phosphate Buffered (Part 1090)
Technique: Paraffin sections cut at 4 microns
Solutions: All solutions are manufactured by Newcomer Supply, Inc.
All Newcomer Supply stain procedures are designed to be used with Coplin jars filled to 40 ml following the provided staining procedure.
PRESTAINING PREPARATION:
- If necessary, heat dry tissue sections/slides in oven.
- Filter Crystal Violet-Oxalate Stain, Alcoholic with high quality filter paper.
STAINING PROCEDURE:
- Deparaffinize sections thoroughly in three changes of xylene, 3 minutes each. Hydrate through two changes each of 100% and 95% ethyl alcohols, 10 dips each. Wash well with distilled water.
- See Procedure Note #1.
- Stain in freshly filtered Crystal Violet-Oxalate Stain, Alcoholic for 30 seconds.
- Rinse quickly in distilled water.
- Mordant in Iodine, Weigert & Lugol, Aqueous (Part 12092); 20 seconds.
- Rinse quickly in distilled water.
- Decolorize one slide at a time with Acetone (Part 10014) until majority of the purple stain is removed, and tissue remains light gray. Approximately 2 quick dips.
- Rinse quickly in distilled water.
- Prepare fresh Twort Stain (Part 14034); combine and mix well. Use within 30 minutes of preparation:
- Neutral Red Stain 1%, Alcoholic 9 ml
- Fast Green Stain 1%, Alcoholic 3 ml
- Distilled Water 30 ml
- Stain in fresh Twort Stain for 2 minutes.
- Rinse quickly in distilled water and carefully blot dry.
- Agitate slides quickly in clean Acetone to dehydrate; do not use any alcohols.
- See Procedure Notes #2 and #3.
- Clear in three changes of xylene, 10 dips each; coverslip with compatible mounting medium.
RESULTS:
| Gram-positive bacteria | Dark blue |
| Gram-negative bacteria | Red |
| Cytoplasm and red blood cells | Shades of green |
| Nuclei | Red |
PROCEDURE NOTES:
- Drain slides after each step to prevent solution carry over.
- To tone down excessive red staining, add extra dips in acetone to differentiate and dehydrate the section.
- Check microscopically to ensure that over-differentiation does not occur.
- Do not use alcohol in dehydration steps. The Neutral Red will be removed with alcohol exposure.
- If using a xylene substitute, closely follow the manufacturer’s recommendations for deparaffinization and clearing steps.
REFERENCES:
- Bancroft, John D., and Alan Stevens. Theory and Practice of Histological Techniques. 3rd ed. Edinburgh: Churchill Livingstone, 1990. 290-292.
- Culling, C.F.A. Handbook of Histopathological and Histochemical Techniques (including museum techniques). 3rd ed. London: Butterworth, 1974. 393-395.
- Twort, F.W., “An Improved Neutral Red, Light Green Double Staining for Animal Parasites, Microorganisms and Tissues”. Journal of State Medicine 32. (1924). 351.
- Modifications developed by Newcomer Supply Laboratory.
![]()
SOLUTION:
| 100 ml | |
| Cresyl Violet Acetate 2.5%, Aqueous | Part 1039A |
Additionally Needed:
| Luxol Fast Blue (LFB) Control Slides | Part 4407 |
| Luxol Fast Blue (LFB) Stain Set | Part 12218 (for LFB/Cresyl Violet Acetate Stain) |
| Acetic Acid, Glacial, ACS | Part 10010 |
| Xylene, ACS | Part 1445 |
| Alcohol, Ethyl Denatured, 100% | Part 10841 |
| Alcohol, Ethyl Denatured, 95% | Part 10842 |
For storage requirements and expiration date refer to individual bottle labels.
APPLICATION:
Newcomer Supply Cresyl Violet Acetate 2.5%, Aqueous is a metachromatic basic dye for the demonstration of Nissl substance and nuclei in nerve tissue. As a working solution, Cresyl Violet Acetate can be utilized in the Luxol Fast Blue (LFB) procedure or used solely as a stand-alone nerve tissue stain.
Cresyl Violet Acetate is also known as Cresyl Violet, Cresyl Fast Violet Acetate and Cresyl Echt Violet Acetate. Due to characteristics of the dye, the actual percentage of dye concentration in Cresyl Violet powder may vary between lots. The minimum acceptable dye content for Cresyl Violet certification is noted as 65%.
METHOD:
Fixation: Formalin 10%, Phosphate Buffered (Part 1090)
Technique: Paraffin sections cut at 8-10 microns on adhesive slides
- Air-dry for a minimum of 30 minutes
Solutions: All solutions are manufactured by Newcomer Supply, Inc.
STAINING PROCEDURES:
- If necessary, heat dry tissue sections/slides in oven.
- Deparaffinize sections thoroughly in three changes of xylene, 3 minutes each. Hydrate through two changes each of 100% and 95% ethyl alcohols, 10 dips each.
- LFB procedure: stop at 95% ethyl alcohol, no distilled water rinse.
- Cresyl Violet Acetate stand-alone staining: continue with distilled water rinse. Proceed to Step #6.
- See Procedure Notes #1 and #2.
- LFB Stain: proceed with LFB Stain Set (Part 12218) protocol through final differentiation step and rinse thoroughly in distilled water.
- Continue with LFB counterstain or Cresyl Violet Acetate stand-alone staining.
- Prepare Acetic Acid 10%, Aqueous; combine and mix well.
- Acetic Acid, Glacial, ACS (Part 10010) 10 ml
- Distilled Water 90 ml
- Store at room temperature for up to 1 year.
- Prepare Working Cresyl Violet Acetate 0.25%; mix well and filter.
- Cresyl Violet Acetate 2.5%, Aqueous 5 ml
- Distilled Water 45 ml
- Acetic Acid 10%, Aqueous 7 drops
- Directly before use, preheat filtered solution to 57°C in microwave; hold in oven.
- See Procedure Notes #3 and #4.
- Stain in filtered, preheated Working Cresyl Violet Acetate 0.25% for 6 minutes.
- Keep solution warm in oven during staining.
- Rinse in distilled water.
- Dehydrate quickly in two changes each of 95% and 100% ethyl alcohol. Clear in three changes of xylene, 10 dips each; coverslip with compatible mounting medium.
- See Procedure Note #5.
RESULTS:
LFB with Cresyl Violet:
| Myelin | Blue |
| Nissl substance and nuclei | Violet |
| Neurons | Pink to violet |
Cresyl Violet alone:
| Nissl substance | Purple/dark blue |
| Nuclei | Purple blue |
| Neurons | Pale purple-blue |
| Background | Colorless |
PROCEDURE NOTES:
- Drain slides after each step to prevent solution carry over.
- Do not allow sections to dry out at any point during procedure.
- Due to possible variance of dye percentage between lots of Cresyl Violet powder, a stronger solution of Working Cresyl Violet Acetate may be required for optimal staining results. Test each new lot of Cresyl Violet Acetate 2.5%, Aqueous to determine best working stain concentration.
- For improved staining of Working Cresyl Violet Acetate, adjust pH to 4.0 with Acetic Acid 10%, Aqueous.
- Dehydrate quickly to maintain Cresyl Violet Acetate staining.
- If using a xylene substitute, closely follow the manufacturer’s recommendations for deparaffinization and clearing steps.
REFERENCES:
- Bancroft, John D., and Marilyn Gamble. Theory and Practice of Histological Techniques. 6th ed. Oxford: Churchill Livingstone Elsevier, 2008. 366-367.
- Carson, Freida L., and Christa Hladik Cappellano. Histotechnology: A Self-instructional Text. 4th ed. Chicago: ASCP Press, 2015. 191-193, 207-208.
- Horobin, Richard and John Kiernan. Conn’s Biological Stains: A Handbook of Dyes, Stains and Fluorochromes for Use in Biology and Medicine. 10th ed. Oxford: BIOS, 2002. 281-282.
- Modifications developed by Newcomer Supply Laboratory.
![]()
SOLUTION:
| 250 ml | 500 ml | |
| Carbol Fuchsin Stain, Kinyoun | Part 1031A | Part 1031B |
Additionally Needed:
| Acid Fast Bacteria (AFB) Control Slides | Part 4011 |
| Acid Alcohol 1% | Part 10011 |
| Methylene Blue Stain 0.14%, Alcoholic | Part 12401 |
| Xylene, ACS | Part 1445 |
| Alcohol, Ethyl Denatured, 100% | Part 10841 |
| Alcohol, Ethyl Denatured, 95% | Part 10842 |
For storage requirements and expiration date refer to individual bottle labels.
APPLICATION:
Newcomer Supply Carbol Fuchsin Stain, Kinyoun is used in the Kinyoun AFB Stain to demonstrate the presence of acid-fast mycobacteria in tissue sections. Carbol Fuchsin Stain, Kinyoun is a concentrated phenol and basic fuchsin solution that works to permeate the lipoid capsule of acid-fast organisms, rendering them resistant to acid alcohol decolorization.
METHOD:
Fixation: Formalin 10%, Phosphate Buffered (Part 1090)
Technique: Paraffin sections cut at 4 microns
Solutions: All solutions are manufactured by Newcomer Supply, Inc.
All Newcomer Supply stain procedures are designed to be used with Coplin jars filled to 40 ml following the provided staining procedure.
PRESTAINING PREPARATION:
-
- If necessary, heat dry tissue sections/slides in oven.
- Filter Carbol Fuchsin Stain, Kinyoun with filter paper before use.
STAINING PROCEDURE:
-
- Deparaffinize sections thoroughly in three changes of xylene, 3 minutes each. Hydrate through two changes each of 100% and 95% ethyl alcohols, 10 dips each. Wash well with distilled water.
-
- See Procedure Notes #1 and #2.
-
- Stain in freshly filtered Carbol Fuchsin Stain, Kinyoun for 15 minutes at room temperature. Keep solution covered.
-
- See Procedure Note #3.
-
- Wash in running tap water for 2 to 3 minutes.
- Differentiate in Acid Alcohol 1% (Part 10011) until color no longer runs off the slide and sections are pale pink; 3 to 10 rapid dips.
- Wash in running tap water 3 to 5 minutes; rinse in distilled water.
- Counterstain in Methylene Blue Stain 0.14%, Alcoholic (Part 12401); 3-6 dips.
-
- See Procedure Note #4.
-
- Wash in running tap water for 1 minute; rinse in distilled water.
- Dehydrate quickly in two changes each of 95% and 100% ethyl alcohol. Clear in three changes of xylene, 10 dips each; coverslip with compatible mounting medium.
- Deparaffinize sections thoroughly in three changes of xylene, 3 minutes each. Hydrate through two changes each of 100% and 95% ethyl alcohols, 10 dips each. Wash well with distilled water.
RESULTS:
| Acid-fast bacteria | Bright red |
| Background | Pale blue |
PROCEDURE NOTES:
-
- Drain slides after each step to prevent solution carry over.
- Do not allow sections to dry out at any point during procedure.
- Sections can remain in Carbol Fuchsin Stain, Kinyoun for up to 60 minutes without adverse effect. Additional differentiation may be required in Step #6.
- If preferred, Light Green SF Yellowish Stain 0.1%, Aqueous (Part 12203) can be used as a counterstain in place of Methylene Blue.
-
- Stain for 3-6 dips.
- Rinse with one quick dip in distilled water or proceed directly to Step #10 without a distilled water rinse.
-
- If using a xylene substitute, closely follow the manufacturer’s recommendations for deparaffinization and clearing steps.
REFERENCES:
-
- Carson, Freida L., and Christa Hladik. Histotechnology: A Self-Instructional Text. 3rd ed. Chicago, Ill.: American Society of Clinical Pathologists, 2009. 224-226.
- J.J. “A Note on Uhlenhuths Method for Sputum Examination, for Tubercle Bacilli.” American Journal of Public Health 5.9 (1915). 867-870.
- Sheehan, Dezna C., and Barbara B. Hrapchak. Theory and Practice of Histotechnology. 2nd ed. St. Louis: Mosby, 1980. 236-237.
- Modifications developed by Newcomer Supply Laboratory.
![]()
SOLUTION:
| 250 ml | 500 ml | |
| Alcian Blue Stain 1%, pH 1.0 Aqueous | Part 1005A | Part 1005B |
Additionally Needed:
| Hydrochloric Acid 0.1N, Aqueous | Part 1207 |
| Nuclear Fast Red Stain, Kernechtrot | Part 1255 |
| Xylene, ACS | Part 1445 |
| Alcohol, Ethyl Denatured, 100% | Part 10841 |
| Alcohol, Ethyl Denatured, 95% | Part 10842 |
For storage requirements and expiration date refer to individual bottle labels.
APPLICATION:
Newcomer Supply Alcian Blue Stain 1%, pH 1.0 Aqueous is for the specific staining of sulfated acid epithelial mucins in the Alcian Blue 1%, pH 1.0 procedure.
METHOD:
Fixation: Formalin 10%, Phosphate Buffered (Part 1090)
Technique: Paraffin sections cut at 4 microns
Solutions: All solutions manufactured by Newcomer Supply, Inc.
All Newcomer Supply stain procedures are designed to be used with Coplin jars filled to 40 ml following the provided staining procedure.
STAINING PROCEDURE:
-
- If necessary, heat dry tissue sections/slides in oven.
- Deparaffinize sections thoroughly in three changes of xylene, 3 minutes each. Hydrate through two changes each of 100% and 95% ethyl alcohols, 10 dips each. Wash well with distilled water.
-
- See procedure note #1.
-
- Rinse briefly in Hydrochloric Acid 0.1N, Aqueous (Part 1207).
-
- Save Hydrochloric Acid 0.1N, Aqueous for Step #5.
-
- Stain in Alcian Blue Stain 1%, pH 1.0 Aqueous for 30 minutes at room temperature.
- Rinse briefly in Hydrochloric Acid 0.1N, Aqueous.
-
- Do not wash in water.
- A water wash may alter pH level resulting in nonspecific staining.
-
- Blot slide(s) dry with filter paper.
- Counterstain dried slide(s) with Nuclear Fast Red Stain, Kernechtrot (Part 1255) for 5 minutes.
-
- Shake solution well before use; do not filter.
-
- Rinse well in distilled water.
-
- See Procedure Note #2.
-
- Dehydrate quickly in two changes each of 95% and 100% ethyl alcohol. Clear in three changes of xylene, 10 dips each; coverslip with compatible mounting medium.
RESULTS:
| Sulfated acid epithelial mucin | Blue |
| Cytoplasm and background | Pink |
| Nuclei | Pink to red |
PROCEDURE NOTES:
-
- Drain slides after each step to prevent solution carry over.
- Wash well after Nuclear Fast Red Stain, Kernechtrot to avoid cloudiness in dehydration steps.
- If using a xylene substitute, closely follow the manufacturer’s recommendations for deparaffinization and clearing steps.
REFERENCES:
-
- Carson, Freida L., and Christa Hladik. Histotechnology: A Self-Instructional Text. 3rd ed. Chicago, Ill.: American Society of Clinical Pathologists, 2009.146-147.
- Sheehan, Dezna C., and Barbara B. Hrapchak. Theory and Practice of Histotechnology. 2nd ed. St. Louis: Mosby, 1980. 173.
- Modifications developed by Newcomer Supply Laboratory.
![]()
Tech Memo 1: Alcian Blue Stain 1%, pH 2.5
SOLUTION:
| 250 ml | 500 ml | |
| Alcian Blue Stain 1%, pH 2.5 Aqueous | Part 1003A | Part 1003B |
Additionally Needed:
| Alcian Blue pH 2.5, Umbilical Cord Control Slides OR Alcian Blue pH 2.5, Multi-Tissue Control Slides |
Part 4020 OR Part 4021 |
| Acetic Acid 3%, Aqueous | Part 10017 |
| Nuclear Fast Red Stain, Kernechtrot | Part 1255 |
| Xylene, ACS | Part 1445 |
| Alcohol, Ethyl Denatured, 100% | Part 10841 |
| Alcohol, Ethyl Denatured, 95% | Part 10842 |
For storage requirements and expiration date refer to individual bottle labels.
APPLICATION:
Newcomer Supply Alcian Blue Stain 1%, pH 2.5 Aqueous is designed to stain acid epithelial mucins (sialomucin, sulfomucin) as well as stromal (mesenchymal) mucin in the Alcian Blue Stain 1%, pH 2.5 procedure.
METHOD:
Fixation: Formalin 10%, Phosphate Buffered (Part 1090)
Technique: Paraffin sections at 4 microns
Solutions: All solutions are manufactured by Newcomer Supply, Inc.
All Newcomer Supply stain procedures are designed to be used with Coplin jars filled to 40 ml following the provided staining procedure.
STAINING PROCEDURE:
- If necessary, heat dry tissue sections/slides in oven.
- Deparaffinize sections thoroughly in three changes of xylene, 3 minutes each. Hydrate through two changes each of 100% and 95% ethyl alcohols, 10 dips each. Wash well with distilled water.
- See Procedure Notes #1 and #2.
- Place slides in Acetic Acid 3%, Aqueous (Part 10017) for 3 minutes.
- Move slides directly into Alcian Blue Stain 1%, pH 2.5 Aqueous. Stain for 30 minutes at room temperature or for 15 minutes in a 37°C water bath.
- Wash in running tap water for 10 minutes; rinse in distilled water.
- See Procedure Note #3.
- Counterstain in Nuclear Fast Red Stain, Kernechtrot (Part 1255) for 5 minutes.
- Shake solution well before use; do not filter.
- Rinse well in distilled water.
- See Procedure Note #4
- Dehydrate quickly through two changes of 95% ethyl alcohol and two changes of 100% ethyl alcohol. Clear in three xylene changes, 10 dips each; coverslip with compatible mounting medium.
RESULTS:
| Acid epithelial mucin | Blue |
| Stromal (mesenchymal) mucin | Blue |
| Nuclei | Pink-red |
| Cytoplasm | Pale pink |
PROCEDURE NOTES:
- Drain slides after each step to prevent solution carry over.
- Do not allow sections to dry out at any point during procedure.
- A brief dip in Acetic Acid 3%, Aqueous from Step #3 can be added before rinsing to remove excess Alcian Blue Stain 1%, pH 2.5 Aqueous if needed.
- Wash well after Nuclear Fast Red Stain, Kernechtrot to avoid cloudiness in dehydration steps.
- If using a xylene substitute, closely follow the manufacturer’s recommendations for deparaffinization and clearing steps.
REFERENCES:
- Carson, Freida. Histotechnology: A Self-Instructional Text. 2nd ed. Chicago: ASCP Press, 1997. 118-120.
- Sheehan, Dezna C., and Barbara B. Hrapchak. Theory and Practice of Histotechnology. 2nd ed. St. Louis: Mosby, 1980. 172-173.
- Modifications developed by Newcomer Supply Laboratory.
Tech Memo 2: Alcian Blue/PAS Stain
SOLUTION:
| 250 ml | 500 ml | |
| Alcian Blue Stain 1%, pH 2.5 Aqueous | Part 1003A | Part 1003B |
Additionally Needed:
| Alcian Blue/PAS Control Slides | Part 4022 |
| Acetic Acid 3%, Aqueous | Part 10017 |
| Periodic Acid 0.5%, Aqueous | Part 13308 |
| Schiff Reagent, McManus | Part 1371 |
| Hematoxylin Stain, Mayer Modified | Part 1202 |
| Xylene, ACS | Part 1445 |
| Alcohol, Ethyl Denatured, 100% | Part 10841 |
| Alcohol, Ethyl Denatured, 95% | Part 10842 |
For storage requirements and expiration date refer to individual bottle labels.
APPLICATION:
Newcomer Supply Alcian Blue Stain 1%, pH 2.5 Aqueous, a crucial element in the Alcian Blue/PAS Stain procedure is used to differentiate between acidic epithelial mucins (sialomucin, sulfomucin) and neutral epithelial mucin and is a means of detecting the overall presence of mucins. Acidic mucins are stained with the Alcian Blue technique while neutral mucins and glycogen are stained by the PAS reaction.
METHOD:
Fixation: Formalin 10%, Phosphate Buffered (Part 1090)
Technique: Paraffin sections cut at 4 microns
Solutions: All solutions are manufactured by Newcomer Supply, Inc.
All Newcomer Supply stain procedures are designed to be used with Coplin jars filled to 40 ml following the provided staining procedure.
STAINING PROCEDURE:
- If necessary, heat dry tissue sections/slides in oven.
- Deparaffinize sections thoroughly in three changes of xylene, 3 minutes each. Hydrate through two changes each of 100% and 95% ethyl alcohols, 10 dips each. Wash well with distilled water.
- See Procedure Notes #1 and #2.
- Place slides in Acetic Acid 3%, Aqueous (Part 10017) for 3 minutes.
- Place slides directly into Alcian Blue Stain 1%, pH 2.5 Aqueous for 15 minutes.
- Wash slides in gently running tap water for 1-2 minutes; rinse in distilled water.
- Place in Periodic Acid 0.5%, Aqueous (Part 13308) for 5 minutes.
- Wash in running tap water for 1-2 minutes; rinse in distilled water.
- Place slides in Schiff Reagent, McManus (Part 1371) for 10 minutes.
- Wash in lukewarm tap water for 5-10 minutes.
- Stain lightly in Hematoxylin Stain, Mayer Modified (Part 1202) for 1 minute.
- Rinse in running tap water for 1-2 minutes.
- Dehydrate in two changes each of 95% and 100% ethyl alcohol. Clear in three changes of xylene, 10 dips each; coverslip with compatible mounting medium.
RESULTS:
| Acid epithelial mucin | Violet |
| Neutral epithelial mucin | Magenta |
| Glycogen | Magenta |
| Stromal (mesenchymal) mucin | Blue |
PROCEDURE NOTES:
- Drain slides after each step to prevent solution carry over.
- Do not allow sections to dry out at any point during procedure.
- If using a xylene substitute, closely follow the manufacturer’s recommendations for deparaffinization and clearing steps.
REFERENCES:
- Bancroft, John D., and Marilyn Gamble. Theory and Practice of Histological Techniques. 6th ed. Oxford: Churchill Livingstone Elsevier, 2008. 173-174.
- Carson, Freida L., and Christa Hladik Cappellano. Histotechnology: A Self-instructional Text. 4th ed. Chicago: ASCP Press, 2015. 150-151
- Modifications developed by Newcomer Supply Laboratory.
![]()
SOLUTIONS:
| 250 ml | 500 ml | 1 Liter | 1 Gallon | |
| Acetic Acid 3%, Aqueous | Part 10017A | Part 10017B | ||
| Alcian Blue Stain 1%, pH 2.5 Aqueous | Part 1003A | Part 1003B | ||
| Hematoxylin Stain, Mayer Modified | Part 1202A | Part 1202B | Part 1202C | |
| Scott Tap Water Substitute | Part 1380A | Part 1380B | Part 1380C | |
| Eosin Y Working Solution | Part 1072A | Part 1072B | Part 1072C | |
| Metanil Yellow Stain, Aqueous | Part 12235B | Part 12235C |
Additionally Needed:
| Alcian Blue pH 2.5, Barrett’s Esophagus Control Slides OR Alcian Blue pH 2.5, Goblet Cell Control Slides |
Part 4023 OR Part 4051 |
| Xylene, ACS | Part 1445 |
| Alcohol, Ethyl Denatured, 100% | Part 10841 |
| Alcohol, Ethyl Denatured, 95% | Part 10842 |
| Alcohol, Ethyl Denatured, 70% | Part 10844 |
For storage requirements and expiration date refer to individual product labels.
APPLICATION:
Newcomer Supply Alcian Blue-H&E-Metanil Yellow Stain is a useful diagnostic screening method for Barrett’s esophagus and distinguishing from other gastrointestinal conditions/disorders. The use of three separate stains and an eosin counterstain, provides a colorful combination of the gastrointestinal tracts various components.
METHOD:
Fixation: Formalin 10%, Phosphate Buffered (Part 1090)
Technique: Paraffin Sections cut at 4 microns
Solutions: All solutions are manufactured by Newcomer Supply, Inc.
All Newcomer Supply stain procedures are designed to be used with Coplin jars filled to 40 ml following the provided staining procedure.
STAINING PROCEDURE:
- If necessary, heat dry tissue sections/slides in oven.
- Deparaffinize sections thoroughly in three changes of xylene, 3 minutes each. Hydrate through two changes each of 100% and 95% ethyl alcohols, 10 dips each. Wash well with distilled water.
- See Procedure Notes #1 and #2.
- Place in Acetic Acid 3%, Aqueous (Part 10017) for 3 minutes.
- Move directly into Alcian Blue Stain 1%, pH 2.5 Aqueous (Part 1003) for 15 minutes.
- Wash in running tap water for 5 minutes; rinse in distilled water.
- Stain with Hematoxylin Stain, Mayer Modified (Part 1202) for 2 to 4 minutes.
- Rinse in running tap water until water runs clear.
- Blue in Scott Tap Water Substitute (Part 1380); 2-3 dips.
- Wash well in running tap water; rinse in distilled water.
- Place in 70% ethyl alcohol for 1 minute.
- Stain with Eosin Y Working Solution (Part 1072) for 1 minute.
- Dehydrate in 95% ethyl alcohol for 30 seconds.
- Dehydrate in two changes of 100% ethyl alcohol; 30 seconds each.
- Place in Metanil Yellow Stain, Aqueous (Part 12235) for 1 minute.
- See Procedure Note #3.
- Rinse/dehydrate in two changes of 100% ethyl alcohol. Clear in three changes of xylene, 10 dips each; coverslip with compatible mounting medium.
RESULTS:
| Nuclei | Blue |
| Cytoplasm | Pink-Red |
| Mucin/ Barrett’s esophagus goblet cells | Turquoise |
| Gastric mucin | Some stain faint blue |
| Collagen | Yellow |
| Smooth Muscle | Salmon |
PROCEDURE NOTES:
- Drain slides after each step to prevent solution carry over.
- Do not allow sections to dry out at any point during procedure.
- If over-stained in Metanil Yellow Stain, Aqueous increased background staining will occur.
- If using a xylene substitute, closely follow the manufacturer’s recommendations for deparaffinization and clearing steps.
REFERENCES:
- Edgett, Wendi. “Alcian Blue-H&E-Metanil Yellow Stain for Diagnosing Barrett’s Esophagus”. Histologic 37.2 (2004). 35-38
- Staples, Terri. “Alcian Blue-H&E-Saffron Stain for Gastrointestinal Biopsies”. Histologic 26.1 (1996). 2-3.
- Modifications developed by Newcomer Supply Laboratory.
Ultra fine-tip (diameter approximately 0.75mm), dark black ink pen. Write easily on microscope slides and plastic cassettes. Will go through the harshest histology chemistries and stay on. Excellent choice for the toughest applications.

Molded from acetal, the patented Micromesh Biopsy Tissue Processing & Embedding Cassettes (4 Compartments) keep specimens safely submerged in liquid and are resistant to the chemical action of most histological solvents. The Micromesh Biopsy Tissue Processing & Embedding Cassettes ensure efficient fluid exchange and drainage without having to use biopsy pads.
PACKAGING OF THE MICROMESH BIOPSY TISSUE PROCESSING & EMBEDDING CASSETTES (4 Compartments):
- 250 cassettes/box; 1,000 cassettes/case with covers assembled.
MICROMESH BIOPSY TISSUE PROCESSING & EMBEDDING CASSETTES (4 Compartments):
- 1676 square openings (0.38mm) allowing for a greatly improved fluid exchange without having to use biopsy pads.
- Four square compartments each measuring 13 x 13mm.
- Large anterior and posterior slots in both cassette and cover ensure that the cassette will sink rapidly.
- Recessed cover allowing more cassettes to be stacked in automatic labeling machines and tissue processors.
- Anterior writing area is at a 45° angle.
This tissue flotation bath is made of a seamless inner-chamber that is easy to fill & clean. Heats quickly and is simple to operate. An excellent tissue flotation bath for any histology lab and very easy on the budget!
FEATURES OF THE ECONOMY HISTOLOGY WATER BATH:
- Low Profile 2.3 liter black, finished interior chamber
- Glass lid for easy viewing of interior
- Durable fiberglass insulated body prevents heat loss
- Non-stick coated chamber for easy cleaning
- Thermometer holder
- Temperature range of room temp. to 75ºC
DIMENSIONS OF THE HISTOLOGY WATER BATH:
- Overall 10.5″ diameter x 8.25″ H
- Interior 8.25″ diameter x 2.5″ H
CERTIFICATION AND APPROVALS:
- CE certified
| ELECTRICAL SPECIFICATIONS | |||
|---|---|---|---|
| Voltage | Amps | Hertz | Wattage |
| 120 | 3.33 | 60 | 400 |
WARRANTY DETAILS:
-
- The manufacturer warrants this instrument to be free from defects in material and workmanship under normal use for one year from the date of purchase. It does not cover damage resulting from abuse or misuse, repairs or alterations performed by other than authorized repair technicians, or damage occurring in transit.
Manual for Tissue Flotation Bath XH-1001
This digital tissue flotation bath has a lighted water basin that produces excellent visibility for the floating tissue section(s). Excellent value and easy to use!
Features of the Histology Water Bath:
- Low profile design with removable rectangular glass basin
- The water bath is illuminated from the side and provides exceptional viewing of the tissue section(s)
- Easy to read LED display shows both set temperature and actual temperature
- Excellent value!
Specifications of the Histology Water Bath:
- Temp Range: Room Temp to 75° C +/- 1° C
- Capacity: 2 Liters (1/2 gallon)
- Size Glass Tray (included): 10″ (W) x 6.5″ (D) x 1.75″ (H)
- Overall Size: 14″ x 14″ x 4″
- Shipping Weight: 22 lbs.
- Power Requirements: 300W (110V, 60Hz)
Certification and Approvals:
- CE certified
| ELECTRICAL SPECIFICATIONS | |||
|---|---|---|---|
| Voltage | Amps | Hertz | Wattage |
| 120 | 4.17 | 60 | 500 |
WARRANTY DETAILS:
-
- The manufacturer warrants this instrument to be free from defects in material and workmanship under normal use for one year from the date of purchase. It does not cover damage resulting from abuse or misuse, repairs or alterations performed by other than authorized repair technicians, or damage occurring in transit.
Manual for Tissue Flotation Bath- Digital XH-1003
Digital Paraffin Trimmer at an Incredible Price!
Our digital paraffin wax trimmer XH-90D model from Premiere is an efficient appliance for removing excess paraffin from embedding tissue cassettes. The digitally controlled temperature update to the unit allows for the user to set the temperature of the heating plate from room temperature up to 120°C in one degree increments.
Compact tabletop design of the digital paraffin trimmer fits easily in any lab. The melted paraffin is easily melted away and drains into the removable tray below. Collection tray stays in place by magnetic contact with unit. Also available is a convenient disposable tray liner that allows easy disposal of the runoff wax. No need to scrape out the collection tray!
FEATURES OF THE PARAFFIN WAX TRIMMER – DIGITAL, PREMIERE:
-
- Digital Control Panel
- Grooved Heating Surface
- Adjustable Heat Setting
- Temperature range: Room Temp. to 120°C
- Magnetically secured collection tray holds disposable tray liners for easy disposal
- Trim multiple cassettes simultaneously
- LED power light
- Includes 5 disposable drip tray liners
DIMENSIONS:
-
- Overall size: 11.25″ x 5″ x 8″
- Plate size: 9″ x 5″
| ELECTRICAL SPECIFICATIONS | ||
|---|---|---|
| Voltage | Hertz | Wattage |
| 110 | 60 | 150W |
The manufacturer warrants this instrument to be free from defects in material and workmanship under normal use for one year from the date of purchase. It does not cover damage resulting from abuse or misuse, repairs or alterations performed by other than authorized repair technicians, or damage occurring in transit.
PARAFFIN DISPENSER XH-4002 FEATURES:
-
- 2.3 gallon basin
- Durable industrial metal outer cabinet for long life
- Built in temperature controller
- Stainless steel interior for easy cleaning
- Heat tolerant metal faucet
- Heats quickly
- 2.3 gallon basin
Temperature Range: Room Temp to 72° C (tolerance +/- 2 degrees) .jpg)
Dimensions:
- Overall size 14″ x 16 1/4” x 19″
- Interior size 9″ diameter x 10″
CERTIFICATION & APPROVALS:
-
- CE certified
- Cord is CSA & UL listed
.JPG)
| ELECTRICAL SPECIFICATIONS | |||
|---|---|---|---|
| Voltage | Amps | Hertz | Wattage |
| 120 | 8.83 | 60 | 1060 |
Click here for Paraffin Dispenser Manual
The manufacturer warrants this instrument to be free from defects in material and workmanship under normal use for one year from the date of purchase. It does not cover damage resulting from abuse or misuse, repairs or alterations performed by other than authorized repair technicians, or damage occurring in transit.
Ideal for use in the fields of cytology, histology, pathology, and biology for paraffin tissue section mounting.
FEATURES OF THE SLIDE WARMER WITH COVER:
- Thermal heater ensures even heat transfer
- Anodized black surface provides contrast
- LED temperature display
- Clear plastic lid allows you to clearly see your specimens and add humidity during your heating
- Thermostat setting range from room temperature to 75° C (+/- 2° C)
DIMENSIONS OF THE XH-2005 (6262) SLIDE WARMER:
- Size 10″ x 7″
- Approx. Capacity – 23 slides
- Weight is 10 lbs.
- Power requirements 100W
DIMENSIONS OF THE XH-2004 (6261) SLIDE WARMER:
- Size 25″ x 8″
- Approx. Capacity – 66 slides
- Weight is 13 lbs.
- Power requirements 200W
CERTIFICATION & APPROVALS:
- CE certified
- Cord is CSA & UL listed
| ELECTRICAL SPECIFICATIONS – #6262 | |||
|---|---|---|---|
| Voltage | Amps | Hertz | Wattage |
| 120 | 0.83 | 60 | 100 |
| ELECTRICAL SPECIFICATIONS – #6261 | |||
|---|---|---|---|
| Voltage | Amps | Hertz | Wattage |
| 120 | 1.7 | 60 | 204 |
![]() Certification
Certification
The manufacturer warrants this instrument to be free from defects in material and workmanship under normal use for one year from the date of purchase. It does not cover damage resulting from abuse or misuse, repairs or alterations performed by other than authorized repair technicians, or damage occurring in transit.