
(use: GMS Stain.)
EASYDIP SLIDE STAINING JAR SPECIFICATIONS:
-
- Made of acetal polymer
- Available in 5 colors
- Use individually or link together as many as you need
- Resistant to most staining agents including alcohol and xylene*
- Dimensions: 2 ½ x 3 x 3 5/8 in. H
- Temperature range: -80°C to +30°C
- Uses just 80 ml reagent for 12 slides
- Jars all have attached hinged lids
- Ideal for special stains, frozen sections and other processes
- Can be used with the EasyDip Slide Staining Rack (Part 5300RK) (sold separately)
*Jars are not resistant to: phenol, iodine, ferric chloride and are not autoclavable. Also not recommended for Gram stain.
EASYDIP SLIDE STAINING RACK SPECIFICATIONS:
-
- Made of acetal polymer
- Holds up to 12 slides vertically
- Slides fit into individual slots for free passage and rapid drainage of staining fluids
- The lid completely covers the EasyDip Slide Staining Jar to minimize spill and evaporation
- The handle is permanently attached to the rack for easy insertion and removal of slides without your fingers touching the solution
- Available in dark gray only
- Temperature range: -80°C to +30°C
- Do not use in microwave
- Dimensions: 2 ¼ x 2 ½ x 3 ¾ in. H
- Can be used with the EasyDip Slide Staining Jar (Part 5300) (sold separately)
Avoid using in picric acid and phenol for prolonged periods of time.
The EasyDip Slide Staining Kit Contains: 5 jars (one of each color) & 1 rack
EASYDIP SLIDE STAINING JARS SPECIFICATIONS:
-
- Made of acetal polymer
- Available in 5 colors
- Use individually or link together as many as you need
- Resistant to most staining agents including alcohol and xylene*
- Dimensions: 2 ½ x 3 x 3 5/8 in. H
- Temperature range: -80°C to +30°C
- Uses just 80 ml reagent for 12 slides
- Jars all have attached hinged lids
- Ideal for special stains, frozen sections and other processes
- Can be used with the EasyDip Slide Staining Rack (Part 5300RK) (sold separately)
*Jars are not resistant to: phenol, iodine, ferric chloride and are not autoclavable. Also not recommended for Gram stain.
EASYDIP SLIDE STAINING RACK SPECIFICATIONS:
-
- Made of acetal polymer
- Holds up to 12 slides vertically
- Slides fit into individual slots for free passage and rapid drainage of staining fluids
- The lid completely covers the EasyDip Slide Staining Jar to minimize spill and evaporation
- The handle is permanently attached to the rack for easy insertion and removal of slides without your fingers touching the solution
- Available in dark gray only
- Temperature range: -80°C to +30°C
- Do not use in microwave
- Dimensions: 2 ¼ x 2 ½ x 3 ¾ in. H
- Can be used with the EasyDip Slide Staining Jar (Part 5300) (sold separately)
Avoid using in picric acid and phenol for prolonged periods of time.
EASYDIP ANODIZED ALUMINUM JAR RACK HOLDER SPECIFICATIONS:
-
- Made of anodized aluminum to resist rust, corrosion and abrasion
- Securely holds up to six Easy Dip Slide Staining Jars
- Helps prevent tipping
- Provides easy mobility of the stationed jars, if needed
- Dimensions: 16 ¾ x 4 x 1 ½ in H
- Temperature range: -80°C to +30°C
- To be used with EasyDip Slide Staining Jars (Part 5300) and EasyDip Slide Staining Racks (Part 5300RK) both sold separately
(use: With Millonig Buffer pH 7.0, #12442 for EM.)
(use: Wolbach & May-Grunwald mod. Giemsa Stain.)
CI 15510
- Shelf Life is 4 years from date of manufacture.
(use: Brown-Hopps modified Gram stain.)
.jpg)
IPC Blue™ Tissue Marking Dyes are a proprietary formula made with Toluidine Blue biopsy marking dye in a 10% neutral buffered formalin.
- Economical – one drop per biopsy.
- Convenient dispenser bottles prevent product from spilling or drying out.
- Continues fixation while grossing.
- Can be added directly to your tissue or on the tissue processor.
BENEFITS OF THE IPC BLUE™ TISSUE MARKING DYES:
- Dark blue color allows better visualization of biopsy during embedding & cutting.
- Do not interfere with any other staining. The IPC Blue™ Dye is totally replaced when the slide is stained. (When Eosin is used as the marking dye, the tissue section will remain stained with Eosin).
- IPC Blue™ Tissue Marking Dyes do not evaporate as quickly as Eosin, because it is formalin based instead of alcohol based.
IPC BLUE™ TISSUE MARKING DYES DIRECTIONS FOR USE:
At the Grossing Station: One to two drops are placed on a biopsy.
On the processor: 1 oz. of IPC Blue™ Tissue Marking Dye is added to the first formalin. (It is important to note that Eosin CANNOT be used on the tissue processor, as this will remove and replace IPC Blue™ Tissue Marking Dye in the specimen).
The recommended application is to add 1 oz. to the first formalin and then rotate it to the second formalin before changing.

PRACTICAL APPLICATION OF FORMIC ACID 96%, ACS:
Formic Acid 96%, ACS can be used in histology/autopsy as a additional step after fixation to reduce CJD infectivity.
TECHNICAL NOTES FOR USING FORMIC ACID 96%, ACS:
Do not reuse open bottle. Use fresh bottle each time
KEY COMPONENT:
>95% FORMIC ACID
RESEARCH:
- Abstract on inactivating virus infectivity in formalin-fixed tissue samples from patients with Creutzfeldt-Jakob disease.
- WHO infection control guidelines for transmissible spongiform encephalopathies.
REFERENCES:
- Brown, P., Wolff, A., Gadusek, D.C. 1990. A simple and effective method for inactivating virus infectivity in formalin-fixed tissue samples from patients with Creutzfeldt-Jakob disease. Neurology 40:887-890.
- CLSI M29-A3 Protection of Laboratory Workers from Occupationally Acquired Infections; Approved Guideline – Third Edition p 47.
![]()
SOLUTION:
| 4 X 1 Gallon | 20 Liter Cube | |
| Lymph Node Grossing Aid | Part 1093A | Part 1093B |
For storage requirements and expiration date refer to individual bottle labels.
APPLICATION:
Newcomer Supply Lymph Node Grossing Aid is a ready-to-use fixative that serves as either a primary or secondary fixative to enhance the visibility and yield of lymph nodes in specimens in which lymph node examination is critical, such as; breast, colon, lung, radical neck dissection, small intestine and omentum.
The combination of formaldehyde, ethanol and acetic acid in the Lymph Node Grossing Aid solution allows for rapid tissue penetration. Following sufficient fixation/immersion lymph nodes will be visibly grayish in color, noticeably standing out from surrounding tissues and readily identifiable.
METHOD:
Fixation:
Larger Biopsies: A minimum of 10-12 hours is recommended.
Small Biopsies: A minimum of 4 to 6 hours is recommended.
Solutions: All solutions are manufactured by Newcomer Supply, Inc.
FIXATION PROCEDURE:
-
- Place fresh tissue in an adequate amount of Lymph Node Grossing Aid solution as soon as possible after surgical excision.
-
- See Procedure Note #1.
-
- Gross tissue specimen in a manner to allow Lymph Node Grossing Aid to adequately penetrate.
-
- Breast tissue: work with entire specimen or remove a smaller area with suspected lymph nodes. Bread loaf tissue to increase surface area and promote efficient fixative penetration.
- Colon tissue: cut open, rinse and pin-out, work with either a segment(s) of colon or entire specimen.
- Other specimens: gross to increase tissue surface area and promote efficient fixative penetration.
-
- Return specimens to Lymph Node Grossing Aid solution and fix for a sufficient amount of time, depending upon size and type of tissue.
- After adequate immersion in Lymph Node Grossing Aid, remove specimen and re-gross.
-
- Remove adipose and palpate for lymph nodes and/or identify nodes by their visibly grayish color.
-
- Hold tissues in either Lymph Node Grossing Aid or Formalin 10%, Phosphate Buffered (Part 1090) until ready to process.
-
- See Procedure Note #2.
-
- Place fresh tissue in an adequate amount of Lymph Node Grossing Aid solution as soon as possible after surgical excision.
PROCEDURE NOTES:
-
- A specimen initially received in Formalin 10%, Phosphate Buffered can remain in fixative until initial grossing occurs, then transferred to Lymph Node Grossing Aid solution as a secondary fixative.
- Extended storage in Lymph Node Grossing Aid is not recommended. After fixation, transfer Lymph Node Grossing Aid wet tissue to Formalin 10%, Phosphate Buffered for long-term storage.
REFERENCES:
-
- Koren, Rumelia, Shlomo Kyzer, Adrian Paz, Vladimir Veltman, Baruch Klein, and Rivka Gal. “Lymph Node Revealing Solution: A New Method for Detection of Minute Axillary Lymph Nodes in Breast Cancer Specimens.” The American Journal of Surgical Pathology11 (1997): 1387-1390.
- Luna, Lee G. Manual of Histologic Staining Methods of the Armed Forces Institute of Pathology. 3rd ed. New York: Blakiston Division, McGraw-Hill, 1968. 4.
- Newell, Ken, Barry Sawka, and Brian Rudrick. “An Inexpensive, Simple and Effective Aid for the Retrieval of Lymph Nodes From Colorectal Cancer Resections.” Archives of Pathology Laboratory Medicine 125 (2001): 642-45.
- Modifications developed by Newcomer Supply Laboratory.
Tissue Microarray (TMA) is a technique enabling tissues from many donor blocks to be arrayed on a single slide. The array mold is specifically designed to be simple, easy to use and inexpensive. Tissues can be analyzed in the same conditions enhancing the efficiency of the research.
The mold kit will allow you to perform TMAs faster while giving excellent results. By using array molds, you can process up to 170 specimens onto one single slide in very little time.
BENEFITS OF THE TISSUE MICROARRAY MOLDS:
- Mold made of silicone
- 45° cut corner on one corner for sample orientation
- View many different samples on the same slide
- Process up to 170 specimens onto one slide
- Easily stored in a drawer
- Can be reused hundreds of times without losing its flexibility
- Withstands temperatures from -100°C to +250°C
.jpg)
INSTRUCTIONS FOR USE:
| 1 | .png) |
Place the mold in an oven for 30 minutes at 70°C to 80°C. |
| 2 | .jpg) |
Slowly dispense liquid paraffin (60°C to 65°C) until the top of core rods are fully submerged. If bubbles are formed, remove them with a pair of heated forceps. |
| 3 | 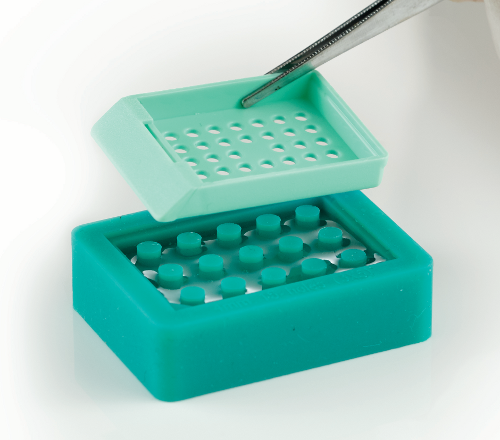 |
Position a cassette on the mold. |
| 4 | 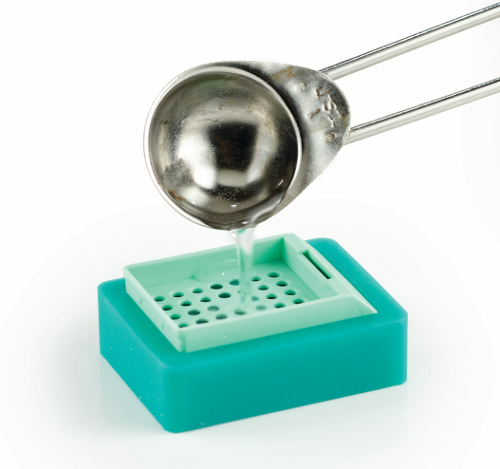 |
Fill embedding cassette with paraffin. |
| 5 |  |
Cool at room temperature or at about 4°C for 30 to 60 minutes. Warning: At lower temperatures, cracks may appear in the block. |
| 6 | 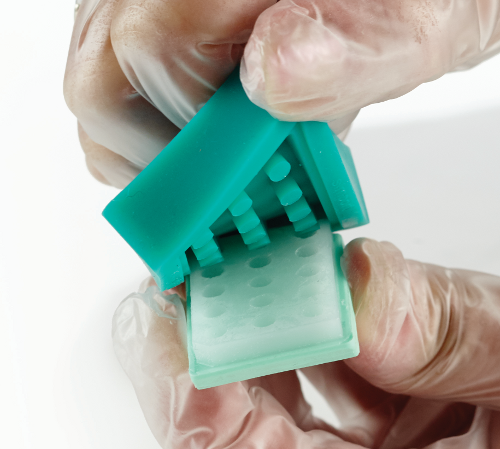 |
Slowly separate the mold from the embedding cassette. |
| 7 | 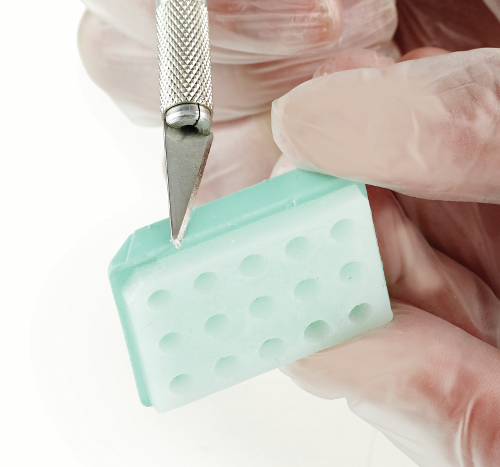 |
Trim paraffin around the edges of the recipient block. |
| 8 |  |
Extract the marked tissue from the donor block by using the appropriate tissue punch.
a. Place the donor block on a horizontal and flat surface. b. Hold the tissue punch in your hand perpendicularly to the marked position of the donor block. c. Slowly insert the tissue punch into the donor block at the proper depth of 5mm. Don’t insert it too quickly and too deep to prevent damaging the donor block and the tissue punch. |
| 9 | 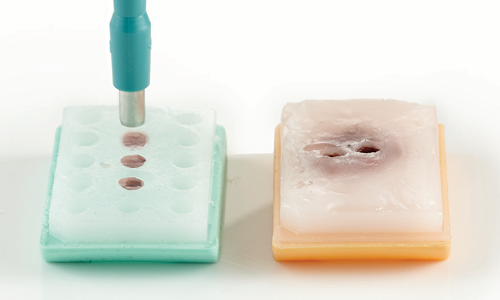 |
By slowly pushing on the tissue punch plunger, deliver the extracted tissue into the corresponding hole of the recipient block. Then, gently push in all the tissue cores to ensure evenness for microtomy. |
| 10 | .jpg) |
Place the recipient block on a glass slide (facing down) and incubate the block at 37°C to 45°C for 3 hours up to overnight. The delivered cores will adhere to their respective holes in the recipient block. Do not pull the slide from the TMA block. |
| 11 | With the recipient block still warm and tacky, heat another slide in an oven to around 70°C for approximately 10 minutes. Then, place it under the slide that is already stuck to the Array block. The Array block surface should quickly turn to liquid. Move the two slides around on the Array block to push any surface air bubbles away and to flatten the Array block surface. | |
| 12 | Now, remove second slide and place Array block with original slide (slide down) on counter for 10 minutes in order to cool down. Once Array block is at room temperature, place it with the slide on an ice tray (no water) to cool for 20 minutes. Slide should remove easily from Array block which will now be ready for cutting. | |
Notes:
- The tissue punches are not intended for use directly on patients. For lab/research purposes only.
- If some of the mold cores are not needed, simply fill unwanted holes in the paraffin Array block with blank paraffin cores.
- If the Array mold has cracked or split, you can still use it by placing a rubber band or tape around it. This will keep the Array mold together when paraffin is poured into it.
- Shelf Life is 2 years from date of manufacture.
- Shelf Life is 2 years from date of manufacture.
Kit includes:
- 10 Specimen Chucks with Colored O-rings & Orientation Mark: 6 – 30mm, 2 – 25mm, 2 – 40mm
- Teasing Needle
- Angular Brush
Features:
- Colored O-rings
- Orientation Mark
- Proper tolerance and soft aluminum
(use: CNS tissue e.g. large animal brains.)
(use: Used in floatation techniques for ova and parasites.)
- Shelf Life is 2 years from date of manufacture.
Features:
- Colored O-rings
- Orientation Mark
- Proper tolerance and soft aluminum
Along with offering formalin vials in multiple sizes, we also sell bulk volumes of 10% buffered formalin in 4 x 1 gallon cases and 20 liter (5 gallon) cubes.
Features:
- Colored O-rings
- Orientation Mark
- Proper tolerance and soft aluminum
Highest quality vials & lids.
Features:
- Colored O-rings
- Orientation Mark
- Proper tolerance and soft aluminum
- Shelf Life is 2 years from date of manufacture.
![]()

TRICHROME, MASSON, FAST GREEN STAIN KIT INCLUDES:
| Part 9180A | ||
| Solution A: | Bouin Fluid | 250 ml |
| Solution B: | Ferric Chloride, Acidified | 125 ml |
| Solution C: | Hematoxylin 1%, Alcoholic | 125 ml |
| Solution D: | Biebrich Scarlet-Acid Fuchsin Stain, Aqueous | 250 ml |
| Solution E: | Phosphotungstic Acid 5%, Aqueous | 250 ml |
| Solution F: | Fast Green Stain 2.5%, Aqueous | 250 ml |
| Solution G: | Acetic Acid 0.5%, Aqueous | 250 ml |
COMPLIMENTARY POSITIVE CONTROL SLIDES: Enclosed are two complimentary unstained positive control slides for the initial verification of staining techniques and reagents. Verification must be documented by running one Newcomer Supply complimentary positive control slide along with your current positive control slide for the first run. Retain the second complimentary control slide for further troubleshooting, if needed.
Individual stain solutions and additional control slides may be available for purchase under separate part numbers.
Additionally Needed:
| Xylene, ACS | Part 1445 |
| Alcohol, Ethyl Denatured, 100% | Part 10841 |
| Alcohol, Ethyl Denatured, 95% | Part 10842 |
| Coplin Jar, Plastic | Part 5184 (for microwave modification) |
For storage requirements and expiration date refer to individual product labels.
APPLICATION:
Newcomer Supply Trichrome, Masson, Fast Green Stain Kit procedure, with included microwave modification, is used to differentially demonstrate connective tissue elements, collagen and muscle fibers.
METHOD:
Fixation: Formalin 10%, Phosphate Buffered (Part 1090)
Technique: Paraffin sections cut at 4 microns
-
-
-
- See Procedure Note #1.
-
-
Solutions: All solutions are manufactured by Newcomer Supply, Inc.
All Newcomer Supply Stain Kits are designed to be used with Coplin jars filled to 40 ml following the staining procedure provided below. Some solutions in the kit may contain extra volumes.
PRESTAINING PREPARATION:
-
- If necessary, heat dry tissue sections/slides in oven.
- Preheat Solution A: Bouin Fluid to 56-60°C in oven or water bath. (Skip if using overnight method or microwave procedure.)
STAINING PROCEDURE:
-
- Deparaffinize sections thoroughly in three changes of xylene, 3 minutes each. Hydrate through two changes each of 100% and 95% ethyl alcohols, 10 dips each. Wash well with distilled water.
-
- See Procedure Notes #2 and #3.
-
- Mordant in preheated Solution A: Bouin Fluid (Step #2) for one hour at 56-60°C or overnight at room temperature. Cool at room temperature for 5-10 minutes.
-
- Skip Step #4 if tissue was originally Bouin fixed.
-
- Deparaffinize sections thoroughly in three changes of xylene, 3 minutes each. Hydrate through two changes each of 100% and 95% ethyl alcohols, 10 dips each. Wash well with distilled water.
Microwave Modification: See Procedure Note #4.
-
-
-
- Place slides in a plastic Coplin jar containing Solution A: Bouin Fluid and microwave for 5 minutes at 60°C. Allow slides to sit an additional 10 minutes in solution.
-
-
-
- Wash well in running tap water; rinse in distilled water.
- Prepare fresh Weigert Iron Hematoxylin; combine and mix well.
-
- Solution B: Ferric Chloride, Acidified 20 ml
- Solution C: Hematoxylin 1%, Alcoholic 20 ml
-
-
- Stain in fresh Weigert Iron Hematoxylin for 10 minutes.
- Wash in running tap water for 10 minutes; rinse in distilled water.
-
- See Procedure Note #5.
-
-
- Place in Solution D: Biebrich Scarlet-Acid Fuchsin Stain, Aqueous for 2 minutes.
- Rinse in distilled water.
- Place in Solution E: Phosphotungstic Acid 5%, Aqueous for 5 minutes.
- Transfer directly to Solution F: Fast Green Stain 2.5%, Aqueous; 5-6 minutes.
- Rinse in distilled water.
- Place in Solution G: Acetic Acid 0.5%, Aqueous; 2 quick dips.
- Dehydrate in two changes each of 95% and 100% ethyl alcohol. Clear in three changes of xylene, 10 dips each; coverslip with compatible mounting medium.
RESULTS:
| Collagen and mucin | Green |
| Muscle fibers, cytoplasm and keratin | Red |
| Nuclei | Blue/black |
PROCEDURE NOTES:
-
- Using ammonium hydroxide to soak/face tissue blocks will alter the pH of tissue sections and diminish trichrome staining.
- Drain slides after each step to prevent solution carry over.
- Do not allow sections to dry out at any point during procedure.
- The suggested microwave procedure has been tested at Newcomer Supply. This procedure is a guideline and techniques should be developed for use in your laboratory.
- If Weigert Iron Hematoxylin is not completely washed from tissue sections, nuclear and cytoplasmic staining will be compromised.
- If using a xylene substitute, closely follow the manufacturer’s recommendations for deparaffinization and clearing steps.
REFERENCES:
-
- Brown, Richard. Histologic Preparations: Common Problems and Their Solutions. Northfield, Ill.: College of American Pathologists, 2009. 95-101.
- Carson, Freida L., and Christa Hladik. Histotechnology: A Self-Instructional Text. 3rd ed. Chicago, Ill.: American Society of Clinical Pathologists, 2009. 162-165.
- Sheehan, Dezna C., and Barbara B. Hrapchak. Theory and Practice of Histotechnology. 2nd ed. St. Louis: Mosby, 1980. 190.
- Vacca, Linda L. Laboratory Manual of Histochemistry. New York: Raven Press, 1985. 308-310.
![]()
TRICHROME, MASSON, ANILINE BLUE STAIN KIT INCLUDES:
| Part 9179A | Part 9179B | ||
| Solution A: | Bouin Fluid | 250 ml | 500 ml |
| Solution B: | Ferric Chloride, Acidified | 125 ml | 250 ml |
| Solution C: | Hematoxylin 1%, Alcoholic | 125 ml | 250 ml |
| Solution D: | Biebrich Scarlet-Acid Fuchsin Stain, Aqueous | 250 ml | 500 ml |
| Solution E: | Phosphomolybdic-Phosphotungstic Acid, Aqueous | 250 ml | 500 ml |
| Solution F: | Aniline Blue Stain, Aqueous | 250 ml | 500 ml |
| Solution G: | Acetic Acid 0.5%, Aqueous | 250 ml | 500 ml |
COMPLIMENTARY POSITIVE CONTROL SLIDES: Enclosed are two complimentary unstained positive control slides for the initial verification of staining techniques and reagents. Verification must be documented by running one Newcomer Supply complimentary positive control slide along with your current positive control slide for the first run. Retain the second complimentary control slide for further troubleshooting, if needed.
Individual stain solutions and additional control slides may be available for purchase under separate part numbers.
Additionally Needed:
| Xylene, ACS | Part 1445 |
| Alcohol, Ethyl Denatured, 100% | Part 10841 |
| Alcohol, Ethyl Denatured, 95% | Part 10842 |
| Coplin Jar, Plastic | Part 5184 (for microwave modification) |
For storage requirements and expiration date refer to individual product labels.
APPLICATION:
Newcomer Supply Trichrome, Masson, Aniline Blue Stain Kit procedure, with included microwave modification, is used to differentially demonstrate connective tissue elements, collagen and muscle fibers.
METHOD:
Fixation: Formalin 10%, Phosphate Buffered (Part 1090)
Technique: Paraffin sections cut at 4 microns
-
- See Procedure Note #1.
Solutions: All solutions are manufactured by Newcomer Supply, Inc.
All Newcomer Supply Stain Kits are designed to be used with Coplin jars filled to 40 ml following the staining procedure provided below. Some solutions in the kit may contain extra volumes.
PRESTAINING PREPARATION:
-
- If necessary, heat dry tissue sections/slides in oven.
- Preheat Solution A: Bouin Fluid to 56-60°C in oven or water bath. (Skip if using overnight method or microwave procedure.)
STAINING PROCEDURE:
-
- Deparaffinize sections thoroughly in three changes of xylene, 3 minutes each. Hydrate through two changes each of 100% and 95% ethyl alcohols, 10 dips each. Wash well with distilled water.
-
- See Procedure Notes #2 and #3.
-
- Mordant in preheated Solution A: Bouin Fluid (Step #2) for one hour at 56-60°C or overnight at room temperature. Cool at room temperature for 5-10 minutes.
-
- Skip Step #4 if tissue was originally Bouin fixed.
-
- Deparaffinize sections thoroughly in three changes of xylene, 3 minutes each. Hydrate through two changes each of 100% and 95% ethyl alcohols, 10 dips each. Wash well with distilled water.
Microwave Modification: See Procedure Note #4.
-
-
-
- Place slides in a plastic Coplin jar containing Solution A: Bouin Fluid and microwave for 5 minutes at 60°C. Allow slides to sit an additional 10 minutes in solution.
-
-
-
- Wash well in running tap water; rinse in distilled water.
- Prepare fresh Weigert Iron Hematoxylin; combine and mix well.
-
- Solution B: Ferric Chloride, Acidified 20 ml
- Solution C: Hematoxylin 1%, Alcoholic 20 ml
-
-
- Stain in fresh Weigert Iron Hematoxylin for 10 minutes.
- Wash in running tap water for 10 minutes; rinse in distilled water.
-
- See Procedure Note #5.
-
-
- Place in Solution D: Biebrich Scarlet-Acid Fuchsin Stain, Aqueous for 2 minutes.
- Rinse in distilled water.
- Place in Solution E: Phosphomolybdic-Phosphotungstic Acid, Aqueous for 10-15 minutes.
- Move directly to Solution F: Aniline Blue Stain, Aqueous; 5 minutes.
- Rinse in distilled water.
- Place in Solution G: Acetic Acid 0.5%, Aqueous for 3-5 minutes.
- Dehydrate in two changes each of 95% and 100% ethyl alcohol. Clear in three changes of xylene, 10 dips each; coverslip with compatible mounting medium.
RESULTS:
| Collagen and mucin | Blue |
| Muscle fibers, cytoplasm and keratin | Red |
| Nuclei | Blue/black |
PROCEDURE NOTES:
-
- Using ammonium hydroxide to soak/face tissue blocks will alter the pH of tissue sections and diminish trichrome staining.
- Drain slides after each step to prevent solution carry over.
- Do not allow sections to dry out at any point during procedure.
- The suggested microwave procedure has been tested at Newcomer Supply. This procedure is a guideline and techniques should be developed for use in your laboratory.
- If Weigert Iron Hematoxylin is not completely washed from tissue sections, nuclear and cytoplasmic staining may be compromised.
- If using a xylene substitute, closely follow the manufacturer’s recommendations for deparaffinization and clearing steps.
REFERENCES:
-
- Brown, Richard. Histologic Preparations: Common Problems and Their Solutions. Northfield, Ill.: College of American Pathologists, 2009. 95-101.
- Carson, Freida L., and Christa Hladik. Histotechnology: A Self-Instructional Text. 3rd ed. Chicago, Ill.: American Society of Clinical Pathologists, 2009. 162-165.
- Sheehan, Dezna C., and Barbara B. Hrapchak. Theory and Practice of Histotechnology. 2nd ed. St. Louis: Mosby, 1980. 190.
- Vacca, Linda L. Laboratory Manual of Histochemistry. New York: Raven Press, 1985. 308-310.
- Modifications developed by Newcomer Supply Laboratory.
(use: Weigert, Lillie & Mallory Iron Hematoxylins: Elastic and Schmorl Melanin stains. Can be diluted to 5% & 2%.)
![]()
TRICHROME, McLETCHIE, ANILINE BLUE STAIN KIT INCLUDES:
| Part 9177A | ||
| Solution A: | Biebrich Scarlet-Acid Fuchsin Stain, Aqueous | 250 ml |
| Solution B: | Iodine, Lugol’s, Aqueous | 250 ml |
| Solution C: | Phosphotungstic Acid 2%, Alcoholic | 250 ml |
| Solution D: | Aniline Blue Stain, Aqueous | 250 ml |
COMPLIMENTARY POSITIVE CONTROL SLIDES: Enclosed are two complimentary unstained positive control slides for the initial verification of staining techniques and reagents. Verification must be documented by running one Newcomer Supply complimentary positive control slide along with your current positive control slide for the first run. Retain the second complimentary control slide for further troubleshooting, if needed.
Individual stain solutions and additional control slides may be available for purchase under separate part numbers.
Additionally Needed:
| Xylene, ACS | Part 1445 |
| Alcohol, Ethyl Denatured, 100% | Part 10841 |
| Alcohol, Ethyl Denatured, 95% | Part 10842 |
For storage requirements and expiration date refer to individual bottle labels.
APPLICATION:
Newcomer Supply Trichrome, McLetchie, Aniline Blue Stain Kit procedure is used for the differential demonstration of collagen and muscle fibers. This modified trichrome protocol provides time efficient results without the use of Bouin Fluid or a hematoxylin nuclear stain.
METHOD:
Fixation: Formalin 10%, Phosphate Buffered (Part 1090)
Technique: Paraffin sections cut at 4 microns
-
-
- See Procedure Note #1.
-
Solutions: All solutions are manufactured by Newcomer Supply, Inc.
All Newcomer Supply Stain Kits are designed to be used with Coplin jars filled to 40 ml following the staining procedure provided below. Some solutions in the kit may contain extra volumes.
STAINING PROCEDURE:
-
- If necessary, heat dry tissue sections/slides in oven.
- Deparaffinize sections thoroughly in three changes of xylene, 3 minutes each. Hydrate through two changes each of 100% and 95% ethyl alcohols, 10 dips each. Wash well with distilled water.
-
- See Procedure Notes #2 and #3.
-
- Place in Solution A: Biebrich Scarlet-Acid Fuchsin Stain, Aqueous for 5 minutes.
- Rinse in several changes of distilled water.
- Place in Solution B: Iodine, Lugol’s, Aqueous; 2 minutes.
- Rinse in several changes of distilled water.
- Differentiate one slide at a time in Solution C: Phosphotungstic Acid 2%, Alcoholic, for 15-30 seconds with gentle agitation.
-
- To avoid over-differentiation, do not exceed 30 seconds.
- If sections are over-differentiated, wash well in distilled water and repeat Steps #3 through #7.
-
- Rinse quickly in several changes of distilled water.
- Place in Solution D: Aniline Blue Stain, Aqueous for 1-3 minutes.
- Rinse in several changes of distilled water.
- Dehydrate in two changes each of 95% and 100% ethyl alcohol. Clear in three changes of xylene, 10 dips each; coverslip with compatible mounting medium.
RESULTS:
| Collagen | Blue |
| Muscle fibers, cytoplasm and keratin | Magenta to red |
| Nuclei | Dark red |
PROCEDURE NOTES:
-
- Using ammonium hydroxide to soak/face tissue blocks will alter the pH of tissue sections and diminish trichrome staining.
- Drain slides after each step to prevent solution carry over.
- Do not allow sections to dry out at any point during procedure.
- If using a xylene substitute, closely follow the manufacturer’s recommendations for deparaffinization and clearing steps.
REFERENCES:
-
- Carson, Freida, Histotechnology: A Self-Instructional Text. 2nd ed. Chicago: ASCP Press, 1997. 134-136.
- McLetchie, Norman G.B. “Trichrome McLetchie Modification”. Laboratory Procedure: Lakes Region General Healthcare, Laconia, NH.
- Modifications developed by Newcomer Supply Laboratory.
![]()
TRICHROME, GOMORI ONE-STEP, ANILINE BLUE STAIN KIT INCLUDES:
| Part 9176B | Part 9176A | ||
| Solution A: | Bouin Fluid | 250 ml | 500 ml |
| Solution B: | Ferric Chloride, Acidified | 125 ml | 250 ml |
| Solution C: | Hematoxylin 1%, Alcoholic | 125 ml | 250 ml |
| Solution D: | Trichrome Stain, Gomori One-Step, Aniline Blue | 250 ml | 500 ml |
| Solution E: | Acetic Acid 0.5%, Aqueous | 250 ml | 500 ml |
COMPLIMENTARY POSITIVE CONTROL SLIDES: Enclosed are two complimentary unstained positive control slides for the initial verification of staining techniques and reagents. Verification must be documented by running one Newcomer Supply complimentary positive control slide along with your current positive control slide for the first run. Retain the second complimentary control slide for further troubleshooting, if needed.
Individual stain solutions and additional control slides may be available for purchase under separate part numbers.
Additionally Needed:
| Xylene, ACS | Part 1445 |
| Alcohol, Ethyl Denatured, 100% | Part 10841 |
| Alcohol, Ethyl Denatured, 95% | Part 10842 |
| Coplin Jar, Plastic | Part 5184 (for microwave modification) |
For storage requirements and expiration date refer to individual product labels.
APPLICATION:
Newcomer Supply Trichrome, Gomori One-Step, Aniline Blue Stain Kit procedure, with included microwave modification, uses a one-step solution combining a plasma stain and a connective tissue stain to differentially demonstrate collagen and muscle fibers.
METHOD:
Fixation: Formalin 10%, Phosphate Buffered (Part 1090)
Technique: Paraffin sections cut at 4 microns
-
-
-
- See Procedure Note #1.
-
-
Solutions: All solutions manufactured by Newcomer Supply, Inc.
All Newcomer Supply Stain Kits are designed to be used with Coplin jars filled to 40 ml following the staining procedure provided below. Some solutions in the kit may contain extra volumes.
PRESTAINING PREPARATION:
-
- If necessary, heat dry tissue sections/slides in oven.
- Preheat Solution A: Bouin Fluid to 56-60°C in oven or water bath. (Skip if using overnight method or microwave procedure.)
STAINING PROCEDURE:
-
- Deparaffinize sections thoroughly in three changes of xylene, 3 minutes each. Hydrate through two changes each of 100% and 95% ethyl alcohols, 10 dips each. Wash well with distilled water.
-
- See Procedure Notes #2 and #3.
-
- Mordant in preheated Solution A: Bouin Fluid (Step #2) for one hour at 56-60°C or overnight at room temperature. Cool at room temperature for 5-10 minutes.
-
- Skip Step #4 if tissue was originally Bouin fixed.
-
- Deparaffinize sections thoroughly in three changes of xylene, 3 minutes each. Hydrate through two changes each of 100% and 95% ethyl alcohols, 10 dips each. Wash well with distilled water.
Microwave Modification: See Procedure Note #4.
-
-
-
- Place slides in a plastic Coplin jar containing Solution A: Bouin Fluid and microwave for 5 minutes at 60°C. Allow slides to sit an additional 10 minutes in solution.
-
-
-
- Wash well in running tap water; rinse in distilled water.
- Prepare fresh Weigert Iron Hematoxylin; combine and mix well.
-
- Solution B: Ferric Chloride, Acidified 20 ml
- Solution C: Hematoxylin 1%, Alcoholic 20 ml
-
-
- Stain in fresh Weigert Iron Hematoxylin for 10 minutes.
- Wash in running tap water for 10 minutes; rinse in distilled water.
-
- See Procedure Note #5.
-
- Stain with Solution D: Trichrome Stain, Gomori One-Step, Aniline Blue for 20 minutes.
- Differentiate in Solution E: Acetic Acid 0.5%, Aqueous; 2 minutes.
- Rinse quickly in distilled water.
- Dehydrate in two changes each of 95% and 100% ethyl alcohol. Clear in three changes of xylene, 10 dips each; coverslip with compatible mounting medium.
RESULTS:
| Collagen and mucin | Blue |
| Muscle fibers, cytoplasm and keratin | Red |
| Nuclei | Blue/black |
PROCEDURE NOTES:
-
- Using ammonium hydroxide to soak/face tissue blocks will alter the pH of tissue sections and diminish trichrome staining.
- Drain slides after each step to prevent solution carry over.
- Do not allow sections to dry out at any point during procedure.
- The suggested microwave procedure has been tested at Newcomer Supply. This procedure is a guideline and techniques should be developed for use in your laboratory.
- If Weigert Iron Hematoxylin is not completely washed from tissue sections, nuclear and cytoplasmic staining may be compromised.
- If using a xylene substitute, closely follow the manufacturer’s recommendations for deparaffinization and clearing steps.
REFERENCES:
-
- Brown, Richard. Histologic Preparations: Common Problems and Their Solutions. Northfield, Ill.: College of American Pathologists, 2009. 95-101.
- Carson, Freida L., and Christa Hladik. Histotechnology: A Self-Instructional Text. 3rd ed. Chicago, Ill.: American Society of Clinical Pathologists, 2009. 165-166.
- Sheehan, Dezna C., and Barbara B. Hrapchak. Theory and Practice of Histotechnology. 2nd ed. St. Louis: Mosby, 1980. 191-192.
- Vacca, Linda L. Laboratory Manual of Histochemistry. New York: Raven Press, 1985. 308-310.
- Modifications developed by Newcomer Supply Laboratory.
(use: Verhoeff Elastic & Hall Bile Stains.)
![]()
TRICHROME, GOMORI ONE-STEP, FAST GREEN STAIN KIT INCLUDES:
| Part 9175A | ||
| Solution A: | Bouin Fluid | 250 ml |
| Solution B: | Ferric Chloride, Acidified | 125 ml |
| Solution C: | Hematoxylin 1%, Alcoholic | 125 ml |
| Solution D: | Trichrome Stain, Gomori One-Step, Fast Green | 250 ml |
| Solution E: | Acetic Acid 0.5%, Aqueous | 250 ml |
COMPLIMENTARY POSITIVE CONTROL SLIDES: Enclosed are two complimentary unstained positive control slides for the initial verification of staining techniques and reagents. Verification must be documented by running one Newcomer Supply complimentary positive control slide along with your current positive control slide for the first run. Retain the second complimentary control slide for further troubleshooting, if needed.
Individual stain solutions and additional control slides may be available for purchase under separate part numbers.
Additionally Needed:
| Xylene, ACS | Part 1445 |
| Alcohol, Ethyl Denatured, 100% | Part 10841 |
| Alcohol, Ethyl Denatured, 95% | Part 10842 |
| Coplin Jar, Plastic | Part 5184 (for microwave modification) |
For storage requirements and expiration date refer to individual product labels.
APPLICATION:
Newcomer Supply Trichrome, Gomori One-Step, Fast Green Stain Kit procedure, with included microwave modification, uses a one-step solution combining a plasma stain and a connective tissue stain to differentially demonstrate collagen and muscle fibers.
METHOD:
Fixation: Formalin 10%, Phosphate Buffered (Part 1090)
Technique: Paraffin sections cut at 4 microns
-
- See Procedure Note #1.
Solutions: All solutions manufactured by Newcomer Supply, Inc.
All Newcomer Supply Stain Kits are designed to be used with Coplin jars filled to 40 ml following the staining procedure provided below. Some solutions in the kit may contain extra volumes.
PRESTAINING PREPARATION:
-
- If necessary, heat dry tissue sections/slides in oven.
- Preheat Solution A: Bouin Fluid to 56-60°C in oven or water bath. (Skip if using overnight method or microwave procedure.)
STAINING PROCEDURE:
-
- Deparaffinize sections thoroughly in three changes of xylene, 3 minutes each. Hydrate through two changes each of 100% and 95% ethyl alcohols, 10 dips each. Wash well with distilled water.
-
- See Procedure Notes #2 and #3.
-
- Mordant in preheated Solution A: Bouin Fluid (Step #2) for one hour at 56-60°C or overnight at room temperature. Cool at room temperature for 5-10 minutes.
-
- Skip Step #4 if tissue was originally Bouin fixed.
-
- Deparaffinize sections thoroughly in three changes of xylene, 3 minutes each. Hydrate through two changes each of 100% and 95% ethyl alcohols, 10 dips each. Wash well with distilled water.
Microwave Modification: See Procedure Note #4.
-
-
-
- Place slides in a plastic Coplin jar containing Solution A: Bouin Fluid and microwave for 5 minutes at 60°C. Allow slides to sit an additional 10 minutes in solution.
-
-
-
- Wash well in running tap water; rinse in distilled water.
- Prepare fresh Weigert Iron Hematoxylin; combine and mix well.
-
- Solution B: Ferric Chloride, Acidified 20 ml
- Solution C: Hematoxylin 1%, Alcoholic 20 ml
-
-
- Stain in fresh Weigert Iron Hematoxylin for 10 minutes.
- Wash in running tap water for 10 minutes; rinse in distilled water.
-
- See Procedure Note #5.
-
- Stain in Solution D: Trichrome Stain, Gomori One-Step, Fast Green for 20 minutes.
- Differentiate in Solution E: Acetic Acid 0.5%, Aqueous; 2 minutes.
- Rinse quickly in distilled water.
- Dehydrate in two changes each of 95% and 100% ethyl alcohol. Clear in three changes of xylene, 10 dips each; coverslip with compatible mounting medium.
RESULTS:
| Collagen and mucin | Green |
| Muscle fibers, cytoplasm and keratin | Red |
| Nuclei | Blue/black |
PROCEDURE NOTES:
-
- Using ammonium hydroxide to soak/face tissue blocks will alter the pH of tissue sections and diminish trichrome staining.
- Drain slides after each step to prevent solution carry over.
- Do not allow sections to dry out at any point during procedure.
- The suggested microwave procedure has been tested at Newcomer Supply. This procedure is a guideline and techniques should be developed for use in your laboratory.
- If Weigert Iron Hematoxylin is not completely washed from tissue sections, nuclear and cytoplasmic staining may be compromised.
- If using a xylene substitute, closely follow the manufacturer’s recommendations for deparaffinization and clearing steps.
REFERENCES:
-
- Brown, Richard. Histologic Preparations: Common Problems and Their Solutions. Northfield, Ill.: College of American Pathologists, 2009. 95-101.
- Carson, Freida L., and Christa Hladik. Histotechnology: A Self-Instructional Text. 3rd ed. Chicago, Ill.: American Society of Clinical Pathologists, 2009. 165-166.
- Sheehan, Dezna C., and Barbara B. Hrapchak. Theory and Practice of Histotechnology. 2nd ed. St. Louis: Mosby, 1980. 191-192.
- Vacca, Linda L. Laboratory Manual of Histochemistry. New York: Raven Press, 1985. 308-310.
- Modifications developed by Newcomer Supply Laboratory.
(use: Schmorl Melanin Stain.)
![]()
JONES BASEMENT MEMBRANE STAIN KIT INCLUDES:
| Part 9167A | ||
| Solution A: | Methenamine 3%, Aqueous | 250 ml |
| Solution B: | Silver Nitrate 5%, Aqueous | 50 ml |
| Solution C: | Sodium Borate 5%, Aqueous | 50 ml |
| Solution D: | Periodic Acid 1%, Aqueous | 250 ml |
| Solution E: | Gold Chloride 0.25%, Aqueous | 250 ml |
| Solution F: | Sodium Thiosulfate 2.5%, Aqueous | 250 ml |
| Solution G: | Light Green SF Yellowish Stain 0.1%, Aqueous | 250 ml |
COMPLIMENTARY POSITIVE CONTROL SLIDES: Enclosed are two complimentary unstained positive control slides for the initial verification of staining techniques and reagents. Verification must be documented by running one Newcomer Supply complimentary positive control slide along with your current positive control slide for the first run. Retain the second complimentary control slide for further troubleshooting, if needed.
Individual stain solutions and additional control slides may be available for purchase under separate part numbers.
Additionally Needed:
| Hydrochloric Acid 5%, Aqueous | Part 12086 (for acid cleaning glassware) |
| Xylene, ACS | Part 1445 |
| Alcohol, Ethyl Denatured, 100% | Part 10841 |
| Alcohol, Ethyl Denatured, 95% | Part 10842 |
| Coplin Jar, Plastic | Part 5184 (for microwave modification) |
For storage requirements and expiration date refer to individual bottle labels.
APPLICATION:
Newcomer Supply Jones Basement Membrane Stain Kit procedure, with included microwave modification, is a silver technique for identification of glomerular and tubular basement membranes in renal tissue. A light green counterstain is used to enhance results.
METHOD:
Fixation: Formalin 10%, Phosphate Buffered (Part 1090)
Technique: Paraffin sections cut at 4 microns
Solutions: All solutions are manufactured by Newcomer Supply, Inc.
All Newcomer Supply Stain Kits are designed to be used with Coplin jars filled to 40 ml following the provided staining procedure. Some solutions in the kit may contain extra volumes.
PRESTAINING PREPARATION:
-
- If necessary, heat dry tissue sections/slides in oven.
- All glassware/plasticware must be acid cleaned prior to use.
-
- See Procedure Notes #1 and #2.
-
- Prepare Silver-Methenamine Working Solution and mix well:
-
- Solution A: Methenamine 3%, Aqueous 40 ml
- Solution B: Silver Nitrate 5%, Aqueous 2 ml
- Solution C: Sodium Borate 5%, Aqueous 4 ml
-
- Preheat Silver-Methenamine Working Solution to 45°-60°C in a water bath 20-30 minutes before use.
-
- Maintain solution between 45°-60°C to minimize precipitate.
- Do not preheat solution if using Microwave Modification.
-
STAINING PROCEDURE:
-
- Deparaffinize sections thoroughly in three changes of xylene, 3 minutes each. Hydrate through two changes each of 100% and 95% ethyl alcohols, 10 dips each. Wash well with distilled water.
-
- See Procedure Notes #3 and #4.
-
- Place in Solution D: Periodic Acid 1%, Aqueous for 15 minutes.
- Wash in tap water for 5 minutes; rinse in distilled water.
- Deparaffinize sections thoroughly in three changes of xylene, 3 minutes each. Hydrate through two changes each of 100% and 95% ethyl alcohols, 10 dips each. Wash well with distilled water.
-
- Incubate slides in preheated Silver-Methenamine Working Solution (Step #4) at 45°-60°C or at room temperature for 12-18 minutes until sections appear paper-bag brown.
- Periodically remove control, rinse in warm distilled water, check microscopically for adequate silver impregnation. Basement membranes should be dark brown. If tissue structures are not sufficiently dark, return slides to warm silver solution. Recheck at 2-3 minute intervals until desired intensity is achieved.
-
- Staining at room temperature will require longer incubation.
-
- Microwave Modification: See Procedure Note #5 .
-
- Place slides in a plastic Coplin jar with prepared Silver-Methenamine Working Solution (Step #3). Microwave at 70°C for 3 minutes.
- Check microscopically for adequate development.
- If additional incubation is required, return slides to heated silver solution and recheck at regular intervals.
-
- Rinse in three changes of distilled water.
- Tone in Solution E: Gold Chloride 0.25%, Aqueous for 1 minute.
- Rinse well in three changes of distilled water.
- Place in Solution F: Sodium Thiosulfate 2.5%, Aqueous; 2 minutes.
- Wash in tap water for 5 minutes; rinse in distilled water.
- Counterstain in Solution G: Light Green SF Yellowish Stain 0.1%, Aqueous for 1 minute.
- Quickly rinse slides in two changes of distilled water.
- Dehydrate in two changes each of 95% and 100% ethyl alcohol. Clear in three changes of xylene, 10 dips each; coverslip with compatible mounting medium.
RESULTS:
| Kidney glomerular basement membranes | Black |
| Intra-glomerular deposits | Black |
| Reticular fibers | Black |
| Nuclei | Outlined in black |
| Cytoplasm | Light green |
PROCEDURE NOTES:
-
- Acid clean all glassware/plasticware (Part 12086) and rinse thoroughly in several changes of distilled water.
- Plastic (Part 5500), plastic-tipped or paraffin coated metal forceps must be used with silver solutions to prevent precipitation of silver salts. No metals of any kind should come in contact with silver solutions. Only glass thermometers should be used.
- Drain slides after each step to prevent solution carry over.
- Do not allow sections to dry out at any point during procedure.
- The suggested microwave procedure has been tested at Newcomer Supply. This procedure is a guideline and techniques should be developed for use in your laboratory.
- If using a xylene substitute, closely follow the manufacturer’s recommendations for deparaffinization and clearing steps.
REFERENCES:
-
- Jones, David B. “Nephrotic Glomerulonephritis,” American Journal of Pathology2 (1957): 313–329.
- Luna, Lee G. Manual of Histologic Staining Methods of the Armed Forces Institute of Pathology. 3rd ed. New York: Blakiston Division, McGraw-Hill, 1968. 97-99.
- Sheehan, Dezna C., and Barbara B. Hrapchak. Theory and Practice of Histotechnology. 2nd ed. St. Louis: Mosby, 1980. 187-188.
- Modifications developed by Newcomer Supply Laboratory.
(use: Working solution for VVG Elastic Stain.)
![]()
SOLUTION:
| 250 ml | 500 ml | |
| Fast Green Stain 2.5%, Aqueous | Part 10852A | Part 10852B |
Additionally Needed:
| Trichrome, Liver Control Slides OR Trichrome, Multi-Tissue Control Slides |
Part 4690 OR Part 4693 |
| Xylene, ACS | Part 1445 |
| Alcohol, Ethyl Denatured, 100% | Part 10841 |
| Alcohol, Ethyl Denatured, 95% | Part 10842 |
| Bouin Fluid | Part 1020 |
| Hematoxylin Stain Set, Weigert Iron | Part 1409 |
| Biebrich Scarlet-Acid Fuchsin Stain, Aqueous | Part 10161 |
| Phosphotungstic Acid 5%, Aqueous | Part 13345 |
| Acetic Acid 0.5%, Aqueous | Part 100121 |
| Coplin Jar, Plastic | Part 5184 (for microwave modification) |
For storage requirements and expiration date refer to individual product labels.
APPLICATION:
Newcomer Supply Trichrome Stain, Masson, Fast Green procedure, with included microwave modification, is used to differentially demonstrate connective tissue elements, collagen and muscle fibers.
METHOD:
Fixation: Formalin 10%, Phosphate Buffered (Part 1090)
Technique: Paraffin sections cut at 4 microns
-
- See Procedure Note #1.
Solutions: All solutions are manufactured by Newcomer Supply, Inc.
All Newcomer Supply stain procedures are designed to be used with Coplin jars filled to 40 ml following the staining procedure.
PRESTAINING PREPARATION:
-
- If necessary, heat dry tissue sections/slides in oven.
- Preheat Bouin Fluid (Part 1020) to 56-60°C in oven or water bath. (Skip if using overnight method or microwave procedure.)
STAINING PROCEDURE:
-
- Deparaffinize sections thoroughly in three changes of xylene, 3 minutes each. Hydrate through two changes each of 100% and 95% ethyl alcohols, 10 dips each. Wash well with distilled water.
-
- See Procedure Notes #2 and #3.
-
- Mordant in preheated Bouin Fluid (Step #2) for one hour at 56-60°C or overnight at room temperature. Cool at room temperature for 5-10 minutes.
-
- Skip Step #4 if tissue was originally Bouin fixed.
-
- Deparaffinize sections thoroughly in three changes of xylene, 3 minutes each. Hydrate through two changes each of 100% and 95% ethyl alcohols, 10 dips each. Wash well with distilled water.
Microwave Modification: See Procedure Note #4.
-
-
-
- Place slides in a plastic Coplin jar containing Bouin Fluid and microwave for 5 minutes at 60° Allow slides to sit an additional 10 minutes in solution.
-
-
-
- Wash well in running tap water; rinse in distilled water.
- Prepare fresh Weigert Iron Hematoxylin (Part 1409); combine and mix well.
-
- Solution A: Ferric Chloride, Acidified 20 ml
- Solution B: Hematoxylin 1%, Alcoholic 20 ml
-
- Stain slides in fresh Weigert Iron Hematoxylin for 10 minutes.
- Wash in running tap water for 10 minutes; rinse in distilled water.
-
- See Procedure Note #5.
-
- Place slides in Biebrich Scarlet-Acid Fuchsin Stain, Aqueous (Part 10161) for 2 minutes.
- Rinse in distilled water.
- Place slides in Phosphotungstic Acid 5%, Aqueous (Part 13345) for 5 minutes.
- Transfer slides directly into Fast Green Stain 2.5%, Aqueous for 5-6 minutes, depending on stain intensity preference.
- Rinse in distilled water.
- Place slides in Acetic Acid 0.5%, Aqueous (Part 100121) for 2 quick dips.
- Dehydrate in two changes each of 95% and 100% ethyl alcohol. Clear in three changes of xylene, 10 dips each; coverslip with compatible mounting medium.
RESULTS:
| Collagen and mucin | Green |
| Muscle fibers, cytoplasm and keratin | Red |
| Nuclei | Blue/black |
PROCEDURE NOTES:
-
- Using ammonium hydroxide to soak/face tissue blocks will alter the pH of tissue sections and diminish trichrome staining.
- Drain slides after each step to prevent solution carry over.
- Do not allow sections to dry out at any point during procedure.
- The suggested microwave procedure has been tested at Newcomer Supply. This procedure is a guideline and techniques should be developed for your laboratory.
- If Weigert Iron Hematoxylin is not completely washed from tissue sections, nuclear and cytoplasmic staining will be compromised.
- If using a xylene substitute, closely follow the manufacturer’s recommendations for deparaffinization and clearing steps.
REFERENCES:
-
- Brown, Richard. Histologic Preparations: Common Problems and Their Solutions. Northfield, Ill.: College of American Pathologists, 2009. 95-101.
- Carson, Freida L., and Christa Hladik. Histotechnology: A Self-Instructional Text. 3rd ed. Chicago, Ill.: American Society of Clinical Pathologists, 2009. 162-165.
- Sheehan, Dezna C., and Barbara B. Hrapchak. Theory and Practice of Histotechnology. 2nd ed. St. Louis: Mosby, 1980. 191-192.
- Vacca, Linda L. Laboratory Manual of Histochemistry. New York: Raven Press, 1985. 308-310.
- Modifications developed by Newcomer Supply Laboratory.
(FYI: Higher % Isopropyl Alcohol & contains ketone.)
See also Alcohol Denatured ACS.
![]()
MUCIN, MAYER MUCICARMINE STAIN KIT INCLUDES:
| Part 9151A | Part 9151B | ||
| Solution A: | Ferric Chloride, Acidified | 125 ml | 250 ml |
| Solution B: | Hematoxylin 1%, Alcoholic | 125 ml | 250 ml |
| Solution C: | Mucicarmine Stock Stain, Mayer | 125 ml | 125 ml |
| Solution D: | Metanil Yellow Stain, Aqueous | 250 ml | 500 ml |
COMPLIMENTARY POSITIVE CONTROL SLIDES: Enclosed are two complimentary unstained positive control slides for the initial verification of staining techniques and reagents. Verification must be documented by running one Newcomer Supply complimentary positive control slide along with your current positive control slide for the first run. Retain the second complimentary control slide for further troubleshooting, if needed.
Individual stain solutions and additional control slides may be available for purchase under separate part numbers.
Additionally Needed:
| Xylene, ACS | Part 1445 |
| Alcohol, Ethyl Denatured, 100% | Part 10841 |
| Alcohol, Ethyl Denatured, 95% | Part 10842 |
| Coplin Jar, Plastic | Part 5184 (for microwave modification) |
For storage requirements and expiration date refer to individual bottle labels.
APPLICATION:
Newcomer Supply Mucin, Mayer Mucicarmine Stain Kit procedure, with included microwave modification, is used to stain acid epithelial mucin (sialomucin, sulfomucin) and is also useful for the demonstration of the encapsulated yeast Cryptococcus neoformans.
METHOD:
Fixation: Formalin 10%, Phosphate Buffered (Part 1090)
Technique: Paraffin sections cut at 4 microns
Solutions: All solutions are manufactured by Newcomer Supply, Inc.
All Newcomer Supply Stain Kits are designed to be used with Coplin jars filled to 40 ml following the staining procedure provided below. Some solutions in the kit may contain extra volumes.
STAINING PROCEDURE:
-
- If necessary, heat dry tissue sections/slides in oven.
- Deparaffinize sections thoroughly in three changes of xylene, 3 minutes each. Hydrate through two changes each of 100% and 95% ethyl alcohols, 10 dips each. Wash well with distilled water.
-
- See Procedure Notes #1 and #2.
-
- Prepare fresh Weigert Iron Hematoxylin Working Solution directly before use; combine and mix well.
-
- Solution A: Ferric Chloride, Acidified 20 ml
- Solution B: Hematoxylin 1%, Alcoholic 20 ml
-
- Stain in fresh Weigert Iron Hematoxylin Working Solution for 7 minutes.
- Rinse in running tap water for 10 minutes.
- Prepare fresh Mayer Mucicarmine Working Solution; combine and mix well.
-
- Solution C: Mucicarmine Stock Stain, Mayer 10 ml
- Tap Water (do not use distilled water) 30 ml
-
- Stain slides in fresh Mayer Mucicarmine Working Solution for 60 minutes or longer if a more intense stain is desired.
Microwave Modification: See Procedure Note #3.
-
-
-
- Place slides in a plastic Coplin jar containing fresh Mayer Mucicarmine Working Solution and microwave at 70°C for 10 minutes.
-
-
-
- Rinse in several changes of tap water.
- Counterstain in Solution D: Metanil Yellow Stain, Aqueous for 30 seconds to 1 minute.
- Dehydrate quickly through 95% and 100% ethyl alcohols. Clear in three changes of xylene, 10 dips each; coverslip with compatible mounting medium.
RESULTS:
| Acid epithelial mucin | Deep rose to red |
| Capsule of Cryptococcus neoformans | Deep rose to red |
| Nuclei | Black |
| Other tissue elements | Yellow |
PROCEDURE NOTES:
-
- Drain slides after each step to prevent solution carry over.
- Do not allow sections to dry out at any point during procedure.
- The suggested microwave procedure has been tested at Newcomer Supply. This procedure is a guideline and techniques should be developed for use in your laboratory.
- If using a xylene substitute, closely follow the manufacturer’s recommendations for deparaffinization and clearing steps.
REFERENCES:
-
- Bancroft, John D., and Marilyn Gamble. Theory and Practice of Histological Techniques. 6th ed. Oxford: Churchill Livingstone Elsevier, 2008. 174-175.
- Carson, Freida L., and Christa Hladik. Histotechnology: A Self-Instructional Text. 3rd ed. Chicago, Ill.: American Society of Clinical Pathologists, 2009. 142-144.
- Sheehan, Dezna C., and Barbara B. Hrapchak. Theory and Practice of Histotechnology. 2nd ed. St. Louis: Mosby, 1980. 168-169.
- Modifications developed by Newcomer Supply Laboratory.
![]()
MOVAT-RUSSELL MODIFIED PENTACHROME STAIN KIT INCLUDES:
| Part 9150A | ||
| Solution A: | Alcian Blue Stain 1%, Aqueous | 250 ml |
| Solution B: | Ammonium Hydroxide 28-30%, ACS | 50 ml |
| Solution C: | Hematoxylin 10%, Alcoholic | 100 ml |
| Solution D: | Ferric Chloride 10%, Aqueous | 100 ml |
| Solution E: | Iodine, Verhoeff, Aqueous | 100 ml |
| Solution F: | Ferric Chloride 2%, Aqueous | 250 ml |
| Solution G: | Sodium Thiosulfate 5%, Aqueous | 250 ml |
| Solution H: | Crocein Scarlet 7B Stain, Aqueous | 250 ml |
| Solution I: | Acid Fuchsin Stain, Aqueous | 100 ml |
| Solution J: | Phosphotungstic Acid 5%, Aqueous | 500 ml |
| Solution K: | Orange G Stain 1%, Aqueous | 250 ml |
| Solution L: | Acetic Acid 0.5%, Aqueous | 500 ml |
COMPLIMENTARY POSITIVE CONTROL SLIDES: Enclosed are two complimentary unstained positive control slides for the initial verification of staining techniques and reagents. Verification must be documented by running one Newcomer Supply complimentary positive control slide along with your current positive control slide for the first run. Retain the second complimentary control slide for further troubleshooting, if needed.
Individual stain solutions and additional control slides may be available for purchase under separate part numbers.
Additionally Needed:
| Xylene, ACS | Part 1445 |
| Alcohol, Ethyl Denatured, 100% | Part 10841 |
| Alcohol, Ethyl Denatured, 95% | Part 10842 |
For storage requirements and expiration date refer to individual bottle labels.
APPLICATION:
Newcomer Supply Movat-Russell Modified Pentachrome Stain Kit provides a single staining procedure that demonstrates five connective tissue elements; mucin, fibrin, elastic fibers, muscle, and collagen.
METHOD:
Fixation: Formalin 10%, Phosphate Buffered (Part 1090)
Technique: Paraffin sections cut at 4 microns
Solutions: All solutions are manufactured by Newcomer Supply, Inc.
All Newcomer Supply Stain Kits are designed to be used with Coplin jars filled to 40 ml following the staining procedure provided below. Some solutions in the kit may contain extra volumes.
STAINING PROCEDURE:
-
- If necessary, heat dry tissue sections/slides in oven.
- Deparaffinize sections thoroughly in three changes of xylene, 3 minutes each. Hydrate through two changes each of 100% and 95% ethyl alcohols, 10 dips each. Wash well with distilled water.
-
- See Procedure Notes #1 and #2.
-
- Stain in Solution A: Alcian Blue Stain 1%, Aqueous for 20 minutes.
- Wash in running tap water for 5 minutes.
- Prepare fresh Alkaline Alcohol Solution; combine and mix well.
-
- Solution B: Ammonium Hydroxide 28-30%, ACS 5 ml
- Alcohol, Ethyl Denatured, 95% (Part 10842) 45 ml
-
- Place slides in fresh Alkaline Alcohol Solution for 30 minutes.
- Wash in running tap water for 10 minutes; rinse in distilled water.
-
- See Procedure Note #3.
-
- Prepare fresh Hematoxylin Working Stain Solution just before use in the order given; combine and mix well.
-
- Solution C: Hematoxylin 10%, Alcoholic 10 ml
- Alcohol, Ethyl Denatured, 100% (Part 10841) 10 ml
- Solution D: Ferric Chloride 10%, Aqueous 10 ml
- Solution E: Iodine, Verhoeff, Aqueous 10 ml
-
- Stain in fresh Hematoxylin Working Stain Solution for 15 minutes.
-
- Discard after successful differentiation in Step #11.
-
- Rinse in several changes of distilled water.
- Differentiate one slide at a time in Solution F: Ferric Chloride 2%, Aqueous until elastic fibers contrast sharply with background; approximately 5-10 dips.
-
- See Procedure Note #4.
-
- Rinse in distilled water.
- Place in Solution G: Sodium Thiosulfate 5%, Aqueous for 1 minute.
- Wash in running tap water for 5 minutes; rinse in distilled water.
- Prepare Crocein Scarlet-Acid Fuchsin Solution:
-
- Solution H: Crocein Scarlet 7B Stain, Aqueous 40 ml
- Solution I: Acid Fuchsin Stain, Aqueous 10 ml
-
- Stain in Crocein Scarlet-Acid Fuchsin Solution for 1 minute.
- Rinse in several changes of distilled water.
- Rinse in Solution L: Acetic Acid 0.5%, Aqueous for 30 seconds.
- Place slides in Solution J: Phosphotungstic Acid 5%, Aqueous; two changes of 5 minutes each.
- Rinse in Solution L: Acetic Acid 0.5%, Aqueous.
- Stain in Solution K: Orange G Stain 1%, Aqueous for 15 minutes.
- Dehydrate through three changes of 100% ethyl alcohol, 10 dips each. Clear in three changes of xylene, 10 dips each; coverslip with compatible mounting medium.
-
- Do not use 95% ethyl alcohol in the dehydration step.
-
RESULTS:
| Nuclei and elastic fibers | Black |
| Collagen and reticular fibers | Yellow |
| Ground substance and mucin | Blue |
| Fibrinoid, fibrin | Intense red |
| Muscle | Red |
PROCEDURE NOTES:
-
- Drain slides after each step to prevent solution carry over.
- Do not allow sections to dry out at any point during procedure.
- Completely remove Alkaline Alcohol Solution with running tap water. Failure to do so will inhibit the subsequent staining steps.
- Do not over-differentiate in Solution F. If background is colorless, the section may be over-differentiated. Over-differentiated sections can be restained in Hematoxylin Working Stain Solution (Step #9) if sections have not been treated with an alcohol/dehydration step.
- If using a xylene substitute, closely follow the manufacturer’s recommendations for deparaffinization and clearing steps.
REFERENCES:
-
- Carson, Freida L., and Christa Hladik. Histotechnology: A Self-Instructional Text. 3rd ed. Chicago, Ill.: American Society of Clinical Pathologists, 2009. 172-174.
- Movat, Henry, “Demonstration of All Connective Tissue Elements in a Single Section”. AMA Archives of Pathology. 1955; 60 (3): 289–295.
- Russell H. K. Jr. “A Modification of Movat’s Pentachrome Stain”. AMA Archives of Pathology.1972; 94 (2): 187–191.
- Modifications developed by Newcomer Supply Laboratory.
(FYI: Higher % Isopropyl Alcohol & contains ketone.)
See also Alcohol Denatured ACS.
![]()
IRON, GOMORI PRUSSIAN BLUE STAIN KIT INCLUDES:
| Part 9136A | Part 9136B | ||
| Solution A: | Hydrochloric Acid 20%, Aqueous | 125 ml | 250 ml |
| Solution B: | Potassium Ferrocyanide 10%, Aqueous | 125 ml | 250 ml |
| Solution C: | Nuclear Fast Red Stain, Kernechtrot | 250 ml | 500 ml |
COMPLIMENTARY POSITIVE CONTROL SLIDES: Enclosed are two complimentary unstained positive control slides for the initial verification of staining techniques and reagents. Verification must be documented by running one Newcomer Supply complimentary positive control slide along with your current positive control slide for the first run. Retain the second complimentary control slide for further troubleshooting, if needed.
Individual stain solutions and additional control slides may be available for purchase under separate part numbers.
Additionally Needed:
| Hydrochloric Acid 5%, Aqueous | Part 12086 (for acid cleaning glassware) |
| Xylene, ACS | Part 1445 |
| Alcohol, Ethyl Denatured, 100% | Part 10841 |
| Alcohol, Ethyl Denatured, 95% | Part 10842 |
For storage requirements and expiration date refer to individual bottle labels.
APPLICATION:
Newcomer Supply Iron, Gomori Prussian Blue Stain Kit procedure is used to detect loosely bound ferric iron in tissue sections. This histochemical reaction is sensitive enough to demonstrate minute amounts of iron deposits in blood cells, bone marrow and spleen.
METHOD:
Fixation: Formalin 10%, Phosphate Buffered (Part 1090)
Technique: Paraffin sections cut at 4 microns
Solutions: All solutions are manufactured by Newcomer Supply, Inc.
All Newcomer Supply Stain Kits are designed to be used with Coplin jars filled to 40 ml following the staining procedure provided below. Some solutions in the kit may contain extra volumes.
PRESTAINING PREPARATION:
-
- If necessary, heat dry tissue sections/slides in oven.
- Acid clean glassware prior to use to avoid residual iron staining.
-
- See Procedure Note #1.
-
STAINING PROCEDURE:
-
- Deparaffinize sections thoroughly in three changes of xylene, 3 minutes each. Hydrate through two changes each of 100% and 95% ethyl alcohols, 10 dips each. Wash well with distilled water.
-
- See Procedure Notes #2 and #3.
-
- Prepare fresh Ferrocyanide Working Solution directly before use; combine and mix well.
-
- Solution A: Hydrochloric Acid 20%, Aqueous 20 ml
- Solution B: Potassium Ferrocyanide 10%, Aqueous 20 ml
-
- Place in fresh Ferrocyanide Working Solution for 20 minutes.
- Rinse in three changes of tap water; rinse in distilled water.
- Place in Solution C: Nuclear Fast Red Stain, Kernechtrot for 5 minutes.
-
- Shake solution well before use; do not filter.
-
- Rinse well in distilled water.
-
- See Procedure Note #4.
-
- Dehydrate in two changes each of 95% and 100% ethyl alcohol. Clear in three changes of xylene, 10 dips each; coverslip with compatible mounting medium.
- Deparaffinize sections thoroughly in three changes of xylene, 3 minutes each. Hydrate through two changes each of 100% and 95% ethyl alcohols, 10 dips each. Wash well with distilled water.
RESULTS:
| Ferric iron deposits | Bright blue |
| Nuclei | Red |
| Cytoplasm | Pink |
PROCEDURE NOTES:
-
- Acid clean all glassware/plasticware (Part 12086) and rinse thoroughly in several changes of distilled water.
- Drain slides after each step to prevent solution carry over.
- Do not allow sections to dry out at any point during procedure.
- Wash well after Nuclear Fast Red Stain, Kernechtrot to avoid cloudiness in dehydration steps.
- If using a xylene substitute, closely follow the manufacturer’s recommendations for deparaffinization and clearing steps
REFERENCES:
-
- Luna, Lee G. Manual of Histologic Staining Methods of the Armed Forces Institute of Pathology. 3rd ed. New York: Blakiston Division, McGraw-Hill, 1968. 179-184.
- Sheehan, Dezna C., and Barbara B. Hrapchak. Theory and Practice of Histotechnology. 2nd ed. St. Louis: Mosby, 1980. 217-218.
- Modifications developed by Newcomer Supply Laboratory.
(FYI: Higher % Isopropyl Alcohol & contains ketone.)
See also Alcohol Denatured ACS.
![]()
FUNGUS, PAS/LIGHT GREEN STAIN KIT INCLUDES:
| Part 9122A | ||
| Solution A: | Periodic Acid 0.5%, Aqueous | 250 ml |
| Solution B: | Schiff Reagent, McManus | 250 ml |
| Solution C: | Light Green SF Yellowish Stain 0.1%, Aqueous | 250 ml |
COMPLIMENTARY POSITIVE CONTROL SLIDES: Enclosed are two complimentary unstained positive control slides for the initial verification of staining techniques and reagents. Verification must be documented by running one Newcomer Supply complimentary positive control slide along with your current positive control slide for the first run. Retain the second complimentary control slide for further troubleshooting, if needed.
Individual stain solutions and additional control slides may be available for purchase under separate part numbers.
Additionally Needed:
| Xylene, ACS | Part 1445 |
| Alcohol, Ethyl Denatured, 100% | Part 10841 |
| Alcohol, Ethyl Denatured, 95% | Part 10842 |
For storage requirements and expiration date refer to individual bottle labels.
APPLICATION:
Newcomer Supply Fungus, PAS/Light Green Stain Kit procedure is used for identifying fungus and glycoproteins in tissue sections. Polysaccharides present in fungal cell walls are oxidized by periodic acid to aldehydes; aldehydes then react with Schiff Reagent, McManus to yield magenta colored fungi.
METHOD:
Fixation: Formalin 10%, Phosphate Buffered (Part 1090)
Technique: Paraffin sections cut at 4 microns
Solutions: All solutions are manufactured by Newcomer Supply, Inc.
All Newcomer Supply Stain Kits are designed to be used with Coplin jars filled to 40 ml following the staining procedure provided below. Some solutions in the kit may contain extra volumes.
STAINING PROCEDURE:
-
- If necessary, heat dry tissue sections/slides in oven.
- Deparaffinize sections thoroughly in three changes of xylene, 3 minutes each. Hydrate through two changes each of 100% and 95% ethyl alcohols, 10 dips each. Wash well with distilled water.
-
- See Procedure Notes #1 and #2.
-
- Place in Solution A: Periodic Acid 0.5%, Aqueous for 5 minutes.
- Wash in three changes of tap water; rinse in distilled water.
- Drain slides of excess water and stain in Solution B: Schiff Reagent, McManus for 20 minutes.
- Wash gently in lukewarm tap water for 10 minutes to allow pink color to develop.
- Counterstain in Solution C: Light Green SF Yellowish Stain 0.1%, Aqueous for 5 seconds.
-
- See Procedure Note #3.
-
- Dehydrate in two changes each of 95% and 100% ethyl alcohol. Clear in three changes of xylene, 10 dips each; coverslip with compatible mounting medium.
RESULTS:
| Fungal cell walls and glycogen | Red to magenta |
| Background | Pale green |
PROCEDURE NOTES:
-
- Drain slides after each step to prevent solution carry over.
- Do not allow sections to dry out at any point during procedure.
- Increase or decrease staining time in Solution C: Light Green SF Yellowish Stain 0.1%, Aqueous for preference of counterstain intensity.
- If using a xylene substitute, closely follow the manufacturer’s recommendations for deparaffinization and clearing steps.
REFERENCES:
-
- Bancroft, John D., and Marilyn Gamble. Theory and Practice of Histological Techniques. 6th ed. Oxford: Churchill Livingstone Elsevier, 2008. 321-323.
- Sheehan, Dezna C., and Barbara B. Hrapchak. Theory and Practice of Histotechnology. 2nd ed. St. Louis: Mosby, 1980. 245.
- Modifications developed by Newcomer Supply Laboratory.
![]()
SET INCLUDES:
| Part 1082A | ||
| Solution A: | Eosin Y Stock Stain 1%, Aqueous | 1000 ml |
| Solution B: | Phloxine B Stock Stain 1%, Aqueous | 100 ml |
Additionally Needed For Eosin-Phloxine Stain Set:
| Alcohol, Ethyl Denatured, 95% | Part 10842 |
| Acetic Acid, Glacial, ACS | Part 10010 |
Additionally Needed For H&E Staining:
| Hematoxylin and Eosin (H&E) Control Slides | Part 4278 |
| Xylene, ACS | Part 1445 |
| Alcohol, Ethyl Denatured, 100% | Part 10841 |
| Alcohol, Ethyl Denatured, 95% | Part 10842 |
| Hematoxylin Stain, Harris Modified OR Hematoxylin Stain, Harris |
Part 1201 OR Part 12013 |
| Acid Alcohol 1% | Part 10011 |
| Lithium Carbonate, Saturated Aqueous OR Scott Tap Water Substitute |
Part 12215 OR Part 1380 |
| Alcohol, Ethyl Denatured, 70% | Part 10844 |
For storage requirements and expiration date refer to individual product labels.
APPLICATION:
Newcomer Supply Eosin-Phloxine Stain Set solutions are aqueous based, provide a finer touch to hematoxylin and eosin stains and can be used in either manual or automated staining platforms. Differentiation of muscle, connective tissue and epithelial elements tend to be sharper and better demonstrated than with the traditional eosin y solution alone.
Hematoxylin and eosin (H&E) staining is used for screening specimens in anatomic pathology, for research, smears, touch preps and other applications. Its two primary coloring agents stain all cellular material: nuclei (blue), and cytoplasmic elements (pink-red). Popularity of this stain is due to its simplicity, ability to clearly demonstrate a variety of tissue components, dependability, repeatability, and speed of use.
Quality Control: Since hematoxylin and eosin staining is the foundation of the diagnostic process, maintaining quality is of critical importance. Procedures will vary between laboratories depending upon volume of slides, automation vs manual staining, chemical hygiene and solution integrity. The longevity of eosin depends upon these factors and stain quality should be regularly screened with an H&E control slide.
METHOD:
Fixation: Formalin 10%, Phosphate Buffered (Part 1090)
Technique: Paraffin sections cut at 4 microns
Solutions: All solutions are manufactured by Newcomer Supply, Inc.
Standard Working Solution:
| Solution A: Eosin Y Stock Stain 1%, Aqueous | 100 ml |
| Solution B: Phloxine B Stock Stain 1%, Aqueous | 10 ml |
| Alcohol, Ethyl Denatured, 95% | 780 ml |
| Acetic Acid, Glacial, ACS | 4 ml |
Combine all solutions and mix well. Store at room temperature for up to one year.
H&E STAINING PROCEDURE WITH EOSIN-PHLOXINE:
-
- Deparaffinize sections thoroughly in three changes of xylene, 3 minutes each. Hydrate through two changes each of 100% and 95% ethyl alcohols, 10 dips each. Wash well with distilled water.
-
- See Procedure Notes #1 and #2.
-
- Stain with Hematoxylin Stain, Harris Modified (Part 1201) or Hematoxylin Stain, Harris (Part 12013) 1-5 minutes, depending on preference of nuclear stain intensity.
- Wash well in three changes of tap water.
- Differentiate quickly in Acid Alcohol 1%.
-
- Nuclei should be distinct and background very light to colorless.
-
- Rinse well in three changes of tap water.
- Blue slides in Lithium Carbonate, Saturated Aqueous (Part 12215) or Scott Tap Water Substitute (Part 1380) for 10 dips.
- Wash in three changes of tap water; rinse in distilled water.
- Drain excess water; proceed to 70% ethyl alcohol for 10 dips.
- Counterstain in Eosin-Phloxine Standard Working Solution for 30 seconds to 3 minutes, depending on preference of intensity.
- Dehydrate in two changes of 95% ethyl alcohol for 1 minute each and two changes of 100% ethyl alcohol, 10 dips each. Clear in three changes of xylene, 10 dips each; coverslip with compatible mounting medium.
- Deparaffinize sections thoroughly in three changes of xylene, 3 minutes each. Hydrate through two changes each of 100% and 95% ethyl alcohols, 10 dips each. Wash well with distilled water.
RESULTS:
| Nuclei | Blue |
| Erythrocytes and eosinophilic granules | Bright pink to red |
| Cytoplasm and other tissue elements | Various shades of pink |
PROCEDURE NOTES:
-
- Drain slides after each step to prevent solution carry over.
- Do not allow sections to dry out at any point during procedure.
- If using a xylene substitute, closely follow the manufacturer’s recommendations for deparaffinization and clearing steps.
REFERENCES:
-
- Bancroft, John D., and Marilyn Gamble. Theory and Practice of Histological Techniques. 6th ed. Oxford: Churchill Livingstone Elsevier, 2008. 126-127.
- Carson, Freida L., and Christa Hladik Cappellano. Histotechnology: A Self-instructional Text. 4th ed. Chicago: ASCP Press, 2015. 116-117.
- Sheehan, Dezna C., and Barbara B. Hrapchak. Theory and Practice of Histotechnology. 2nd ed. St. Louis: Mosby, 1980. 143-144, 153-154.
- Modifications developed by Newcomer Supply Laboratory.
![]()
STAIN SOLUTION:
| 500 ml | 1 Liter | 1 Gallon | |
| Eosin Y Stock Stain 1%, Aqueous | Part 1080B | Part 1080C | Part 1080D |
Additionally Needed For H&E Staining:
| Hematoxylin and Eosin (H&E) Control Slides | Part 4278 |
| Xylene, ACS | Part 1445 |
| Alcohol, Ethyl Denatured, 100% | Part 10841 |
| Alcohol, Ethyl Denatured, 95% | Part 10842 |
| Acetic Acid, Glacial, ACS | Part 10010 |
| Hematoxylin Stain, Harris Modified OR Hematoxylin Stain, Harris |
Part 1201 OR Part 12013 |
| Acid Alcohol 1% | Part 10011 |
| Lithium Carbonate, Saturated Aqueous OR Scott Tap Water Substitute |
Part 12215 OR Part 1380 |
| Alcohol, Ethyl Denatured, 70% | Part 10844 |
For storage requirements and expiration date refer to individual product labels.
APPLICATION:
Newcomer Supply Eosin Y Stock Stain 1%, Aqueous provides the key component of an Eosin Y Working Solution in the hematoxylin and eosin stain and can be used in either manual or automated staining platforms. Eosin’s value is in its ability to distinguish between the cytoplasm of different types of cells by staining cytoplasmic components differing shades and intensities of pink to red.
Hematoxylin and eosin (H&E) staining is used for screening specimens in anatomic pathology, for research, smears, touch preps and other applications. Its two primary coloring agents stain all cellular material: nuclei (blue), and cytoplasmic elements (pink-red). Popularity of this stain is due to its simplicity, ability to clearly demonstrate a variety of tissue components, dependability, repeatability, and speed of use.
Quality Control: Since hematoxylin and eosin staining is the foundation of the diagnostic process, maintaining quality is of critical importance. Procedures will vary between laboratories depending upon volume of slides, automation vs manual staining, chemical hygiene and solution integrity. The longevity of eosin depends upon these factors and stain quality should be regularly screened with an H&E control slide.
METHOD:
Fixation: Formalin 10%, Phosphate Buffered (Part 1090)
Technique: Paraffin sections cut at 4 microns
Solutions: All solutions are manufactured by Newcomer Supply, Inc.
Standard Eosin Y Working Solution:
| Eosin Y Stock Stain 1%, Aqueous | 200 ml |
| Alcohol, Ethyl Denatured, 95% | 600 ml |
| Acetic Acid, Glacial, ACS | 4 ml |
Combine all solutions and mix well. Store at room temperature for up to one year.
H&E STAINING PROCEDURE WITH EOSIN Y:
-
- Deparaffinize sections thoroughly in three changes of xylene, 3 minutes each. Hydrate through two changes each of 100% and 95% ethyl alcohols, 10 dips each. Wash well with distilled water.
-
- See Procedure Notes #1 and #2.
-
- Stain with Hematoxylin Stain, Harris Modified (Part 1201) or Hematoxylin Stain, Harris (Part 12013) 1-5 minutes, depending on preference of nuclear stain intensity.
- Wash well in three changes of tap water.
- Differentiate quickly in Acid Alcohol 1%.
-
- Nuclei should be distinct and background very light to colorless.
-
- Rinse well in three changes of tap water.
- Blue slides in Lithium Carbonate, Saturated Aqueous (Part 12215) or Scott Tap Water Substitute (Part 1380) for 10 dips.
- Wash in three changes of tap water; rinse in distilled water.
- Drain excess water; proceed to 70% ethyl alcohol for 10 dips.
- Counterstain in Eosin Y Working Solution for 30 seconds to 3 minutes, depending on preference of intensity.
- Dehydrate in two changes of 95% ethyl alcohol for 1 minute each and two changes of 100% ethyl alcohol, 10 dips each. Clear in three changes of xylene, 10 dips each; coverslip with compatible mounting medium.
- Deparaffinize sections thoroughly in three changes of xylene, 3 minutes each. Hydrate through two changes each of 100% and 95% ethyl alcohols, 10 dips each. Wash well with distilled water.
RESULTS:
| Nuclei | Blue |
| Erythrocytes and eosinophilic granules | Pink to red |
| Cytoplasm and other tissue elements | Various shades of pink |
PROCEDURE NOTES:
-
- Drain slides after each step to prevent solution carry over.
- Do not allow sections to dry out at any point during procedure.
- If using a xylene substitute, closely follow the manufacturer’s recommendations for deparaffinization and clearing steps.
REFERENCES:
-
- Bancroft, John D., and Marilyn Gamble. Theory and Practice of Histological Techniques. 6th ed. Oxford: Churchill Livingstone Elsevier, 2008. 123-126.
- Carson, Freida L., and Christa Hladik Cappellano. Histotechnology: A Self-instructional Text. 4th ed. Chicago: ASCP Press, 2015. 116-117.
- Luna, Lee G. Histopathologic Methods and Color Atlas of Special Stains and Tissue Artifacts. Gaitheresburg, MD: American Histolabs, 1992. 86-87, 91-92.
- Sheehan, Dezna C., and Barbara B. Hrapchak. Theory and Practice of Histotechnology. 2nd ed. St. Louis: Mosby, 1980. 143-144, 153-154.
- Modifications developed by Newcomer Supply Laboratory.
![]()
ELASTIC, VERHOEFF STAIN KIT INCLUDES:
| Part 9116A | Part 9116B | ||
| Solution A: | Hematoxylin 5%, Alcoholic | 125 ml | 250 ml |
| Solution B: | Ferric Chloride 10%, Aqueous | 125 ml | 250 ml |
| Solution C: | Iodine, Lugol’s, Aqueous | 75 ml | 150 ml |
| Solution D: | Sodium Thiosulfate 5%, Aqueous | 250 ml | 500 ml |
| Solution E: | Van Gieson Stain | 250 ml | 500 ml |
COMPLIMENTARY POSITIVE CONTROL SLIDES: Enclosed are two complimentary unstained positive control slides for the initial verification of staining techniques and reagents. Verification must be documented by running one Newcomer Supply complimentary positive control slide along with your current positive control slide for the first run. Retain the second complimentary control slide for further troubleshooting, if needed.
Individual stain solutions and additional control slides may be available for purchase under separate part numbers.
Additionally Needed:
| Xylene, ACS | Part 1445 |
| Alcohol, Ethyl Denatured, 100% | Part 10841 |
| Alcohol, Ethyl Denatured, 95% | Part 10842 |
For storage requirements and expiration date refer to individual bottle labels.
APPLICATION:
Newcomer Supply Elastic, Verhoeff Stain Kit procedure, commonly referred to as Verhoeff-Van Gieson (VVG) technique, is used to demonstrate pathologic changes in elastic fibers as well as demonstration of normal elastic tissue such as arteries and veins.
METHOD:
Fixation: Formalin 10%, Phosphate Buffered (Part 1090)
Technique: Paraffin sections cut at 4 microns
Solutions: All solutions are manufactured by Newcomer Supply, Inc.
All Newcomer Supply Stain Kits are designed to be used with Coplin jars filled to 40 ml following the provided staining procedure. Some solutions in the kit may contain extra volumes.
PRESTAINING PREPARATION:
-
- If necessary, heat dry tissue sections/slides in oven.
- Prepare fresh Verhoeff Working Solution by combining in the exact order listed, mixing well after each addition. Save for Step #5.
- Solution A: Hematoxylin 5%, Alcoholic 20 ml
- Solution B: Ferric Chloride 10%, Aqueous 8 ml
- Solution C: Iodine, Lugol’s, Aqueous 8 ml
- Prepare fresh Ferric Chloride 2%, Aqueous Solution for Step #7.
- Solution B: Ferric Chloride 10%, Aqueous 10 ml
- Distilled water 40 ml
STAINING PROCEDURE:
-
- Deparaffinize sections thoroughly in three changes of xylene, 3 minutes each. Hydrate through two changes each of 100% and 95% ethyl alcohols, 10 dips each. Wash well with distilled water.
- See Procedure Notes #1 and #2.
- Stain in fresh Verhoeff Working Solution (Step #2) for 30 minutes.
- Discard solution after successful differentiation in Step #7.
- Rinse in several changes of tap water.
- Differentiate each slide individually with agitation, in fresh Ferric Chloride 2%, Aqueous Solution (Step #3); approximately 5-10 dips.
- Check differentiation: rinse well in tap water and check microscopically for black elastic staining with gray background.
- If necessary, return to Ferric Chloride 2%, Aqueous Solution until desired elastic differentiation is achieved.
- See Procedure Notes #3 and #4.
- Deparaffinize sections thoroughly in three changes of xylene, 3 minutes each. Hydrate through two changes each of 100% and 95% ethyl alcohols, 10 dips each. Wash well with distilled water.
-
- Wash well in tap water.
- Place in Solution D: Sodium Thiosulfate 5%, Aqueous for 1 minute.
- Wash well in running tap water for 5 minutes.
- Counterstain in Solution E: Van Gieson Stain for 3 to 5 minutes.
- Dehydrate in two changes each of 95% and 100% ethyl alcohol. Clear in three changes of xylene, 10 dips each; coverslip with compatible mounting medium.
RESULTS:
| Elastic fibers/tissue | Blue-black to black |
| Collagen | Red |
| Other tissue elements | Yellow |
PROCEDURE NOTES:
-
- Drain slides after each step to prevent solution carry over.
- Do not allow sections to dry out at any point during procedure.
- If background is colorless, the section has been over-differentiated.
- Return to Step #5, restain and reduce differentiation dips.
- Differentiation will vary between slides depending on amount of elastic present in sections.
- If using a xylene substitute, closely follow the manufacturer’s recommendations for deparaffinization and clearing steps.
REFERENCES:
-
- Carson, Freida L., and Christa Hladik Cappellano. Histotechnology: A Self-instructional Text. 4th ed. Chicago: ASCP Press, 2015. 167-169.
- Mallory, Frank Burr, and James Homer Wright. Pathological Technique. 7th ed. Philadelphia, PA: W.B. Saunders Company, 1918. 118-119.
- Modifications developed by Newcomer Supply Laboratory.
![]()
COPPER, RHODANINE STAIN KIT INCLUDES:
| Part 9113A | ||
| Solution A: | Rhodanine Stock Stain 0.2%, Alcoholic | 50 ml |
| Solution B: | Hematoxylin Stain, Mayer Modified | 250 ml |
| Solution C: | Sodium Borate 0.5%, Aqueous | 500 ml |
COMPLIMENTARY POSITIVE CONTROL SLIDES: Enclosed are two complimentary unstained positive control slides for the initial verification of staining techniques and reagents. Verification must be documented by running one Newcomer Supply complimentary positive control slide along with your current positive control slide for the first run. Retain the second complimentary control slide for further troubleshooting, if needed.
Individual stain solutions and additional control slides may be available for purchase under separate part numbers.
Additionally Needed:
| Xylene, ACS | Part 1445 |
| Alcohol, Ethyl Denatured, 100% | Part 10841 |
| Alcohol, Ethyl Denatured, 95% | Part 10842 |
| Coplin Jar, Plastic | Part 5184 (for microwave modification) |
For storage requirements and expiration date refer to individual bottle labels.
APPLICATION:
Newcomer Supply Copper, Rhodanine Stain Kit procedure, with included microwave modification, is used for detection of copper and copper-associated protein (CAP) in tissue sections. Abnormal copper accumulations are predominantly found in liver tissue, most notably in Wilson’s disease.
METHOD:
Fixation: Formalin 10%, Phosphate Buffered (Part 1090)
Technique: Paraffin sections cut at 4 microns
Solutions: All solutions are manufactured by Newcomer Supply, Inc.
All Newcomer Supply Stain Kits are designed to be used with Coplin jars filled to 40 ml following the staining procedure provided below. Some solutions in the kit may contain extra volumes.
PRESTAINING PREPARATION:
-
- If necessary, heat dry tissue sections/slides in oven.
- Prepare Working Rhodanine Solution; combine and mix well.
-
- Shake Solution A: Rhodanine Stock Stain 0.2%, Alcoholic well before each use.
- Solution A: Rhodanine Stock Stain 0.2%, Alcoholic 3 ml
- Distilled Water 47 ml
-
STAINING PROCEDURE:
-
- Deparaffinize sections thoroughly in three changes of xylene, 3 minutes each. Hydrate through two changes each of 100% and 95% ethyl alcohols, 10 dips each. Wash well with distilled water.
-
- See Procedure Notes #1 and #2.
-
- Stain in Working Rhodanine Solution (Step #2) at 60°C for 1-2 hours or at 37oC for 18 hours.
- Deparaffinize sections thoroughly in three changes of xylene, 3 minutes each. Hydrate through two changes each of 100% and 95% ethyl alcohols, 10 dips each. Wash well with distilled water.
Microwave Modification: See Procedure Note #3.
-
-
-
- Place slides in a plastic Coplin jar containing Working Rhodanine Solution and microwave for 6 minutes at 70°C.
-
-
-
- At the end of incubation (for both oven and microwave), to avoid unwanted slide precipitate, pour off warm Working Rhodanine Solution into a second Coplin jar; reserve and set aside.
- Rinse slides well in several changes of distilled water.
- Check positive control slide microscopically to determine adequate copper/reddish brown development.
-
- Return slides to reserved Working Rhodanine Solution if additional incubation is required.
-
-
- Prepare dilute Mayer Hematoxylin Stain directly before use; combine and mix well.
-
- Solution B: Hematoxylin Stain, Mayer Modified 20 ml
- Distilled Water 20 ml
-
- Stain in dilute Mayer Hematoxylin Stain for 10 minutes.
- Rinse in distilled water.
- Rinse in Solution C: Sodium Borate 0.5%, Aqueous; 2-3 quick dips.
- Rinse well in distilled water.
- Dehydrate in two changes each of 95% and 100% ethyl alcohol. Clear in three changes of xylene, 10 dips each; coverslip with compatible mounting medium.
- Prepare dilute Mayer Hematoxylin Stain directly before use; combine and mix well.
RESULTS:
| Copper | Copper/reddish brown |
| Nuclei | Light blue |
PROCEDURE NOTES:
-
- Drain slides after each step to prevent solution carry over.
- Do not allow sections to dry out at any point during procedure.
- The suggested microwave procedure has been tested at Newcomer Supply. This procedure is a guideline and techniques should be developed for use in your laboratory.
- If using a xylene substitute, closely follow the manufacturer’s recommendations for deparaffinization and clearing steps.
REFERENCES:
-
- Bancroft, John D., and Marilyn Gamble. Theory and Practice of Histological Techniques. 6th ed. Oxford: Churchill Livingstone Elsevier, 2008. 251.
- Carson, Freida L., and Christa Hladik Cappellano. Histotechnology: A Self-instructional Text. 4th ed. Chicago: ASCP Press, 2015. 258-260.
- Sheehan, Dezna C., and Barbara B. Hrapchak. Theory and Practice of Histotechnology. 2nd ed. St. Louis: Mosby, 1980. 230.
- Modifications developed by Newcomer Supply Laboratory.
![]()
Tech Memo 1: Differential Stain Kit for Smears & Touch Imprints
DIFFERENTIAL STAIN KIT FOR SMEARS & TOUCH IMPRINTS INCLUDES:
| Part 9112B | ||
| Solution A: | Xanthene Stain | 500ml |
| Solution B: | Thiazine Stain | 500ml |
| Solution C: | Fixative | 500ml |
Individual stain solutions may be available for purchase under separate part numbers.
Additionally Needed:
| Xylene, ACS | Part 1445 |
For storage requirements and expiration date refer to individual bottle labels.
APPLICATION:
Newcomer Supply Differential Stain Kit, a modification of the Wright Giemsa Stain, uses a methanol fixative and aqueous based stains to provide a rapid 3-step process for differential assessment of: peripheral blood smears, touch imprints, fine needle aspirations (FNA), bone marrow biopsy aspirations, and detecting microorganisms.
METHOD:
Solutions: All solutions are manufactured by Newcomer Supply, Inc.
All Newcomer Supply Stain Kits are designed to be used with Coplin jars filled to 40 ml following the staining procedure provided below. Some solutions in the kit may contain extra volumes.
STAINING PROCEDURE:
-
- Prepare within an accepted time frame, a well-made blood smear, touch imprint, FNA smear or bone marrow aspiration smear/film per your laboratories protocol, with a focus on uniform cell distribution.
- Allow slides to thoroughly air-dry prior to staining.
- Dip dried slides in Solution C: Fixative 5-10 times, one second per dip. Allow excess fixative to drain.
- Dip in Solution A: Xanthene Stain 5 times, one second per dip. Allow excess solution to drain.
-
- See Procedure Notes #1, #2 and #3.
-
- Quickly rinse slides with distilled water.
- Dip slides in Solution B: Thiazine Stain 5 times, one second per dip. Allow excess solution to drain.
- Rinse slides quickly in distilled water.
- Allow slides to air-dry, then examine microscopically.
- If coverslip is preferred, allow slides to air-dry; dip dried slides in xylene and coverslip with compatible mounting medium.
RESULTS:
| Erythrocytes: | Pink to yellowish-red |
| Platelets: | Violet or purple granules |
Granulocytes
| Neutrophils: | Nucleus – Dark blue to violet |
| Cytoplasm – Pale pink | |
| Granules – Purple to lilac | |
| Eosinophils: | Nucleus – Blue |
| Cytoplasm – Blue | |
| Granules – Red to red-orange | |
| Basophils: | Nucleus – Purple or dark blue |
| Granules – Dark purple |
Mononuclear Cells
| Monocytes: | Nucleus – Violet |
| Cytoplasm – Sky blue | |
| Lymphocytes: | Nucleus – Violet |
| Cytoplasm – Dark blue | |
| Bacteria/microorganisms: | Deep blue in varying shapes |
| Muscle and collagen | Pale Pink |
| Nuclei | Blue/violet |
| Cytoplasm | Varying shades of light blue |
PROCEDURE NOTES:
-
- The division of stains in this kit gives the user the advantage of varying dips in Solutions A and B to produce different degrees of shading and intensity. However; never use fewer than three dips of one full second each.
- If more intense stain is desired, increase dips in Solutions A and B.
-
- To increase eosinophilic staining; increase dips in Solution A.
- To increase basophilic staining; increase dips in Solution B.
-
- If a paler stain is desired; decrease dips in Solutions A and B.
- If using a xylene substitute, closely follow the manufacturer’s recommendations for coverslipping application.
REFERENCES:
-
- Bain, B.J. “Bone Marrow Aspiration”. Journal of Clinical Pathology 54 (2001): 657-663.
- Cox, Charles. “Accuracy of Intraoperative Imprint Cytology for Sentinel Lymph Node Evaluation in the Treatment of Breast Carcinoma.” Cancer Cytopathology1 (2005): 13-20.
- “Guidelines of the Papanicolaou Society for Fine-Needle Aspiration Procedure and Reporting.” Diagnostic Cytopathology 17 (1997): 239-247.
- McPherson, Richard and Matthew Pincus. Henry’s Clinical Diagnosis and Management by Laboratory Methods. 22nd ed. Philadelphia: Elsevier Saunders, 2011. 522-535.
- Thompson, Samuel Wisley, and Ronald D. Hunt. Selected Histochemical and Histopathological Methods. 2nd ed. Springfield, IL: Thomas, 1966. 756-762.
- Modifications developed by Newcomer Supply Laboratory.
Tech Memo 2: Differential Stain Kit, Helicobacter Pylori, sp. in Tissue Sections
DIFFERENTIAL STAIN KIT, HELICOBACTER PYLORI, SP IN TISSUE SECTIONS INCLUDES:
| 500 ml | 1 Gallon | ||
| Solution A: | Xanthene Stain | Part 10521A | Part 10521B |
| Solution B: | Thiazine Stain | Part 10522A | Part 10522B |
Additionally Needed:
| Helicobacter sp., Artificial Control Slides | Part 4275 |
| Xylene, ACS | Part 1445 |
| Alcohol, Ethyl Denatured, 100% | Part 10841 |
| Alcohol, Ethyl Denatured, 95% | Part 10842 |
For storage requirements and expiration date refer to individual product labels.
APPLICATION:
Newcomer Supply Differential Stain procedure, a modification of the Wright Giemsa Stain, provides a rapid staining method for demonstration of Helicobacter pylori sp. in gastrointestinal tissue sections. Procedures for both monochromatic and polychromatic versions of the Differential Stain are provided.
METHOD:
Fixation: Formalin 10%, Phosphate Buffered (Part 1090)
Technique: Paraffin sections cut at 4 microns
Solutions: All solutions are manufactured by Newcomer Supply, Inc.
STAINING PROCEDURE:
-
- If necessary, heat dry tissue sections/slides in oven.
- Deparaffinize sections thoroughly in three changes of xylene, 3 minutes each. Hydrate through two changes each of 100% and 95% ethyl alcohols, 10 dips each. Wash well with distilled water.
-
- Proceed with either the monochromatic or polychromatic staining method.
-
Monochromatic Staining Method: See Procedure Note #1.
-
- Place slides in Solution B: Thiazine Stain for 1-4 minutes depending upon staining intensity preference.
- Rinse quickly in distilled water to remove excess stain.
- Allow slides to air-dry in a vertical position.
- Dip dried slides in xylene and coverslip with compatible mounting medium.
-
- See Procedure Note #2.
-
RESULTS:
| Helicobacter pylori sp. | Dark blue |
| Collagen and muscle | Blue |
| Nuclei | Blue |
| Cytoplasm | Varying shades of light blue |
Polychromatic Staining Method: See Procedure Note #1.
-
- Place slides in Solution A: Xanthene Stain for 3-5 minutes.
- Drain slides briefly; go directly into Solution B: Thiazine Stain for 1-4 minutes depending upon staining intensity preference.
- Rinse well in distilled water.
- Allow slides to air-dry in a vertical position.
- Dip dried slides in xylene and coverslip with compatible mounting medium.
-
- See Procedure Note #2.
-
RESULTS:
| Helicobacter pylori sp. | Dark blue |
| Collagen and muscle | Pale pink |
| Nuclei | Blue/violet |
| Cytoplasm | Varying shades of light blue |
PROCEDURE NOTES:
-
- The timings are suggested ranges. Optimal staining times will depend upon staining intensity preference.
- The elimination of dehydration steps is necessary to retain the dark stain of the organism.
- If using a xylene substitute, closely follow the manufacturer’s recommendations for deparaffinization and coverslipping steps.
REFERENCES:
-
- Potvin, Carol. “A Modified Diff-Quik Stain for Helicobacter pylori in Gastrointestinal Biopsies.” Laboratory Medicine6 (1994): 389-391.
- Skipper, Ray, and Don DeStephano. “A Rapid Stain for Campylobacter pylori in Gastrointestinal Tissue Sections Using Diff-Quik.” The Journal of Histotechnology4 (1989): 303-304.
- Modifications developed by Newcomer Supply Laboratory.
![]()
PHOSPHOTUNGSTIC ACID HEMATOXYLIN (PTAH) STAIN KIT INCLUDES:
| Part 9111A | ||
| Solution A: | Zenker Fixative, Modified, Zinc Chloride | 250ml |
| Solution B: | Acetic Acid, Glacial, ACS | 25ml |
| Solution C: | Potassium Permanganate 0.25%, Aqueous | 250ml |
| Solution D: | Oxalic Acid 5%, Aqueous | 250ml |
| Solution E: | Phosphotungstic Acid Hematoxylin (PTAH) Stain | 250ml |
COMPLIMENTARY POSITIVE CONTROL SLIDES: Enclosed are two complimentary unstained positive control slides for the initial verification of staining techniques and reagents. Verification must be documented by running one Newcomer Supply complimentary positive control slide along with your current positive control slide for the first run. Retain the second complimentary control slide for further troubleshooting, if needed.
Individual stain solutions and additional control slides may be available for purchase under separate part numbers.
Additionally Needed:
| Xylene, ACS | Part 1445 |
| Alcohol, Ethyl Denatured, 100% | Part 10841 |
| Alcohol, Ethyl Denatured, 95% | Part 10842 |
| Coplin Jar, Plastic | Part 5184 (for microwave modification) |
For storage requirements and expiration date refer to individual bottle labels.
APPLICATION:
The Newcomer Supply Phosphotungstic Acid Hematoxylin (PTAH) Stain Kit procedure, with included microwave modification, is used for the demonstration of collagen, muscle striations and central nervous system (CNS) structures. The Zenker fixative used in this procedure is modified with zinc chloride and does not contain mercury.
METHOD:
Fixation: 10% Phosphate Buffered Formalin (Part 1090)
Technique: Paraffin sections cut at 4 microns
Solutions: All solutions are manufactured by Newcomer Supply, Inc.
All Newcomer Supply Stain Kits are designed to be used with Coplin jars filled to 40 ml following the staining procedure provided below. Some solutions in the kit may contain extra volumes.
PRESTAINING PREPARATION:
- If necessary, heat dry tissue sections/slides in oven.
- Prepare Zenker Fixative Working Solution; combine and mix well.
Solution A: Zenker Fixative, Modified, Zinc Chloride 38 ml
Solution B: Acetic Acid, Glacial, ACS 2 ml
STAINING PROCEDURE:
- Deparaffinize sections thoroughly in three changes of xylene, 3 minutes each. Hydrate through two changes each of 100% and 95% ethyl alcohols, 10 dips each. Wash well with distilled water.
-
- See Procedure Notes #1 and #2.
-
- Fix in Zenker Fixative Working Solution (Step #2) at 56°C; 3 hours.
Microwave Modification: See Procedure Note #3.
-
-
- Place slides in a plastic Coplin jar containing Zenker Fixative Working Solution and microwave for 5 minutes at 60°C.
-
- Wash well in three changes of tap water; rinse in distilled water.
- Place in Solution C: Potassium Permanganate 0.25%, Aqueous for 10 minutes.
- Wash in three changes of tap water; rinse in distilled water.
- Place in Solution D: Oxalic Acid 5%, Aqueous for 10 minutes.
- Wash in three changes of tap water; rinse in distilled water.
- Stain in Solution E: PTAH Stain for 12-24 hours at room temperature, or 2 hours at 56°C.
-
- See Procedure Note #4.
-
Microwave Modification:
-
-
- Place slides in a plastic Coplin jar containing Solution E: PTAH Stain and microwave for 7 minutes at 70°C.
-
- Dehydrate quickly in two changes each of 95% and 100% ethyl alcohol. Clear in three changes of xylene, 10 dips each, coverslip with compatible mounting medium.
-
-
- Dehydrate quickly, alcohol may extract stain.
-
RESULTS:
| Collagen, cartilage, elastic fibers | Deep reddish brown |
| Muscle striations, fibrin, keratin | Dark blue |
| Glia fibers | Dark blue |
| Myelin | Lighter blue |
| Neurons | Salmon/Pink |
| Nuclei | Blue |
PROCEDURE NOTES:
- Drain slides after each step to prevent solution carry over.
- Do not allow sections to dry out at any point during procedure.
- The suggested microwave procedure has been tested at Newcomer Supply. This procedure is a guideline and techniques should be developed for use in your laboratory.
- The PTAH Stain formulation is twice as strong as the original Mallory formulation; adjust staining time according to preference of intensity. Suggested staining time at 37°C is 18 hours.
- If using a xylene substitute, closely follow the manufacturer’s recommendations for deparaffinization and clearing steps.
REFERENCES:
- Bancroft, John D., and Marilyn Gamble. Theory and Practice of Histological Techniques. 6th ed. Oxford: Churchill Livingstone Elsevier, 2008.130-131.
- Carson, Freida L., and Christa Hladik Cappellano. Histotechnology: A Self-instructional Text. 4th ed. Chicago: ASCP Press, 2015.. 178-180, 201-202.
- Sheehan, Dezna C., and Barbara B. Hrapchak. Theory and Practice of Histotechnology. 2nd ed. St. Louis: Mosby, 1980. 193-194.
- Modifications developed by Newcomer Supply Laboratory.
![]()

COLLOIDAL IRON, MÜLLER-MOWRY STAIN KIT INCLUDES:
| Part 9110A | ||
| Solution A: | Acetic Acid 12%, Aqueous | 500 ml x 2 |
| Solution B: | Colloidal Iron Stock | 125 ml |
| Solution C: | Acetic Acid, Glacial, ACS | 50 ml |
| Solution D: | Potassium Ferrocyanide 2%, Aqueous | 125 ml |
| Solution E: | Hydrochloric Acid 2%, Aqueous | 125 ml |
| Solution F: | Van Gieson Stain | 250 ml |
COMPLIMENTARY POSITIVE CONTROL SLIDES: Enclosed are two complimentary unstained positive control slides for the initial verification of staining techniques and reagents. Verification must be documented by running one Newcomer Supply complimentary positive control slide along with your current positive control slide for the first run. Retain the second complimentary control slide for further troubleshooting, if needed.
Individual stain solutions and additional control slides may be available for purchase under separate part numbers.
Additionally Needed:
| Hydrochloric Acid 5%, Aqueous | Part 12086 (for acid cleaning glassware) |
| Xylene, ACS | Part 1445 |
| Alcohol, Ethyl Denatured, 100% | Part 10841 |
| Alcohol, Ethyl Denatured, 95% | Part 10842 |
For storage requirements and expiration date refer to individual bottle labels.
APPLICATION:
Newcomer Supply Colloidal Iron, Mϋller-Mowry Stain Kit procedure is used to demonstrate acid epithelial mucin (sialomucin, sulfomucin) and stromal (mesenchymal) mucin. This method is also excellent for the demonstration of the encapsulated yeast Cryptococcus neoformans.
METHOD:
Fixation: Formalin 10%, Phosphate Buffered (Part 1090)
Technique: Paraffin sections cut at 4 microns
Solutions: All solutions are manufactured by Newcomer Supply, Inc.
All Newcomer Supply Stain Kits are designed to be used with Coplin jars filled to 40 ml following the staining procedure provided below. Some solutions in the kit may contain extra volumes.
PRESTAINING PREPARATION:
-
- If necessary, heat dry tissue sections/slides in oven.
- Acid clean glassware prior to use to avoid residual iron staining.
-
- See Procedure Note #1.
-
- Prepare Colloidal Iron Working Solution; combine and mix well.
-
- Solution B: Colloidal Iron Stock 20 ml
- Solution C: Acetic Acid, Glacial, ACS 5 ml
- Distilled Water 15 ml
-
STAINING PROCEDURE:
-
- Deparaffinize sections thoroughly in three changes of xylene, 3 minutes each. Hydrate through two changes each of 100% and 95% ethyl alcohols, 10 dips each. Wash well with distilled water.
-
- See Procedure Notes #2 and #3.
-
- Deparaffinize sections thoroughly in three changes of xylene, 3 minutes each. Hydrate through two changes each of 100% and 95% ethyl alcohols, 10 dips each. Wash well with distilled water.
-
- Place in Solution A: Acetic Acid 12%, Aqueous for 30 seconds.
- Drain Slides. Do not rinse.
- Place in Colloidal Iron Working Solution (Step #3) for 30 minutes.
- Rinse in three changes of Solution A: Acetic Acid 12%, Aqueous; 3 minutes each.
- Prepare fresh Ferrocyanide-Hydrochloric Acid Solution directly before use; combine and mix well.
-
- Solution D: Potassium Ferrocyanide 2%, Aqueous 20 ml
- Solution E: Hydrochloric Acid 2%, Aqueous 20 ml
-
- Place in Ferrocyanide-Hydrochloric Acid Solution for 15 minutes.
- Wash in running tap water for 1-5 minutes.
- Counterstain in Solution F: Van Gieson Stain for 3-5 minutes.
-
- Proceed directly to dehydration step without rinsing.
-
- Dehydrate in two changes of 100% ethyl alcohol. Clear in three changes of xylene, 10 dips each; coverslip with compatible mounting medium.
RESULTS:
| Acid epithelial mucin | Blue |
| Stromal mucin | Blue |
| Capsule of Cryptococcus neoformans | Blue |
| Collagen | Red |
| Muscle and cytoplasm | Yellow |
PROCEDURE NOTES:
-
- Acid clean all glassware/plasticware (Part 12086) and rinse thoroughly in several changes of distilled water.
- Drain slides after each step to prevent solution carry over.
- Do not allow sections to dry out at any point during procedure.
- If using a xylene substitute, closely follow the manufacturer’s recommendations for deparaffinization and clearing steps.
REFERENCES:
-
- Bancroft, John D., and Marilyn Gamble. Theory and Practice of Histological Techniques. 6th ed. Oxford: Churchill Livingstone Elsevier, 2008. 175-176.
- Carson, Freida L., and Christa Hladik Cappellano. Histotechnology: A Self-instructional Text. 4th ed. Chicago: ASCP Press, 2015. 151-153.
- Rekhtman, Natasha, and Justin Bishop. Quick Reference Handbook for Surgical Pathologists. Berlin: Springer, 2011. 69.
- Modifications developed by Newcomer Supply Laboratory.
![]()
STAIN SOLUTION:
| 500 ml | 1 Liter | 1 Gallon | |
| Eosin Y Working Solution | Part 1072A | Part 1072B | Part 1072C |
Additionally Needed For H&E Staining:
| Hematoxylin and Eosin (H&E) Control Slides | Part 4278 |
| Xylene, ACS | Part 1445 |
| Alcohol, Ethyl Denatured, 100% | Part 10841 |
| Alcohol, Ethyl Denatured, 95% | Part 10842 |
| Hematoxylin Stain, Harris Modified OR Hematoxylin Stain, Harris |
Part 1201 OR Part 12013 |
| Acid Alcohol 1% | Part 10011 |
| Lithium Carbonate, Saturated Aqueous OR Scott Tap Water Substitute |
Part 12215 OR Part 1380 |
| Alcohol, Ethyl Denatured, 70% | Part 10844 |
For storage requirements and expiration date refer to individual product labels.
APPLICATION:
Newcomer Supply Eosin Y Working Solution is a ready to use counterstain in the hematoxylin and eosin stain and can be used in either manual or automated staining platforms. Eosin’s value is in its ability to distinguish between the cytoplasm of different types of cells by staining cytoplasmic components differing shades and intensities of pink to red.
Hematoxylin and eosin (H&E) staining is used for screening specimens in anatomic pathology, for research, smears, touch preps and other applications. Its two primary coloring agents stain all cellular material: nuclei (blue), and cytoplasmic elements (pink-red). Popularity of this stain is due to its simplicity, ability to clearly demonstrate a variety of tissue components, dependability, repeatability, and speed of use.
Quality Control: Since hematoxylin and eosin staining is the foundation of the diagnostic process, maintaining quality is of critical importance. Procedures will vary between laboratories depending upon volume of slides, automation vs manual staining, chemical hygiene and solution integrity. The longevity of eosin depends upon these factors and stain quality should be regularly screened with an H&E control slide.
METHOD:
Fixation: Formalin 10%, Phosphate Buffered (Part 1090)
Technique: Paraffin sections cut at 4 microns
Solutions: All solutions are manufactured by Newcomer Supply, Inc.
H&E STAINING PROCEDURE WITH EOSIN Y:
-
- Deparaffinize sections thoroughly in three changes of xylene, 3 minutes each. Hydrate through two changes each of 100% and 95% ethyl alcohols, 10 dips each. Wash well with distilled water.
-
- See Procedure Notes #1 and #2.
-
- Stain with Hematoxylin Stain, Harris Modified (Part 1201) or Hematoxylin Stain, Harris (Part 12013) 1 to 5 minutes, depending on preference of nuclear stain intensity.
- Wash well in three changes of tap water.
- Differentiate quickly in Acid Alcohol 1%.
-
- Nuclei should be distinct and background very light to colorless.
-
- Rinse well in three changes of tap water.
- Blue slides in Lithium Carbonate, Saturated Aqueous (Part 12215) or Scott Tap Water Substitute (Part 1380) for 10 dips.
- Wash in three changes of tap water; rinse in distilled water.
- Drain excess water; proceed to 70% ethyl alcohol for 10 dips.
- Counterstain in Eosin Y Working Solution for 30 seconds to 3 minutes, depending on preference of intensity.
- Dehydrate in two changes of 95% ethyl alcohol for 1 minute each and two changes of 100% ethyl alcohol, 10 dips each. Clear in three changes of xylene, 10 dips each; coverslip with compatible mounting medium.
- Deparaffinize sections thoroughly in three changes of xylene, 3 minutes each. Hydrate through two changes each of 100% and 95% ethyl alcohols, 10 dips each. Wash well with distilled water.
RESULTS:
| Nuclei | Blue |
| Erythrocytes and eosinophilic granules | Pink to red |
| Cytoplasm and other tissue elements | Various shades of pink |
PROCEDURE NOTES:
-
- Drain slides after each step to prevent solution carry over.
- Do not allow sections to dry out at any point during procedure.
- If using a xylene substitute, closely follow the manufacturer’s recommendations for deparaffinization and clearing steps.
REFERENCES:
-
- Bancroft, John D., and Marilyn Gamble. Theory and Practice of Histological Techniques. 6th ed. Oxford: Churchill Livingstone Elsevier, 2008. 123-126.
- Carson, Freida L., and Christa Hladik Cappellano. Histotechnology: A Self-instructional Text. 4th ed. Chicago: ASCP Press, 2015. 116-117.
- Luna, Lee G. Histopathologic Methods and Color Atlas of Special Stains and Tissue Artifacts. Gaitheresburg, MD: American Histolabs, 1992. 86-87, 91-92.
- Sheehan, Dezna C., and Barbara B. Hrapchak. Theory and Practice of Histotechnology. 2nd ed. St. Louis: Mosby, 1980. 143-144, 153-154.
- Modifications developed by Newcomer Supply Laboratory.
![]()
AMYLOID, PUCHTLER CONGO RED STAIN KIT INCLUDES:
| Part 9104A | ||
| Solution A: | Hematoxylin Stain, Harris Modified | 250 ml |
| Solution B: | Sodium Hydroxide 1%, Aqueous | 25 ml |
| Solution C: | Congo Red Stain, Alcoholic | 250 ml |
COMPLIMENTARY POSITIVE CONTROL SLIDES: Enclosed are two complimentary unstained positive control slides for the initial verification of staining techniques and reagents. Verification must be documented by running one Newcomer Supply complimentary positive control slide along with your current positive control slide for the first run. Retain the second complimentary control slide for further troubleshooting, if needed.
Individual stain solutions and additional control slides may be available for purchase under separate part numbers.
Additionally Needed:
| Xylene, ACS | Part 1445 |
| Alcohol, Ethyl Denatured, 100% | Part 10841 |
| Alcohol, Ethyl Denatured, 95% | Part 10842 |
For storage requirements and expiration date refer to individual bottle labels.
APPLICATION:
Newcomer Supply Amyloid, Puchtler Congo Red Stain Kit procedure is used in identifying the extraneous protein deposits in amyloidosis. The use of polarizing lenses is an essential technique for visualizing amyloid positive areas and/or to confirm negativity.
METHOD:
Fixation: Formalin 10%, Phosphate Buffered (Part 1090)
Technique: Paraffin sections cut at 8-10 microns
Solutions: All solutions are manufactured by Newcomer Supply, Inc.
All Newcomer Supply Stain Kits are designed to be used with Coplin jars filled to 40 ml following the staining procedure provided below. Some solutions in the kit may contain extra volumes.
PRESTAINING PREPARATION:
-
- If necessary, heat dry tissue sections/slides in oven.
- Prepare fresh Congo Red Working Stain Solution; combine and mix well.
-
- Solution C: Congo Red Stain, Alcoholic 40 ml
- Solution B: Sodium Hydroxide 1%, Aqueous 4 ml
- See Procedure Note #1.
-
STAINING PROCEDURE:
-
- Deparaffinize sections thoroughly in three changes of xylene, 3 minutes each. Hydrate through two changes each of 100% and 95% ethyl alcohols, 10 dips each. Wash well with distilled water.
-
- See Procedure Notes #2 and #3.
-
- Stain in Solution A: Hematoxylin Stain, Harris Modified for 30 seconds to 1 minute.
- Wash in running tap water for 1 minute; rinse in distilled water.
-
- Do not differentiate or blue after hematoxylin staining.
-
- Place in 95% ethyl alcohol; 1-2 dips.
- Stain in fresh Congo Red Working Stain Solution (Step #2) for 20-30 minutes.
-
- See Procedure Note #4.
-
- Dehydrate quickly in two changes each of 95% and 100% ethyl alcohol; 10 dips each. Clear in three changes of xylene, 10 dips each; coverslip with compatible mounting medium.
- Deparaffinize sections thoroughly in three changes of xylene, 3 minutes each. Hydrate through two changes each of 100% and 95% ethyl alcohols, 10 dips each. Wash well with distilled water.
RESULTS:
| Light Field Microscopy: | ||
| Amyloid | Pink to red | |
| Nuclei | Blue | |
| Polarized Light: | ||
| Amyloid fluorescence | Apple green | |
PROCEDURE NOTES:
-
- Solution C: Congo Red Stain, Alcoholic is a saturated solution and dye may precipitate. Excess precipitate can be filtered out.
- Drain slides after each step to prevent solution carry over.
- Do not allow sections to dry out at any point during procedure.
- Exposure in Congo Red Working Stain Solution can be extended up to 50 minutes to increase staining intensity.
- For optimal results sections should be cut at 8-10 microns to provide more intense staining and allow smaller amyloid deposits to be identified. Sections cut too thin may show faint staining and sections that are thicker than 8-10 microns may display yellow birefringence.
- If using a xylene substitute, closely follow the manufacturer’s recommendations for deparaffinization and clearing steps.
REFERENCES:
-
- Bancroft, John D., and Marilyn Gamble. Theory and Practice of Histological Techniques. 6th ed. Oxford: Churchill Livingstone Elsevier, 2008. 270-272.
- Carson, Freida L., and Christa Hladik Cappellano. Histotechnology: A Self-instructional Text. 4th ed. Chicago: ASCP Press, 2015. 154-155.
- Churukian, Charles. “Improved Puchtler’s Congo Red Method for Demonstrating Amyloid.” The Journal of Histotechnology2 (2000): 139-141.
- Sheehan, Dezna C., and Barbara B. Hrapchak. Theory and Practice of Histotechnology. 2nd ed. St. Louis: Mosby, 1980. 177-178.
- Modifications developed by Newcomer Supply Laboratory.
![]()
AMYLOID, BENNHOLD CONGO RED STAIN KIT INCLUDES:
| Part 9103A | ||
| Solution A: | Congo Red Stain 1%, Aqueous | 250 ml |
| Solution B: | Alkaline Alcohol | 250 ml |
| Solution C: | Hematoxylin Stain, Mayer Modified | 250 ml |
COMPLIMENTARY POSITIVE CONTROL SLIDES: Enclosed are two complimentary unstained positive control slides for the initial verification of staining techniques and reagents. Verification must be documented by running one Newcomer Supply complimentary positive control slide along with your current positive control slide for the first run. Retain the second complimentary control slide for further troubleshooting, if needed.
Individual stain solutions and additional control slides may be available for purchase under separate part numbers.
Additionally Needed:
| Xylene, ACS | Part 1445 |
| Alcohol, Ethyl Denatured, 100% | Part 10841 |
| Alcohol, Ethyl Denatured, 95% | Part 10842 |
| Coplin Jar, Plastic | Part 5184 (for microwave modification) |
For storage requirements and expiration date refer to individual bottle labels.
APPLICATION:
Newcomer Supply Amyloid, Bennhold Congo Red Stain Kit procedure, with included microwave modification, is used for identifying the extraneous protein deposits in amyloidosis. The use of polarizing lenses is an essential technique for visualizing amyloid positive areas and/or to confirm negativity.
METHOD:
Fixation: Formalin 10%, Phosphate Buffered (Part 1090)
Technique: Paraffin sections cut at 8-10 microns
Solutions: All solutions are manufactured by Newcomer Supply, Inc.
All Newcomer Supply Stain Kits are designed to be used with Coplin jars filled to 40 ml following the staining procedure provided below. Some solutions in the kit may contain extra volumes.
STAINING PROCEDURE:
-
- If necessary, heat dry tissue sections/slides in oven.
- Deparaffinize sections thoroughly in three changes of xylene, 3 minutes each. Hydrate through two changes each of 100% and 95% ethyl alcohols, 10 dips each. Wash well with distilled water.
-
- See Procedure Notes #1 and #2.
-
- Place slides in Solution A: Congo Red Stain 1%, Aqueous for 1 hour.
Microwave Modification: See Procedure Note #3.
-
-
-
- Place slides in a plastic Coplin jar containing Solution A: Congo Red Stain 1%, Aqueous and microwave at 70°C for 3 minutes.
-
-
-
- Rinse in two to three changes of tap water; rinse in distilled water.
- Differentiate in Solution B: Alkaline Alcohol, 5 to 30 seconds, agitating constantly until slide background is cleared of Solution A: Congo Red Stain 1%, Aqueous.
- Rinse in two to three changes of tap water; rinse in distilled water.
- Counterstain with Solution C: Hematoxylin Stain, Mayer Modified, 3 to 5 minutes, depending on preference of nuclear stain intensity.
- Wash in running tap water for 5 to 10 minutes.
- Dehydrate in two changes each of 95% and 100% ethyl alcohol. Clear in three changes of xylene, 10 dips each; coverslip with compatible mounting medium.
RESULTS:
| Light Field Microscopy: | ||
| Amyloid | Pink to red | |
| Nuclei | Blue | |
| Polarized Light: | ||
| Amyloid fluorescence | Apple green | |
PROCEDURE NOTES:
-
-
- Drain slides after each step to prevent solution carry over.
- Do not allow sections to dry out at any point during procedure.
- The suggested microwave procedure has been tested at Newcomer Supply. This procedure is a guideline and techniques should be developed for use in your laboratory.
- For optimal results sections should be cut at 8-10 microns to provide more intense staining and allow smaller amyloid deposits to be identified. Sections cut too thin may show faint staining and sections cut thicker than 8-10 microns may display yellow birefringence.
- If using a xylene substitute, closely follow the manufacturer’s recommendations for deparaffinization and clearing steps.
-
REFERENCES:
-
-
- Luna, Lee G. Histopathologic Methods and Color Atlas of Special Stains and Tissue Artifacts. Gaitheresburg, MD: American Histolabs, 1992. 366-367.
- Sheehan, Dezna C., and Barbara B. Hrapchak. Theory and Practice of Histotechnology. 2nd ed. St. Louis: Mosby, 1980. 177-178.
- Modifications developed by Newcomer Supply Laboratory.
-
![]()
ALCIAN BLUE 1%, pH2.5 STAIN KIT INCLUDES:
| Part 9102A | Part 9102B | ||
| Solution A: | Acetic Acid 3%, Aqueous | 250 ml | 500 ml |
| Solution B: | Alcian Blue Stain 1%, pH 2.5 Aqueous | 250 ml | 500 ml |
| Solution C: | Nuclear Fast Red Stain, Kernechtrot | 250 ml | 500 ml |
COMPLIMENTARY POSITIVE CONTROL SLIDES: Enclosed are two complimentary unstained positive control slides for the initial verification of staining techniques and reagents. Verification must be documented by running one Newcomer Supply complimentary positive control slide along with your current positive control slide for the first run. Retain the second complimentary control slide for further troubleshooting, if needed.
Individual stain solutions and additional control slides may be available for purchase under separate part numbers.
Additionally Needed:
| Xylene, ACS | Part 1445 |
| Alcohol, Ethyl Denatured, 100% | Part 10841 |
| Alcohol, Ethyl Denatured, 95% | Part 10842 |
| Hyaluronidase | For stromal mucin digestion |
| Hyaluronidase Buffer | Part 1150 (for stromal mucin digestion) |
For storage requirements and expiration date refer to individual bottle labels.
APPLICATION:
Newcomer Supply Alcian Blue 1%, pH 2.5 Stain Kit procedure, with included hyaluronidase method for stromal mucin digestion, is designed to stain acid epithelial mucin (sialomucin, sulfomucin) as well as stromal (mesenchymal) mucin. The hyaluronidase digestion step is used for further differentiation of acid epithelial from stromal mucin.
METHOD:
Fixation: Formalin 10%, Phosphate Buffered (Part 1090)
Technique: Paraffin sections cut at 4 microns
Solutions: All solutions are manufactured by Newcomer Supply, Inc.
All Newcomer Supply Stain Kits are designed to be used with Coplin jars filled to 40 ml following the staining procedure provided below. Some solutions in the kit may contain extra volumes.
STAINING PROCEDURE:
-
- If necessary, heat dry tissue sections/slides in oven.
- Deparaffinize sections thoroughly in three changes of xylene, 3 minutes each. Hydrate through two changes each of 100% and 95% ethyl alcohols, 10 dips each. Wash well with distilled water.
-
- See Procedure Notes #1 and #2.
-
- Digestion Step: Proceed to Step #4 if not running Digestion.
-
- Two control slides and two patient slides are needed.
- Label one control slide and one patient slide “with”.
- Label the other control slide and patient slide “without”.
- Prepare Hyaluronidase Digestion Solution and mix well.
Hyaluronidase 0.025gm Hyaluronidase Buffer (Part 1150) 50ml - Prepare separate Coplin jar of Hyaluronidase Buffer.
- Preheat both solutions from Steps #2d and #2e to 37°C.
- Place slides labeled “with” in preheated Hyaluronidase Digestion Solution and slides labeled “without” in preheated Hyaluronidase Buffer.
- Incubate both for 2 hours at 37°
-
-
- Wash all slides in running tap water for 5 minutes; rinse in distilled water. Combine slides for remaining steps.
- Place slides in Solution A: Acetic Acid 3%, Aqueous for 3 minutes.
- Move slides directly into Solution B: Alcian Blue Stain 1%, pH 2.5 Aqueous. Stain for 30 minutes at room temperature or for 15 minutes in a 37°C water bath.
- Wash in running tap water for 10 minutes; rinse in distilled water.
-
- See Procedure Note #3.
-
- Counterstain in Solution C: Nuclear Fast Red Stain, Kernechtrot for 5 minutes.
-
- Shake solution well before use; do not filter.
-
- Rinse well in distilled water.
-
- See Procedure Note #4
-
- Dehydrate quickly through two changes of 95% ethyl alcohol and two changes of 100% ethyl alcohol. Clear in three xylene changes, 10 dips each; coverslip with compatible mounting medium.
RESULTS:
| Acid epithelial mucin | Blue |
| Stromal (mesenchymal) mucin | Blue |
| Stromal mucin digestion | Marked loss of staining |
| Nuclei | Pink-red |
| Cytoplasm | Pale pink |
PROCEDURE NOTES:
-
- Drain slides after each step to prevent solution carry over.
- Do not allow sections to dry out at any point during procedure.
- A brief dip in Solution A: Acetic Acid 3%, Aqueous from Step #5 can be added before water rinses to remove excess Alcian Blue Solution if needed.
- Wash well after Nuclear Fast Red Stain, Kernechtrot to avoid cloudiness in dehydration steps.
- Sigma Hyaluronidase from Bovine Testes (H3506) is the Hyaluronidase used in the digestion step.
- If using a xylene substitute, closely follow the manufacturer’s recommendations for deparaffinization and clearing steps.
REFERENCES:
-
- Carson, Freida L., and Christa Hladik. Histotechnology: A Self-Instructional Text. 3rd ed. Chicago, Ill.: American Society of Clinical Pathologists, 2009. 145-148.
- Sheehan, Dezna C., and Barbara B. Hrapchak. Theory and Practice of Histotechnology. 2nd ed. St. Louis: Mosby, 1980. 172-175.
- Modifications developed by Newcomer Supply Laboratory.
(use: in Leica Peloris Processor as tint for tissue prior to embedding)
![]()
AFB, ZIEHL-NEELSEN STAIN KIT INCLUDES:
| Part 9101A | ||
| Solution A: | Carbol Fuchsin Stain, Ziehl-Neelsen | 250 ml |
| Solution B: | Acid Alcohol 1% | 250 ml |
| Solution C: | Light Green SF Yellowish Stain 0.1%, Aqueous | 250 ml |
COMPLIMENTARY POSITIVE CONTROL SLIDES: Enclosed are two complimentary unstained positive control slides for the initial verification of staining techniques and reagents. Verification must be documented by running one Newcomer Supply complimentary positive control slide along with your current positive control slide for the first run. Retain the second complimentary control slide for further troubleshooting, if needed.
Individual stain solutions and additional control slides may be available for purchase under separate part numbers.
Additionally Needed:
| Xylene, ACS | Part 1445 |
| Alcohol, Ethyl Denatured, 100% | Part 10841 |
| Alcohol, Ethyl Denatured, 95% | Part 10842 |
For storage requirements and expiration date refer to individual bottle labels.
APPLICATION:
Newcomer Supply AFB, Ziehl-Neelsen Stain Kit procedure is used to demonstrate the presence of acid-fast mycobacteria in tissue sections. Carbol Fuchsin Stain, Ziehl-Neelson, combines phenol and basic fuchsin that works to permeate the lipoid capsule of acid-fast organisms and render them resistant to acid alcohol decolorization.
METHOD:
Fixation: Formalin 10%, Phosphate Buffered (Part 1090)
Technique: Paraffin sections cut at 4 microns
Solutions: All solutions are manufactured by Newcomer Supply, Inc.
All Newcomer Supply Stain Kits are designed to be used with Coplin jars filled to 40 ml following the staining procedure provided below. Some solutions in the kit may contain extra volumes.
PRESTAINING PREPARATION:
-
- If necessary, heat dry tissue sections/slides in oven.
- Filter Solution A: Carbol Fuchsin Stain, Ziehl-Neelsen with filter paper whenever a thick sheen develops on solution surface.
STAINING PROCEDURE:
-
- Deparaffinize sections thoroughly in three changes of xylene, 3 minutes each. Hydrate through two changes each of 100% and 95% ethyl alcohols, 10 dips each. Wash well with distilled water.
-
- See Procedure Notes #1 and #2.
-
- Stain in Solution A: Carbol Fuchsin Stain, Ziehl-Neelsen for 15 minutes at room temperature. Keep solution covered.
-
- See Procedure Note #3.
-
- Rinse in running tap water for 2 to 3 minutes.
- Differentiate in Solution B: Acid Alcohol 1% until color no longer runs off the slide and sections are pale pink; 3 to 10 rapid dips.
- Wash in running tap water 3 to 5 minutes; rinse in distilled water.
- Counterstain in Solution C: Light Green SF Yellowish Stain 0.1%, Aqueous; 2-5 dips.
- Rinse with one quick dip in distilled water or proceed directly to Step #10 without a distilled water rinse.
- Dehydrate quickly in two changes each of 95% and 100% ethyl alcohol. Clear in three changes of xylene, 10 dips each; coverslip with compatible mounting medium.
- Deparaffinize sections thoroughly in three changes of xylene, 3 minutes each. Hydrate through two changes each of 100% and 95% ethyl alcohols, 10 dips each. Wash well with distilled water.
RESULTS:
| Acid-fast bacilli | Bright red |
| Background | Green |
PROCEDURE NOTES:
-
- Drain slides after each step to prevent solution carry over.
- Do not allow sections to dry out at any point during procedure.
- Sections can remain in Carbol Fuchsin Stain, Ziehl-Neelsen for up to 60 minutes without adverse effect. Additional differentiation may be required in Step #6.
- If using a xylene substitute, closely follow the manufacturer’s recommendations for deparaffinization and clearing steps.
REFERENCES:
-
- Carson, Freida L., and Christa Hladik Cappellano. Histotechnology: A Self-instructional Text. 4th ed. Chicago: ASCP Press, 2015. 218-220.
- Sheehan, Dezna C., and Barbara B. Hrapchak. Theory and Practice of Histotechnology. 2nd ed. St. Louis: Mosby, 1980. 237.
- Modifications developed by Newcomer Supply Laboratory.
![]()
AFB, FITE STAIN KIT INCLUDES:
| Part 91013A | ||
| Solution A: | Xylene/Peanut Oil, 2:1 | 500 ml |
| Solution B: | Carbol Fuchsin Stain, Ziehl-Neelsen | 250 ml |
| Solution C: | Acid Alcohol 1% | 250 ml |
| Solution D: | Light Green SF Yellowish Stain 0.1%, Aqueous | 250 ml |
COMPLIMENTARY POSITIVE CONTROL SLIDES: Enclosed are two complimentary unstained positive control slides for the initial verification of staining techniques and reagents. Verification must be documented by running one Newcomer Supply complimentary positive control slide along with your current positive control slide for the first run. Retain the second complimentary control slide for further troubleshooting, if needed.
Individual stain solutions and additional control slides may be available for purchase under separate part numbers.
Additionally Needed:
| Xylene, ACS | Part 1445 |
For storage requirements and expiration date refer to individual bottle labels.
APPLICATION:
Newcomer Supply AFB, Fite Stain Kit procedure is used to detect the presence of either Nocardia sp. or Mycobacterium leprae sp. (causative agent of leprosy) in tissue sections. Procedural variations are included for detection of either organism.
METHOD:
Fixation: Formalin 10%, Phosphate Buffered (Part 1090)
Technique: Paraffin sections cut at 4 microns
Solutions: All solutions are manufactured by Newcomer Supply, Inc.
All Newcomer Supply Stain Kits are designed to be used with Coplin jars filled to 40 ml following the staining procedure provided below. Some solutions in the kit may contain extra volumes.
PRESTAINING PREPARATION:
-
- If necessary, heat dry tissue sections/slides in oven.
- Filter Solution B: Carbol Fuchsin Stain, Ziehl-Neelsen with high quality filter paper.
- If staining for Nocardia sp., prepare Diluted Acid Alcohol Solution:
-
- Solution C: Acid Alcohol 1% 20 ml
- Distilled water 20 ml
-
STAINING PROCEDURE:
-
- Deparaffinize slides in Solution A: Xylene/Peanut Oil, 2:1, two changes for 10 minutes each.
-
- See Procedure Note #1
-
- Drain slides, wipe off excess oil, and blot to opacity taking care to remove residual oil.
-
- See Procedure Note #2.
-
- Stain in freshly filtered Solution B: Carbol Fuchsin Stain, Ziehl-Neelsen for 15 minutes at room temperature.
- Rinse well in distilled water.
- Differentiation for Nocardia sp.:
-
- Differentiate slides individually in Diluted Acid Alcohol Solution (Step #3) until background is pale pink; 10-20 dips.
- Quickly rinse in distilled water and check microscopically for correct differentiation.
-
- Differentiation for Mycobacterium leprae sp.:
-
- Differentiate slides individually in Solution C: Acid Alcohol 1% until sections are light pink; 5-10 dips.
-
- Rinse well in distilled water.
- Counterstain in Solution D: Light Green SF Yellowish Stain 0.1%, Aqueous; 5-10 dips.
- Rinse in distilled water.
- Blot excess water from slide and air-dry or oven-dry completely.
- Dip dried slides in xylene; coverslip with compatible mounting medium.
- Deparaffinize slides in Solution A: Xylene/Peanut Oil, 2:1, two changes for 10 minutes each.
RESULTS:
| Acid-fast bacilli and Mycobacterium leprae sp. | Red |
| Nocardia sp. | Red |
| Other tissue elements | Green |
PROCEDURE NOTES:
-
- Acid-fastness of leprosy organisms is enhanced when the waxy capsule is protected by the mixture of xylene/peanut oil and avoidance of dehydrating solutions.
- It is important to blot well, residual oil may produce staining artifact.
- A small percentage of Nocardia sp. organisms may resist taking the red stain and stain green due to the growth phase of the individual organism.
- If using a xylene substitute, closely follow the manufacturer’s recommendations for coverslipping step.
REFERENCES:
-
- Carson, Freida L., and Christa Hladik Cappellano. Histotechnology: A Self-instructional Text. 4th ed. Chicago: ASCP Press, 2015. 220-221.
- Fite, George, P.J. Cambre and M.H. Turner. “Procedure for Demonstrating Lepra Bacilli in Paraffin Sections”. Archives of Pathology 43 (1947). 624-625.
- Sheehan, Dezna C., and Barbara B. Hrapchak. Theory and Practice of Histotechnology. 2nd ed. St. Louis: Mosby, 1980. 237.
- Modifications developed by Newcomer Supply Laboratory.
![]()
STAIN SOLUTION:
| 500 ml | 1 Liter | 1 Gallon | |
| Eosin Y Stock Stain 1%, Alcoholic | Part 1070B | Part 1070C | Part 1070D |
Additionally Needed For H&E Staining:
| Hematoxylin and Eosin (H&E) Control Slides | Part 4278 |
| Xylene, ACS | Part 1445 |
| Alcohol, Ethyl Denatured, 100% | Part 10841 |
| Alcohol, Ethyl Denatured, 95% | Part 10842 |
| Acetic Acid, Glacial, ACS | Part 10010 |
| Hematoxylin Stain, Harris Modified OR Hematoxylin Stain, Harris |
Part 1201 OR Part 12013 |
| Acid Alcohol 1% | Part 10011 |
| Lithium Carbonate, Saturated Aqueous OR Scott Tap Water Substitute |
Part 12215 OR Part 1380 |
| Alcohol, Ethyl Denatured, 70% | Part 10844 |
For storage requirements and expiration date refer to individual product labels.
APPLICATION:
Newcomer Supply Eosin Y Stock Stain 1%, Alcoholic provides the key component of an alcohol-based Eosin Y Working Solution in the hematoxylin and eosin stain and can be used in either manual or automated staining platforms. Eosin’s value is its ability to distinguish between the cytoplasm of different types of cells by staining cytoplasmic components differing shades and intensities of pink to red.
Hematoxylin and eosin (H&E) staining is used for screening specimens in anatomic pathology, for research, smears, touch preps and other applications. Its two primary coloring agents stain all cellular material: nuclei (blue), and cytoplasmic elements (pink-red). Popularity of this stain is due to its simplicity, ability to clearly demonstrate a variety of tissue components, dependability, repeatability, and speed of use.
Quality Control: Since hematoxylin and eosin staining is the foundation of the diagnostic process, maintaining quality is of critical importance. Procedures will vary between laboratories depending upon volume of slides, automation vs manual staining, chemical hygiene and solution integrity. The longevity of eosin depends upon these factors and stain quality should be regularly screened with an H&E control slide.
METHOD:
Fixation: Formalin 10%, Phosphate Buffered (Part 1090)
Technique: Paraffin sections cut at 4 microns
Solutions: All solutions are manufactured by Newcomer Supply, Inc.
Standard Eosin Y Working Solution, Alcoholic:
| Eosin Y Stock Stain 1%, Alcoholic | 200 ml |
| Alcohol, Ethyl Denatured, 95% | 600 ml |
| Acetic Acid, Glacial, ACS | 4 ml |
Combine all solutions and mix well. Store at room temperature for up to one year.
H&E STAINING PROCEDURE WITH EOSIN Y:
-
- Deparaffinize sections thoroughly in three changes of xylene, 3 minutes each. Hydrate through two changes each of 100% and 95% ethyl alcohols, 10 dips each. Wash well with distilled water.
-
- See Procedure Notes #1 and #2.
-
- Stain with Hematoxylin Stain, Harris Modified (Part 1201) or Hematoxylin Stain, Harris (Part 12013) 1-5 minutes, depending on preference of nuclear stain intensity.
- Wash well in three changes of tap water.
- Differentiate quickly in Acid Alcohol 1%.
-
- Nuclei should be distinct and background very light to colorless.
-
- Rinse well in three changes of tap water.
- Blue slides in Lithium Carbonate, Saturated Aqueous (Part 12215) or Scott Tap Water Substitute (Part 1380) for 10 dips.
- Wash in three changes of tap water; rinse in distilled water.
- Drain excess water; proceed to 70% ethyl alcohol for 10 dips.
- Counterstain in Eosin Y Working Solution, Alcoholic for 30 seconds to 3 minutes, depending on preference of intensity.
- Dehydrate in two changes of 95% ethyl alcohol for 1 minute each and two changes of 100% ethyl alcohol, 10 dips each. Clear in three changes of xylene, 10 dips each; coverslip with compatible mounting medium.
- Deparaffinize sections thoroughly in three changes of xylene, 3 minutes each. Hydrate through two changes each of 100% and 95% ethyl alcohols, 10 dips each. Wash well with distilled water.
RESULTS:
| Nuclei | Blue |
| Erythrocytes and eosinophilic granules | Pink to red |
| Cytoplasm and other tissue elements | Various shades of pink |
PROCEDURE NOTES:
-
- Drain slides after each step to prevent solution carry over.
- Do not allow sections to dry out at any point during procedure.
- If using a xylene substitute, closely follow the manufacturer’s recommendations for deparaffinization and clearing steps.
REFERENCES:
-
- Bancroft, John D., and Marilyn Gamble. Theory and Practice of Histological Techniques. 6th ed. Oxford: Churchill Livingstone Elsevier, 2008. 123-126.
- Luna, Lee G. Histopathologic Methods and Color Atlas of Special Stains and Tissue Artifacts. Gaitheresburg, MD: American Histolabs, 1992. 86-87, 91-92.
- Sheehan, Dezna C., and Barbara B. Hrapchak. Theory and Practice of Histotechnology. 2nd ed. St. Louis: Mosby, 1980. 143-144, 153-154.
- Modifications developed by Newcomer Supply Laboratory.
![]()
AFB, BASIC FUCHSIN, ELLIS & ZABROWARNY STAIN KIT INCLUDES:
| Part 91012A | ||
| Solution A: | Basic Fuchsin Stain 1%, Alcoholic | 250 ml |
| Solution B: | Acid Alcohol 3% | 250 ml |
| Solution C: | Methylene Blue Stain 0.25%, Aqueous | 250 ml |
COMPLIMENTARY POSITIVE CONTROL SLIDES: Enclosed are two complimentary unstained positive control slides for the initial verification of staining techniques and reagents. Verification must be documented by running one Newcomer Supply complimentary positive control slide along with your current positive control slide for the first run. Retain the second complimentary control slide for further troubleshooting, if needed.
Individual stain solutions and additional control slides may be available for purchase under separate part numbers.
Additionally Needed:
| Xylene, ACS | Part 1445 |
| Alcohol, Ethyl Denatured, 100% | Part 10841 |
| Alcohol, Ethyl Denatured, 95% | Part 10842 |
| Coplin Jar, Plastic | Part 5184 (for microwave modification) |
For storage requirements and expiration date refer to individual bottle labels.
APPLICATION:
Newcomer Supply AFB, Basic Fuchsin, Ellis & Zabrowarny Stain Kit procedure, with included microwave modification, provides a safe method for staining acid-fast bacilli without the use of phenol. Results are comparable to the AFB, Ziehl-Neelsen method.
METHOD:
Fixation: Formalin 10%, Phosphate Buffered (Part 1090)
Technique: Paraffin sections cut at 4 microns
Solutions: All solutions are manufactured by Newcomer Supply, Inc.
All Newcomer Supply Stain Kits are designed to be used with Coplin jars filled to 40 ml following the staining procedure provided below. Some solutions in the kit may contain extra volumes.
PRESTAINING PREPARATION:
-
- If necessary, heat dry tissue sections/slides in oven.
- Preheat Solution A: Basic Fuchsin Stain 1%, Alcoholic to 60°C in an oven or water bath. (Skip if using Microwave Modification.)
STAINING PROCEDURE:
-
- Deparaffinize sections thoroughly in three changes of xylene, 3 minutes each. Hydrate through two changes each of 100% and 95% ethyl alcohols, 10 dips each. Wash well with distilled water.
-
- See Procedure Notes #1 and #2.
-
- Place in preheated Solution A: Basic Fuchsin Stain 1%, Alcoholic (Step #2) for 15 minutes.
- Deparaffinize sections thoroughly in three changes of xylene, 3 minutes each. Hydrate through two changes each of 100% and 95% ethyl alcohols, 10 dips each. Wash well with distilled water.
Microwave Modification: See Procedure Note #3.
-
-
-
- Place slides in a plastic Coplin jar containing Solution A: Basic Fuchsin Stain 1%, Alcoholic and microwave for 1 minute at 70°C.
-
-
-
- Rinse well in running tap water for 2 to 3 minutes.
- Differentiate in Solution B: Acid Alcohol 3% until color no longer runs off the slide and sections are pale pink; 3 to 10 rapid dips.
- Wash in running tap water for 1 minute.
- Counterstain one slide at a time in Solution C: Methylene Blue Stain 0.25%, Aqueous for 15 to 30 seconds.
-
- Dip slides a few times in counterstain; rinse in tap water, followed by a distilled water rinse.
- Check microscopically. Sections should be pale blue.
-
- Wash in running tap water for 1 minute; rinse in distilled water.
- Dehydrate in two changes each of 95% and 100% ethyl alcohol. Clear in three changes of xylene, 10 dips each; coverslip with compatible mounting medium.
RESULTS:
| Acid-fast bacilli | Red |
| Nuclei and background | Shades of blue |
PROCEDURE NOTES:
-
- Drain slides after each step to prevent solution carry over.
- Do not allow sections to dry out at any point during procedure.
- The suggested microwave procedure has been tested at Newcomer Supply. This procedure is a guideline and techniques should be developed for use in your laboratory.
- Solution A: Basic Fuchsin Stain 1%, Alcoholic does not contain phenol and can be readily disposed of.
- If using a xylene substitute, closely follow the manufacturer’s recommendations for deparaffinization and clearing steps.
REFERENCES:
-
- Ellis, R C, and L A Zabrowarny. “Safer Staining Method for Acid Fast Bacilli.” Journal of Clinical Pathology (1993): 559-560.
- Modifications developed by Newcomer Supply Laboratory.
CI 45380
- Shelf Life is 4 years from date of manufacture.
For direct slide application.
Store at 2-8°C.
(use: Copper Stain.)
![]()
SOLUTION:
| 250 ml | 500 ml | |
| Rhodanine Stock Stain 0.2%, Alcoholic | Part 10531A | Part 10531B |
Additionally Needed, Rhodanine Stain for Copper:
| Copper, Animal Control Slides | Part 4130 |
| Hematoxylin Stain, Mayer Modified | Part 1202 |
| Sodium Borate 0.5%, Aqueous | Part 13824 |
| Xylene, ACS | Part 1445 |
| Alcohol, Ethyl Denatured, 100% | Part 10841 |
| Alcohol, Ethyl Denatured, 95% | Part 10842 |
| Coplin Jar, Plastic | Part 5184 (for microwave modification) |
For storage requirements and expiration date refer to individual product labels.
APPLICATION:
Newcomer Supply Rhodanine Stain for Copper, with included microwave modification, is used for the detection of copper and copper-associated protein (CAP) in tissue sections. Abnormal copper accumulations are predominantly found in liver tissue, most notably in Wilson’s disease.
METHOD:
Fixation: Formalin 10%, Phosphate Buffered (Part 1090)
Technique: Paraffin sections cut at 4 microns
Solutions: All solutions are manufactured by Newcomer Supply, Inc.
All Newcomer Supply stain procedures are designed to be used with Coplin jars filled to 40 ml following the staining procedure provided below.
PRESTAINING PREPARATION:
- Prepare Working Rhodanine Solution; combine and mix well.
- Shake Solution A: Rhodanine Stock Stain 0.2%, Alcoholic well before each use.
- Solution A: Rhodanine Stock Stain 0.2%, Alcoholic 3 ml
- Distilled Water 47 ml
STAINING PROCEDURE:
- Deparaffinize sections thoroughly in three changes of xylene, 3 minutes each. Hydrate through two changes each of 100% and 95% ethyl alcohols, 10 dips each. Wash well with distilled water.
- See Procedure Notes #1 and #2.
- Stain in Working Rhodanine Solution at 60°C for 1-2 hours or at 37oC for 18 hours.
Microwave Modification: See Procedure Note #3.
- Place slides in a plastic Coplin jar containing Working Rhodanine Solution and microwave for 6 minutes at 70°C.
- At the end of incubation (for both oven and microwave), to avoid unwanted slide precipitate, pour off warm Working Rhodanine Solution into a second Coplin jar; reserve and set aside.
- Rinse slides well in several changes of distilled water.
- Check positive control slide microscopically to determine adequate copper/reddish brown development.
- Return slides to reserved Working Rhodanine Solution if additional incubation is required.
- Prepare dilute Mayer Hematoxylin Stain Solution directly before use; combine and mix well:
- Hematoxylin Stain, Mayer Modified (Part 1202) 20 ml
- Distilled Water 20 ml
- Stain in dilute Mayer Hematoxylin Stain Solution for 10 minutes.
- Rinse in distilled water.
- Rinse in Sodium Borate 0.5%, Aqueous (Part 13824); 2-3 quick dips.
- Rinse well in distilled water.
- Dehydrate in two changes each of 95% and 100% ethyl alcohol. Clear in three changes of xylene, 10 dips each; coverslip with compatible mounting medium.
RESULTS:
| Copper | Copper/reddish brown |
| Nuclei | Light blue |
PROCEDURE NOTES:
- Drain staining rack/slides after each step to prevent solution carry over.
- Do not allow sections to dry out at any point during staining procedure.
- The suggested microwave procedure has been tested at Newcomer Supply using an “EB Sciences”, 850 watt microwave oven with temperature probe and agitation tubes. This procedure is reproducible in our laboratory. It is nonetheless a guideline and techniques should be developed for your laboratory which meet the requirements of your situation. Microwave devices should be placed in a fume hood or vented into a fume hood, according to manufacturer’s instructions, to prevent exposure to chemical vapors.
- If using a xylene substitute, closely follow the manufacturer’s recommendations for deparaffinization and clearing steps.
REFERENCES:
- Bancroft, John D., and Marilyn Gamble. Theory and Practice of Histological Techniques. 6th ed. Oxford: Churchill Livingstone Elsevier, 2008. 251.
- Carson, Freida L., and Christa Hladik Cappellano. Histotechnology: A Self-instructional Text. 4th ed. Chicago: ASCP Press, 2015. 258-260
- Sheehan, Dezna C., and Barbara B. Hrapchak. Theory and Practice of Histotechnology. 2nd ed. St. Louis: Mosby, 1980. 230.
- Modifications developed by Newcomer Supply Laboratory.
Ship Ground Only
Solution A of the Differential Stain Kit.
- Shelf Life is 2 years from date of manufacture.
For Staining Procedure, click here
Click here to view the Differential Stain Kit.
![]()
SET INCLUDES:
| Part 1051A | ||
| Solution A: | Ammonium Hydroxide, Aqueous | 250 ml |
| Solution B: | Ammonium Oxalate, Aqueous | 250 ml |
For storage requirements and expiration date refer to individual bottle labels.
APPLICATION:
Newcomer Supply Decalcification End Point Set uses a chemical testing method for detecting the presence of released calcium and determining the completion point of bone decalcification process. This procedure will avoid over decalcification and limit the decalcifying process to what is needed to maintain a high-quality specimen. Decalcification End Point Set can be used with either acid or chelating decalcifying agents.
METHOD:
Fixation: Fully fixed bone specimen in fixative of choice.
Solutions: All solutions are manufactured by Newcomer Supply, Inc.
PROCEDURE:
-
- Submerge fixed and washed bone segment in decalcifying solution of choice, adequately covering specimen at a 20:1 ratio.
- Check specimen regularly for adequate solution coverage. Change solution daily and do not add or mix fresh solution with old.
- Decalcification time will vary, dependent on specimen type, thickness and strength of the decalcifying agent used.
- Check completion of decal with Decalcification End Point Set. Prepare a test aliquot by pipetting and combining in a 20 ml beaker:
-
- Solution A: Ammonium Hydroxide, Aqueous 5 ml
- Solution B: Ammonium Oxalate, Aqueous 5 ml
- Used decal solution from specimen container 5 ml
- Avoid pipetting up particulates from used solution
-
- Mix well; allow test aliquot to stand for 15 minutes.
- Decalcification is complete if test aliquot is clear.
-
- Clear indicates solution is calcium free and decalcification has reached an end point stage.
- Proceed to Step #8.
-
- Decalcification is incomplete if the test aliquot is cloudy.
-
- Cloudy indicates presence of calcium oxalate and decalcification is incomplete.
- Transfer specimen into fresh decalcification fluid and continue to repeat Step #3 – Step #6 until decalcification end point stage is reached.
-
- Wash in running tap water when decalcification is complete.
-
- Wash small samples 30-60 minutes.
- Wash larger bones 1-4 hours.
- Additional trimming of decaled bone can occur at this point to size and thickness suitable for tissue processing.
-
- Proceed with tissue processing procedure for bone specimens.
PROCEDURE NOTE:
-
- Decalcification end-point testing can also be done with specimen radiography. Physical probing of bone is not recommended.
REFERENCES:
-
-
- Bancroft, John D., and Marilyn Gamble. Theory and Practice of Histological Techniques. 6th ed. Oxford: Churchill Livingstone Elsevier, 2008. 341-342.
- Carson, Freida L., and Christa Hladik Cappellano. Histotechnology: A Self-instructional Text. 4th ed. Chicago: ASCP Press, 2015. 48-49.
- Luna, Lee G. Histopathologic Methods and Color Atlas of Special Stains and Tissue Artifacts. Gaitheresburg, MD: American Histolabs, 1992. 115-118.
- Modifications developed by Newcomer Supply Laboratory.
-
![]()
SOLUTION:
| 1 Liter | 1 Gallon | 20 Liter Cube | |
| Decalcifying Solution, Formic Acid 5%, Aqueous | Part 1049B | Part 1049C | Part 1049E |
Additionally Needed:
| Decalcification End Point Set | Part 1051 |
For storage requirements and expiration date refer to individual bottle labels.
APPLICATION:
Newcomer Supply Decalcifying Solution, Formic Acid, 5% Aqueous, provides a moderate rate of decalcification while maintaining excellent cellular morphology. This solution is a general purpose decalcifier and is suitable for all bone specimen types from sternal or iliac crest bone marrow biopsies (light bone) to femoral head and long bone sections (compact bone).
METHOD:
Fixation: Formalin 10% Phosphate Buffered (Part 1090)
- See Procedure Note #1.
Technique: Paraffin sections cut at 5 microns on adhesive slides
Solutions: All solutions are manufactured by Newcomer Supply, Inc.
PROCEDURE:
- Fix bone specimen in fixative of choice, for a length of time sufficient for specimen size and type.
- See Procedure Notes #2 and #3.
- Wash fixed specimen in running tap water for 10 minutes.
- Submerge fixed bone segment(s) in container of Decalcifying Solution, Formic Acid 5%, Aqueous that adequately covers the specimen. A 20:1 ratio is recommended.
- See Procedure Notes #4 and #5.
- Check the specimen regularly for adequate solution coverage during the decalcification process for optimal decalcifying reaction. Decalcification time will vary and is dependent on size and weight of bone.
- Check light bone samples every 30 to 60 minutes; check compact bone samples every 1 to 2 hours.
- Bone marrow or light bone biopsies, on the average, will decalcify in 4 to 6 hours.
- A 3 mm thick section of femoral head, on the average, will decalcify in 8 to 24 hours.
- Check completion of decalcification with Decalcification End Point Set (Part 1051) regularly to deter over-decalcification and loss of cellular morphology.
- See Procedure Note #6.
- Wash the specimen in running tap water when decalcification is judged to be complete. Suggested time for small samples is 30-60 minutes; larger bones 1-4 hours or according to laboratory protocol established times.
- Additional trimming of decalcified bone can occur at this stage to a size and thickness suitable for tissue processing.
- Proceed with laboratory tissue processing procedure for bone specimens.
- Trim block(s) and section the processed, paraffin embedded bone; if block trimming or sectioning is impaired due to bone hardness, surface decalcification is recommended.
- Perform surface decalcification by soaking the paraffin block with exposed tissue surface side down in Decalcifying Solution, Formic Acid 5%, Aqueous for 15-60 minutes. Rinse block thoroughly with distilled water to remove corrosive acids and re-section.
- See Procedure Note #7.
PROCEDURE NOTES:
- Other fixatives that provide satisfactory results for bone specimens are: AZF Fixative (Part 1009), B-5 Fixative Modified, Zinc Chloride (Part 1015), Bouin Fluid (Part 1020), Zamboni Fixative (Part 1459) and Zinc Formalin Fixative (Part 1482).
- If possible, reduce the overall size of a larger bone specimen by bisecting or cutting the bone into smaller pieces and remove any excess attached soft tissue or skin for faster fixation. A maximum bone thickness of 3-5 mm is recommended.
- To ensure optimal staining results, adequate fixation of bone is essential before exposing specimen to decalcification solution.
- Decalcification solution should be in contact with all specimen surfaces. If multiple pieces are in one container, ensure that pieces are separated and/or suspended and not in direct contact or stacked on top of each other. Change the solution at least daily and never add to or mix fresh solution with old.
- Decalcification can be enhanced with the use of low speed agitation with either a stir bar/stir plate or rotator/shaker.
- Decalcification end-point testing can also be accomplished through specimen radiography. Physical testing (probing or bending) of the bone is not recommended.
- Surface decalcification removes only a thin layer of residual calcium from the tissue block surface. This will allow only a few calcium-free sections to be obtained. Repeating the surface decalcification process for additional sections may be required.
REFERENCES:
- Bancroft, John D., and Marilyn Gamble. Theory and Practice of Histological Techniques. 6th ed. Oxford: Churchill Livingstone Elsevier, 2008. 338-343.
- Luna, Lee G. Manual of Histologic Staining Methods of the Armed Forces Institute of Pathology. 3rd ed. New York: Blakiston Division, McGraw-Hill, 1968. 6-11.
- Urban, Ken. “Routine Decalcification of Bone.” Laboratory Medicine 12.4 (1981): 207-212.
- Villanueva, Anthony. “Experimental Studies in Demineralization and Its Effects on Cytology and Staining of Bone Marrow Cells.” The Journal of Histotechnology 9.3 (1986): 155-161.
- Modifications developed by Newcomer Supply Laboratory.
![]()
SOLUTION:
| 1 Liter | 1 Gallon | |
| Decalcifying Solution, Formic Acid/Formalin | Part 10493B | Part 10493C |
Additionally Needed:
| Decalcification End Point Set | Part 1051 |
For storage requirements and expiration date refer to individual bottle labels.
APPLICATION:
Newcomer Supply Decalcifying Solution, Formic Acid/Formalin combines bone decalcification and fixation into a one-step time saving process. This solution provides good cellular morphology preservation with a moderate rate of decalcification that is designed for light bone specimens such as sinus contents and disc material. It is not recommended for femoral head and long bone sections.
METHOD:
Fixation: Separate fixation not required
Technique: Paraffin sections cut at 4 microns on adhesive slides
Solutions: All solutions are manufactured by Newcomer Supply, Inc.
PROCEDURE:
-
- Submerge bone segment in Decalcifying Solution, Formic Acid/Formalin, adequately covering specimen at a 20:1 ratio.
-
- See Procedure Notes #1 and #2.
-
- Check the specimen regularly for adequate solution coverage. Change solution daily and do not add or mix fresh solution with old.
- Decalcification time will vary, dependent on bone size and weight.
-
- Check light bone samples every 1 to 2 hours.
- Light bone specimens, on average, will fix and decalcify in 4 to 6 hours.
-
- Check decal completion at regular intervals with Decalcification End Point Set (Part 1051) to deter over-decalcification.
-
- See Procedure Note #3.
-
- Wash in running tap water when decalcification is complete.
-
- Wash small samples 30-60 minutes.
- Wash larger bones 1-4 hours.
- Additional trimming of decaled bone can occur at this point to size and thickness suitable for tissue processing.
-
- Proceed with tissue processing procedure for bone specimens.
- Trim block and section bone. If trimming or sectioning is impaired due to bone hardness, surface decalcification is recommended.
-
- See Procedure Note #4.
-
- Perform surface decalcification: Soak exposed tissue surface side down in recommended decalcifying solution for 15-60 minutes. Rinse block with distilled water to remove corrosive acids and re-section.
-
- See Procedure Note #5.
-
- Submerge bone segment in Decalcifying Solution, Formic Acid/Formalin, adequately covering specimen at a 20:1 ratio.
PROCEDURE NOTES:
-
- Decal solution should be in contact with all specimen surfaces. For multiple pieces, ensure pieces are separated or suspended and not in direct contact or stacked on each other.
- Enhance fixation/decalcification with low-speed agitation shaker, rotator or stir plate.
- Decalcification end-point testing can also be done with specimen radiography. Physical probing of bone is not recommended.
- Decalcifying Solution, Formic Acid/Formalin is not a preferred product for surface decalcification. Decalcifying Solution, Formic Acid 5%, Aqueous (Part 1049) and Decalcifying Solution, Formic/Citrate (Part 10492) are recommended for optimal surface decalcification.
- Only a few calcium-free sections will be obtained after surface decalcification. Repeat the process for additional sections.
REFERENCES:
-
- Bancroft, John D., and Marilyn Gamble. Theory and Practice of Histological Techniques. 6th ed. Oxford: Churchill Livingstone Elsevier, 2008. 338-343.
- Luna, Lee G. Manual of Histologic Staining Methods of the Armed Forces Institute of Pathology. 3rd ed. New York: Blakiston Division, McGraw-Hill, 1968. 6-11.
- Urban, Ken. “Routine Decalcification of Bone.” Laboratory Medicine 12.4 (1981): 207-212.
- Villanueva, Anthony. “Experimental Studies in Demineralization and Its Effects on Cytology and Staining of Bone Marrow Cells.” The Journal of Histotechnology3 (1986): 155-161.
- Modifications developed by Newcomer Supply Laboratory.
![]()
SOLUTION:
| 500 ml | 1 Liter | 1 Gallon | |
| Decalcifying Solution, Formic/Citrate | Part 10492A | Part 10492B | Part 10492C |
Additionally Needed:
| Decalcification End Point Set | Part 1051 |
For storage requirements and expiration date refer to individual bottle labels.
APPLICATION:
Newcomer Supply Decalcifying Solution, Formic/Citrate uses an acid decalcifying agent along with an added citrate buffer to help prevent cellular swelling and distortion during the decalcification process. This combination of reagents provides rapid decalcification while maintaining excellent cellular morphology and is good for all bone specimen types and is especially suitable for compact bone.
METHOD:
Fixation: Formalin 10%, Phosphate Buffered (Part 1090)
-
-
- See Procedure Note #1.
-
Technique: Paraffin sections cut at 4 microns on adhesive slides
Solutions: All solutions are manufactured by Newcomer Supply, Inc.
PROCEDURE:
-
- Fix bone for a length of time sufficient for specimen size and type.
-
- See Procedure Note #2.
-
- Adequate bone fixation is essential before decal solution exposure.
- Wash fixed specimen in running tap water for 10 minutes.
- Submerge fixed bone segment in Decalcifying Solution, Formic/Citrate, adequately covering specimen at a 20:1 ratio.
-
- See Procedure Notes #3 and #4.
-
- Check the specimen regularly for adequate solution coverage. Change solution daily and do not add or mix fresh solution with old.
- Decalcification time will vary, dependent on bone size and weight.
-
- Check light bone samples every 30 to 60 minutes.
- Check compact bone samples every 1 to 2 hours.
- Bone marrow or light bone biopsies, on average, will decalcify in 1 to 2 hours.
- 3 mm thick section of femoral head, on average, will decalcify in 4 to 12 hours.
-
- Check decal completion at regular intervals with Decalcification End Point Set (Part 1051) to deter over-decalcification.
-
- See Procedure Note #5.
-
- Wash in running tap water when decalcification is complete.
-
- Wash small samples 30-60 minutes.
- Wash larger bones 1-4 hours.
- Additional trimming of decalcified bone can occur at this point to size and thickness suitable for tissue processing.
-
- Proceed with tissue processing procedure for bone specimens.
- Trim block and section bone. If trimming or sectioning is impaired due to bone hardness, surface decalcification is recommended.
- Perform surface decalcification: Soak exposed tissue surface side down in Decalcifying Solution, Formic/Citrate for 15-60 minutes. Rinse block with distilled water to remove corrosive acids and re-section.
-
- See Procedure Note #6.
-
- Fix bone for a length of time sufficient for specimen size and type.
PROCEDURE NOTES:
-
- Other fixatives suitable for bone specimens include: AZF Fixative (Part 1009), B-5 Fixative Modified, Zinc Chloride (Part 1015), Bouin Fluid (Part 1020), Zamboni Fixative (Part 1459) and Zinc Formalin Fixative (Part 1482).
- Reduce size of a larger bone by bisecting bone into smaller pieces and remove excess soft tissue and skin for faster fixation. Maximum bone thickness of 3-5 mm is recommended.
- Decal solution should be in contact with all specimen surfaces. For multiple pieces, ensure pieces are separated or suspended and not in direct contact or stacked on each other.
- Enhance decal with low-speed agitation shaker, rotator or stir plate.
- Decalcification end-point testing can also be done with specimen radiography. Physical probing of bone is not recommended.
- Only a few calcium-free sections will be obtained after surface decalcification. Repeat the process for additional sections.
REFERENCES:
-
- Bancroft, John D., and Marilyn Gamble. Theory and Practice of Histological Techniques. 6th ed. Oxford: Churchill Livingstone Elsevier, 2008. 338-343.
- Luna, Lee G. Manual of Histologic Staining Methods of the Armed Forces Institute of Pathology. 3rd ed. New York: Blakiston Division, McGraw-Hill, 1968. 6-11.
- Urban, Ken. “Routine Decalcification of Bone.” Laboratory Medicine4 (1981): 207-212.
- Villanueva, Anthony. “Experimental Studies in Demineralization and Its Effects on Cytology and Staining of Bone Marrow Cells.” The Journal of Histotechnology3 (1986): 155-161.
- Modifications developed by Newcomer Supply Laboratory.
![]()
SOLUTION:
| 1 Liter | 1 Gallon | 10 Liter Cube | |
| Decalcifying Solution, EDTA/Sucrose | Part 1048B | Part 1048C | Part 1048D |
Additionally Needed:
| Decalcification End Point Set | Part 1051 |
For storage requirements and expiration date refer to individual bottle labels.
APPLICATION:
Newcomer Supply Decalcifying Solution, EDTA/Sucrose procedure uses a chelating agent with an added TRIS buffer for gentle bone decalcification. Decalcification rate will be slower but preservation of cellular morphology is excellent and viability of staining for enzymes, immunohistochemistry antigenicity and electron microscopy is maintained. This solution is not recommended for use when proteoglycan preservation in articular cartilage is important.
METHOD:
Fixation: Formalin 10%, Phosphate Buffered (Part 1090)
-
-
- See Procedure Note #1.
-
Technique: Paraffin sections cut at 4 microns on adhesive slides
Solutions: All solutions are manufactured by Newcomer Supply, Inc.
PROCEDURE:
-
- Fix bone for a length of time sufficient for specimen size and type.
-
- See Procedure Note #2.
-
- Adequate bone fixation is essential before decal solution exposure.
- Wash fixed specimen in running tap water for 10 minutes.
- Submerge fixed bone segment in Decalcifying Solution, EDTA/Sucrose, adequately covering specimen at a 20:1 ratio.
-
- See Procedure Notes #3 and #4.
-
- Check specimen daily for adequate solution coverage. Change solution at least daily to ensure chelating agent is not depleted by its reaction with calcium. Do not add or mix fresh solution with old.
- Decalcification with Decalcifying Solution, EDTA/Sucrose can take from 2-14 days, dependent on specimen type, thickness and weight. Larger bones may require longer decal exposure.
- Check decal completion at regular intervals with Decalcification End Point Set (Part 1051) to deter over-decalcification.
-
- See Procedure Note #5.
-
- Wash in running tap water when decalcification is complete.
-
- Wash small samples 30-60 minutes.
- Wash larger bones 1-4 hours.
- Additional trimming of decaled bone can occur at this point to size and thickness suitable for tissue processing.
-
- Proceed with tissue processing procedure for bone specimens.
- Fix bone for a length of time sufficient for specimen size and type.
PROCEDURE NOTES:
-
- Other fixatives suitable for bone specimens include: AZF Fixative (Part 1009), B-5 Fixative Modified, Zinc Chloride (Part 1015), Bouin Fluid (Part 1020), Zamboni Fixative (Part 1459) and Zinc Formalin Fixative (Part 1482).
- Reduce size of a larger bone by bisecting bone into smaller pieces and remove excess soft tissue and skin for faster fixation. Maximum bone thickness of 3-5 mm is recommended.
- Decal solution should be in contact with all specimen surfaces. For multiple pieces, ensure pieces are separated or suspended and not in direct contact or stacked on each other.
- Enhance decal with low-speed agitation shaker, rotator or stir plate.
- Decalcification end-point testing can also be done with specimen radiography. Physical probing of bone is not recommended.
REFERENCES:
-
- Bancroft, John D., and Marilyn Gamble. Theory and Practice of Histological Techniques. 6th ed. Oxford: Churchill Livingstone Elsevier, 2008. 338-343.
- Callis, Gayle and Diane Sterchi. “Decalcification of Bone: Literature Review and Practical Study of Various Decalcifying Agents, Methods, and Their Effects on Bone Histology.” The Journal of Histotechnology 1 (1998): 49-58.
- Hao, Zhengling, Vicki Kalscheur, and Peter Muir. “Decalcification of Bone for Histochemistry and Immunohistochemistry Procedures.” The Journal of Histotechnology1 (2002): 33-37.
- Urban, Ken. “Routine Decalcification of Bone.” Laboratory Medicine4 (1981): 207-212.
- Villanueva, Anthony. “Experimental Studies in Demineralization and Its Effects on Cytology and Staining of Bone Marrow Cells.” The Journal of Histotechnology3 (1986): 155-161.
- Modifications developed by Newcomer Supply Laboratory.
![]()
SOLUTION:
| 1 Gallon | |
| Davidson Fixative | Part 1045A |
For storage requirements and expiration date refer to individual bottle label.
APPLICATION:
Newcomer Supply Davidson Fixative is an alcohol-formalin-acetic acid based fixative with human, veterinary and research applications. This ready-to-use fixative (also known as Hartmann’s Solution) is recommended for a variety of specimens, including eyes and testes, penetrates structures quickly, preserves morphological detail and immunohistochemical staining.
Tissues placed in Davidson Fixative turn white/opaque, enhancing the visibility and yield of lymph nodes in fatty breast, colon and radical dissections. Overnight fixation is recommended for large and/or fatty specimens and lymph node detection.
METHOD:
Fixation Recommendations:
-
- Small Biopsies: Up to 24 hours.
- Mice Eyes: Up to 12 hours.
- Rat and Rabbit Eyes: Up to 24 hours.
- Large Eyes (human or animal): 48-72 hours.
- Mollusks: 24-48 hours.
- Lymph Nodes: Up to 24 hours. Small nodes (5 mm or less) should be halved. Dissect larger nodes so that no piece is thicker than 2-3 mm.
Solutions: All solutions are manufactured by Newcomer Supply, Inc.
FIXATION PROCEDURE:
-
- Place tissue directly in Davidson Fixative after excision.
-
- See Procedure Note #1.
-
- Fix in Davidson Fixative for the recommended fixation time.
-
- See Procedure Note #2.
-
- Rinse Davidson fixed tissue in distilled water; 1-2 minutes.
- Hold tissue in either Formalin 10%, Phosphate Buffered (Part 1090) or in 70% Ethyl Alcohol (Part 10844) prior to processing.
- Place tissue directly in Davidson Fixative after excision.
PROCEDURE NOTES:
-
- If initially received in Formalin 10%, Phosphate Buffered, rinse specimen in tap water prior to placing in Davidson Fixative.
- Extended storage in Davidson Fixative may result in hard, brittle tissue. After recommended fixation time, transfer Davidson fixed tissue to 70% Ethyl Alcohol or Formalin 10%, Phosphate Buffered for storage.
REFERENCES:
-
- Eltoum, Isam, Jerry Fredenburgh, Russell Myers and William Grizzle. “Introduction to the Theory and Practice of Fixation of Tissues.” The Journal of Histotechnology3 (2001): 173-190.
- Howard, Dorothy, Earl Lewis, Jane Keller and Cecilia Smith. Histological Techniques for Marine Bivalve Mollusks and Crustaceans. 2nd ed. Oxford, MD: NOAA, National Ocean Service, 2004. 60.
- Kiernan, J. A. Histological and Histochemical Methods: Theory and Practice. 3rd ed. London, Ontario: Arnold, 2003. 28-29.
- Latendresse, John R., Alan R. Warbrittion, Henning Jonassen, and Dianne M. Creasy. “Fixation of Testes and Eyes Using a Modified Davidson’s Fluid: Comparison with Bouin’s Fluid and Conventional Davidson’s Fluid.” Toxicologic Pathology (2002): 524-33.
- Modifications developed by Newcomer Supply Laboratory.
![]()
SOLUTION:
| 500 ml | |
| Crystal Violet Stain 1%, Aqueous, Brown-Hopps | Part 1041A |
Additionally Needed:
| Gram, Multi-Tissue, Artificial Control Slides OR Gram+ & Gram- Bacteria, Artificial Control Slides |
Part 4256 OR Part 4255 |
| Xylene, ACS | Part 1445 |
| Alcohol, Ethyl Denatured, 100% | Part 10841 |
| Alcohol, Ethyl Denatured, 95% | Part 10842 |
| Iodine, Gram, Aqueous | Part 1140 |
| Acetone, ACS | Part 10014 |
| Basic Fuchsin Stain 0.25%, Aqueous | Part 1011 |
| Gallego Solution | Part 1098 |
| Picric Acid-Acetone 0.05% | Part 13351 |
| Acetone-Xylene 1:1 | Part 10015 |
For storage requirements and expiration date refer to individual product labels.
APPLICATION:
Newcomer Supply Gram Stain, Brown-Hopps, a modification of the original Gram Stain technique, is used for differential staining of gram-positive and gram-negative bacteria in tissue sections.
METHOD:
Fixation: Formalin 10%, Phosphate Buffered (Part 1090)
Technique: Paraffin sections cut at 4 microns
Solutions: All solutions are manufactured by Newcomer Supply, Inc.
All Newcomer Supply stain procedures are designed to be used with Coplin jars filled to 40 ml following the provided staining procedure.
STAINING PROCEDURE:
-
- If necessary, heat dry tissue sections/slides in oven.
- Deparaffinize sections thoroughly in three changes of xylene, 3 minutes each. Hydrate through two changes each of 100% and 95% ethyl alcohols, 10 dips each. Wash well with distilled water.
-
- See Procedure Notes #1 and #2.
-
- Stain slides in Crystal Violet Stain 1%, Aqueous, Brown-Hopps for 2 minutes.
- Rinse well in distilled water.
- Mordant in Iodine, Gram, Aqueous (Part 1140) for 5 minutes.
- Rinse well in running tap water.
- Blot one slide at a time and individually decolorize in Acetone, ACS (Part 10014) until the blue color stops running; 1-2 dips.
-
- Sections should be very light gray in color.
-
- Quickly rinse in running tap water.
- Place in Basic Fuchsin Stain 0.25%, Aqueous (Part 1011) for 5 minutes.
- Rinse well in running tap water.
- Differentiate sections in Gallego Solution (Part 1098) for 5 minutes.
- Rinse in running tap water. Blot off slides, but not to dryness.
-
- Proceed with Steps #13 to #16 one slide at a time.
-
- Dip quickly in Acetone, ACS for 1-2 dips.
- Dip directly in Picric Acid-Acetone 0.05% (Part 13351) for 3-10 dips.
- Dip quickly in Acetone-Xylene 1:1 (Part 10015) for 5 dips.
- Clear in three changes of xylene, 10 dips each; coverslip with compatible mounting medium.
RESULTS:
| Gram-positive bacteria | Blue |
| Gram-negative bacteria | Red |
| Nuclei | Red |
| Background tissue | Yellow |
PROCEDURE NOTES:
-
- Drain slides after each step to prevent solution carry over.
- Do not allow sections to dry out at any point during procedure.
- If using a xylene substitute, closely follow the manufacturer’s recommendations for deparaffinization and clearing steps.
REFERENCES:
-
- Brown, Robert C., and Howard C. Hopps. “Staining of Bacteria in Tissue Sections: A Reliable Gram Stain Method.” American Journal of Clinical Pathology 2 (1973): 234-240.
- Carson, Freida L., and Christa Hladik Cappellano. Histotechnology: A Self-instructional Text. 4th ed. Chicago: ASCP Press, 2015. 222-224.
- Luna, Lee G. Histopathologic Methods and Color Atlas of Special Stains and Tissue Artifacts. Gaitheresburg, MD: American Histolabs, 1992. 194-195.
- Modifications developed by Newcomer Supply Laboratory.
CI 42555
- Shelf Life is 4 years from date of manufacture.
(use: Mowry Colloidal Iron.)
![]()
SOLUTIONS:
| 500 ml | 1 Liter | 1 Gallon | |
| EDTA Buffer 0.001M, pH 8.0 | Part 1056A | Part 1056B | Part 1056C |
| Citrate Buffer 0.01M, pH 6.0 | Part 10355A | Part 10355B | Part 10355C |
For storage requirements and expiration date refer to individual bottle labels.
APPLICATION:
Newcomer Supply Buffer Solutions for Epitope Retrieval procedure provides a choice of two ready-to-use buffers for antigen retrieval. The majority of epitopes/antigens are masked in formalin fixed paraffin embedded (FFPE) tissues. Antigen retrieval methods improve antibody binding by de-masking the FFPE chemical modification of epitopes through heat induced epitope retrieval (HIER) procedures when performed prior to immunohistochemical (IHC) staining.
No retrieval buffer is optimal for all tissue antigens. The choice of buffer will depend upon the suggested retrieval buffer specific to an individual antibody. Refer to each antibody datasheet for recommended chemical composition and pH value of retrieval buffer.
-
- Part 1056: EDTA Buffer 0.001M, pH 8.0 is an alkaline buffer optimal for use with primary antibodies that require an EDTA buffer at a higher pH for
- Part 10355: Citrate Buffer 0.01M, pH 6.0 is an acidic buffer optimal for use with primary antibodies that require a citrate buffer at a lower pH for HIER.
METHOD:
Fixation: Formalin 10%, Phosphate Buffered (Part 1090)
Technique: Paraffin sections on adhesive slides
Solutions: All solutions are manufactured by Newcomer Supply, Inc.
EPITOPE RETRIEVAL PROCEDURE:
-
- Choose a HIER procedure that suits the laboratory and anticipated workload.
-
- Instrumentation and methods for HIER include but not limited to: microwave, pressure cooker and steamer methods.
-
- Validate instrumentation according to manufacturer’s suggested instructions for antigen retrieval methods.
- After validation of instrumentation and methodology; deparaffinize sections thoroughly in three changes of xylene, 3 minutes each. Hydrate through two changes each of 100% and 95% ethyl alcohols, 10 dips each. Wash well with distilled water.
-
- See Procedure Notes #2 and #3.
-
- Proceed with a validated method of HIER per established protocol implementing either EDTA Buffer 0.001M, pH 8.0 or Citrate Buffer 0.01M, pH 6.0.
- After completion of HIER, allow sufficient time for slides to cool before proceeding with IHC protocol.
- Choose a HIER procedure that suits the laboratory and anticipated workload.
PROCEDURE NOTES:
-
- Drain slides after each step to prevent solution carry over.
- Do not allow sections to dry out during
- If using a xylene substitute, closely follow the manufacturer’s recommendations for deparaffinization and clearing steps.
REFERENCES:
-
- Bancroft, John D., and Marilyn Gamble. Theory and Practice of Histological Techniques. 6th ed. Oxford: Churchill Livingstone Elsevier, 2008. 442-445, 458-459.
- Shi, Shan-Rong, Richard J. Cote, Lillian L. Young, and Clive R. Taylor. “Antigen Retrieval Immunohistochemistry: Practice and Development.” The Journal of Histotechnology2 (1997): 145-154.
- Tacha, David, and Maria Teixeira. “History and Overview of Antigen Retrieval: Methodologies and Critical Aspects.” The Journal of Histotechnology4 (2002): 237-242.
- Modifications developed by Newcomer Supply Laboratory.
![]()
SOLUTION:
| 250 ml | |
| Trichrome Stain, Wheatley Modified | Part 10351A |
Additionally Needed:
| Alcohol, Ethyl Denatured, 70% | Part 10844 |
| Acetic Acid, Glacial, ACS | Part 10010 |
| Alcohol, Ethyl Denatured, 95% | Part 10842 |
| Alcohol, Ethyl Denatured, 100% | Part 10841 |
| Xylene, ACS | Part 1445 |
For storage requirements and expiration date refer to individual bottle labels.
APPLICATION:
Newcomer Supply Trichrome Stain, Wheatley Modified provides a ready-to-use solution for rapid staining and permanent slide preparation for detection and identification of intestinal protozoa, flagellates and microsporidia in fecal smears.
METHOD:
Fixation: According to laboratory protocol for fecal/stool samples
-
- See Procedure Note #1.
Solutions: All solutions are manufactured by Newcomer Supply, Inc.
All Newcomer Supply stain procedures are designed to be used with Coplin jars filled to 40 ml following the provided staining procedure.
STAINING PROCEDURE:
-
- Prepare a well-made fecal smear from a fresh or fixed specimen with focus on uniform distribution of material.
-
- Fix fresh smears according to recommendations.
-
- Allow smears to dry for an hour at 35-37°C or overnight at room temperature.
- Place slides in 70% ethyl alcohol; two changes 3 minutes each.
-
- See Procedure Note #2.
-
- Stain in Trichrome Stain, Wheatley Modified for 8-10 minutes.
- Prepare Acid-Ethanol Solution; combine and mix well.
-
- Alcohol, Ethyl Denatured, 95% (Part 10842) 100 ml
- Acetic Acid, Glacial, ACS (Part 10010) 5 ml
-
- Differentiate slides in Acid-Ethanol Solution; 3-5 seconds.
- Rinse quickly in 100% ethyl alcohol; 2 dips.
- Dehydrate in two changes of 100% ethyl alcohol; 3 minutes each.
- Clear in three changes of xylene, 10 dips each; coverslip with compatible mounting medium.
- Prepare a well-made fecal smear from a fresh or fixed specimen with focus on uniform distribution of material.
PROCEDURE NOTES:
-
- Stool specimens received in modified polyvinyl alcohol (PVA) and sodium acetate-acetic acid-formalin fixatives (SAF) or freshly fixed smears in a modified Schaudinn Solution should be fixed and prepared according to manufacturer’s recommendations.
- Drain slides after each step to prevent solution carry over.
RESULTS:
| Nuclear chromatin & chromatoid bodies | Red to purple |
| Bacteria & ingested RBC’s | Red to purple |
| Cytoplasm of cysts | Blue/green with purple tinge |
| Cytoplasm of protozoan trophozoites | Blue/green with purple tinge |
| Microsporidia spores | Pink/red wall with clear interior |
| Background | Green |
REFERENCES:
-
- Bauer, John D. Clinical Laboratory Methods. 9th ed. St. Louis: Mosby, 1982. 951-952.
- “CDC – DPDx – Diagnostic Procedures – Stool Specimens,” cdc.gov/dpdx/diagnosticprocedures/stool/staining.html.
- Ryan, Norbert, G. Sutherland, K. Coughlan, M. Globan, J. Doubletree, J. Marshall, R.W. Baird, J. Pedersen, and Brian Dwyer. “A New Trichrome-Blue Stain for Detection of Microsporidial Species in Urine, Stool and Nasopharyngeal Specimens.” Journal of Clinical Microbiology2 (1993): 3264-3269.
- Sheehan, Dezna C., and Barbara B. Hrapchak. Theory and Practice of Histotechnology. 2nd ed. St. Louis: Mosby, 1980. 250.
- Wheatley, W.B. “A Rapid Staining Procedure for Intestinal Amoeba and Flagellates.” American Journal of Clinical Pathology 21 (1951): 990-991.
- Modifications developed by Newcomer Supply Laboratory.
(use: Stock solution for Grocott Solution GMS.)
(use: Working dilution for Grocott Solution GMS.)
![]()
SOLUTION:
| 250 ml | 500 ml | 1 Liter | |
| Chrome Alum-Gelatin Adhesive | Part 1033A | Part 1033B | Part 1033C |
Additionally Needed:
| Non-Adhesive Slides: | |
| Plain | Part 6210 |
| Frosted End | Part 6215 OR Part 6216 |
| Colored End | Part 6206 |
For storage requirements and expiration date refer to individual product labels.
APPLICATION:
Newcomer Supply Chrome Alum-Gelatin Adhesive provides a blended solution of chrome alum and high-quality gelatin that promotes a strong adhesive bond between tissue sections and microscopic slides. Chrome Alum-Gelatin Adhesive can be used as an additive to water baths or as subbed slide/direct slide coating application to prevent or reduce the loss of tissue sections due to the nature of the tissue, section thickness or harsh staining treatments, while leaving minimal or no background staining.
METHOD:
Technique: Frozen or paraffin sections
-
-
- See Procedure Note #1.
-
Solutions: All solutions are manufactured by Newcomer Supply, Inc.
PROCEDURES:
Water Bath Method for Paraffin Sections:
-
-
- Fill water bath with distilled or deionized water, set and maintain temperature at 5°C-10°C below embedding medium melting point.
-
- See Procedure Note #2.
-
- Add 10 ml of Chrome Alum-Gelatin Adhesive for each liter of water bath water; combine and mix well.
- Float sections onto non-adhesive glass slides. Drain and dry.
-
- See Procedure Note #3.
-
- Fill water bath with distilled or deionized water, set and maintain temperature at 5°C-10°C below embedding medium melting point.
-
Subbed Slide Preparation:
-
-
- Use only clean and dry non-adhesive slides.
- Smear method: Place a large drop of undiluted Chrome Alum-Adhesive solution on non-adhesive glass slide, spread evenly creating a thin film.
-
- See Procedure Notes #3, #4 and #5.
-
- To sub multiple or racked slides; Dip slides in sufficient amount of undiluted Chrome Alum-Gelatin Adhesive for 1-3 minutes, ensuring that slide surfaces are thoroughly coated.
-
- Chrome Alum-Gelatin Adhesive may be difficult to remove from slide racks and glassware. Wash as soon as possible after use and/or set aside dedicated racks and glassware for subbing procedure.
- See Procedure Notes #3, #4 and #5.
-
-
Subbed Slide Method for Paraffin and Frozen Sections:
-
-
- Paraffin Sections: float tissue sections onto thoroughly dried subbed slides. Drain and dry.
- Frozen Sections: pick up sections on thoroughly dried subbed slides. Thaw and dry.
-
PROCEDURE NOTES:
-
-
-
- The use of Chrome Alum-Gelatin Adhesive is not recommended with silver stains due to potential background staining.
- Thoroughly clean interior/exterior of water bath on a daily basis to deter contaminates and residual adhesive build-up.
- The use of adhesive slides with gelatin adhesives is not recommended.
- Drain and dry vertically in slide racks in a “dust-free” environment.
-
- Can be dried in 60°C oven for approximately 1 hour.
-
- Store dried subbed slides indefinitely in a clean slide box at room temperature in a humidity/temperature controlled environment.
-
- Slides not thoroughly dried before storing will adhere together.
-
-
-
REFERENCES:
-
-
- Kiernan, J. A. Histological and Histochemical Methods: Theory and Practice. 3rd ed. London, Ontario: Arnold, 2003. 50-51.
- Luna, Lee G. Histopathologic Methods and Color Atlas of Special Stains and Tissue Artifacts. Gaitheresburg, MD: American Histolabs, 1992. 584-585.
- Marcos, Ricardo, Eduardo Rocha and Rogerio Monteiro. “Strategies to Maximize Adhesion of Thick Paraffin Sections of the Brown Trout Liver for Stereological Purposes.” The Journal of Histotechnology 1 (2001): 37-42.
- Modifications developed by Newcomer Supply Laboratory.
-
![]()
SOLUTION:
| 1 Liter | 1 Gallon | 20 Liter Cube | |
| Bouin Fluid | Part 1020A | Part 1020B | Part 1020C |
For storage requirements and expiration date refer to individual bottle labels.
APPLICATION:
Newcomer Supply Bouin Fluid is a ready-to-use picric acid based fixative combined with acetic acid and formalin. Bouin Fluid penetrates rapidly, fixes evenly, provides crisp nuclear staining and preserves structures with soft and delicate features.
Bouin Fluid is recommended for a variety of specimens including bone marrow clots and biopsies, gastrointestinal tract biopsies, testicular biopsies and lymph nodes. It also serves as both fixative and mordant for tissues stained with trichrome procedures.
METHOD:
Fixation Recommendations:
-
- Bone Marrow Clot/Biopsy: Minimum of 4 hours up to 24 hours.
- Lymph Nodes: Up to 24 hours. Small nodes (5 mm or less) should be halved. Dissect larger nodes so that no piece is thicker than 2-3 mm.
- Small Biopsies: A minimum of 4 hours.
Solutions: All solutions are manufactured by Newcomer Supply, Inc.
FIXATION PROCEDURE:
-
- Place specimen directly in Bouin Fluid after excision.
-
- See Procedure Notes #1 and #2.
-
- Hold tissue specimens in Bouin Fluid until ready to process or a maximum of 72 hours.
-
- See Procedure Note #3.
-
- Rinse Bouin fixed tissue thoroughly in 70% ethyl alcohol (Part 10844) for 1 hour prior to processing.
- Place on tissue processor starting in Formalin 10%, Phosphate Buffered (Part 1090) fixation step.
- Blocked and sectioned tissues may retain excess picric acid. The yellow picric acid pigment will normally be removed from tissue sections in the deparaffinization process. If needed, additional methods of removing picric acid are:
-
- Wash deparaffinized tissue sections in running tap water or in 70% ethyl alcohol until yellow pigment is removed.
- Rinse deparaffinized tissue sections in 70% ethyl alcohol saturated with lithium carbonate until yellow pigment is removed.
-
- Post-fixation applications of Bouin Fluid include use as a mordant to intensify color reactions in trichrome staining procedures.
-
- Refer to individual trichrome stain protocols for additional information.
-
- Place specimen directly in Bouin Fluid after excision.
PROCEDURE NOTES:
-
- If initially received in Formalin 10%, Phosphate Buffered, rinse specimen thoroughly in tap water prior to placing in Bouin Fluid.
- Bouin Fluid should not be used for preservation of red blood cells or tissues for electron microscopy examination.
- Extended storage of tissue in Bouin Fluid is not recommended
-
- After a maximum fixation time of 72 hours, transfer Bouin fixed wet tissue to 70% ethyl alcohol or Formalin 10%, Phosphate Buffered for long-term storage purposes.
-
REFERENCES:
-
- Carson, Freida L., and Christa Hladik Cappellano. Histotechnology: A Self-instructional Text. 4th ed. Chicago: ASCP Press, 2015. 19-20.
- Dapson, Janet Crookham, and Richard Dapson. Hazardous Materials in the Histopathology Laboratory: Regulations, Risks, Handling, and Disposal. 4th ed. Battle Creek, MI: Anatech, 2005. 150, 265-266.
- Sheehan, Dezna C., and Barbara B. Hrapchak. Theory and Practice of Histotechnology. 2nd ed. St. Louis: Mosby, 1980. 43.
- Modifications developed by Newcomer Supply Laboratory.
(use: Sulfated Alcian Blue for Amyloid.)
![]()
SOLUTION:
| 250 ml | 500 ml | |
| Biebrich Scarlet-Acid Fuchsin Stain, Elastic-Trichrome, Aqueous | Part 1016A | Part 1016B |
Additionally Needed:
| Picric Acid, Saturated Alcoholic OR Bouin Fluid |
Part 1337 OR Part 1020 |
| Ferric Chloride 10%, Aqueous | Part 10856 |
| Hematoxylin 5%, Alcoholic | Part 11623 |
| Iodine, Lugol’s, Aqueous | Part 12092 |
| Phosphomolybdic-Phosphotungstic Acid, Aqueous | Part 1332 |
| Aniline Blue Stain, Aqueous | Part 10072 |
| Acetic Acid 1%, Aqueous | Part 10012 |
| Xylene, ACS | Part 1445 |
| Alcohol, Ethyl Denatured, 100% | Part 10841 |
| Alcohol, Ethyl Denatured, 95% | Part 10842 |
For storage requirements and expiration date refer to individual bottle labels.
APPLICATION:
Newcomer Supply Modified Verhoeff Elastic-Masson Trichrome Stain combines elastic and trichrome staining for demonstration and definition of elastic fibers of all sizes, connective tissue and nuclei in a single tissue section. This procedure is useful in identifying normal tissue morphology as well as heart, liver, lung and kidney pathologic conditions.
METHOD:
Fixation: Formalin 10%, Phosphate Buffered (Part 1090)
Technique: Paraffin sections cut at 4 microns
Solutions: All solutions manufactured by Newcomer Supply, Inc.
All Newcomer Supply stain procedures are designed to be used with Coplin jars filled to 40 ml following the provided staining procedure.
STAINING PROCEDURE:
-
- Deparaffinize sections thoroughly in three changes of xylene, 3 minutes each. Hydrate through two changes each of 100% and 95% ethyl alcohols, 10 dips each. Wash well with distilled water.
-
- See Procedure Notes #1 and #2.
-
- Mordant in Picric Acid, Saturated Alcoholic (Part 1337) for 5 minutes or Bouin Fluid (Part 1020) at 56º C for 1 hour.
-
- See Procedure Note #3.
- Bouin Fluid mordant; Cool at room temperature for 5-10 minutes before proceeding.
- Skip Step #2 if tissue was originally Bouin fixed.
-
- Wash well in running tap water; rinse in distilled water.
- Prepare Verhoeff Working Solution:
-
- Hematoxylin 5%, Alcoholic (Part 11623) 20 ml
- Ferric Chloride 10%, Aqueous (Part 10856) 12 ml
- Iodine, Lugol’s, Aqueous (Part 12092) 8 ml
-
- Stain slides in Verhoeff Working Solution for 15 minutes.
- Rinse in several changes of tap water.
- Prepare fresh Ferric Chloride 2%, Aqueous.
-
- Ferric Chloride 10%, Aqueous 10 ml
- Distilled Water 40 ml
-
- Differentiate each slide individually in Ferric Chloride 2%, Aqueous with agitation; 2-10 dips.
-
- Check differentiation: rinse well in tap water, check microscopically for black elastic staining with gray background.
- If needed, repeat in Ferric Chloride 2%, Aqueous until desired elastic differentiation is achieved.
-
- Wash well in running tap water.
- Stain in Biebrich Scarlet-Acid Fuchsin Stain, Elastic-Trichrome, Aqueous for 3 minutes.
- Rinse in distilled water for 10 minutes.
- Differentiate in Phosphomolybdic-Phosphotungstic Acid, Aqueous (Part 1332) for 15 minutes.
-
- Until collagen is colorless but muscle remains red.
-
- Transfer into Aniline Blue Stain, Aqueous (Part 10072) for 3 minutes.
- Differentiate in Acetic Acid 1%, Aqueous (Part 10012) for 3 minutes.
- Dehydrate in two changes each of 95% and 100% ethyl alcohol. Clear in three changes of xylene, 10 dips each; coverslip with compatible mounting medium.
- Deparaffinize sections thoroughly in three changes of xylene, 3 minutes each. Hydrate through two changes each of 100% and 95% ethyl alcohols, 10 dips each. Wash well with distilled water.
RESULTS:
| Elastin | Blue-black |
| Muscle, keratin & cytoplasm | Red |
| Collagen | Blue |
| Nuclei | Red-brown to blue-black |
PROCEDURE NOTES:
-
- Drain slides after each step to prevent solution carry over.
- Do not allow sections to dry out at any point during procedure.
- The use of:
-
- Picric Acid, Saturated Alcoholic will reduce staining time.
- Bouin Fluid requires longer exposure but enhances Biebrich Scarlet-Acid Fuchsin staining (Step #10).
-
- If using a xylene substitute, closely follow the manufacturer’s recommendations for deparaffinization and clearing steps.
REFERENCES:
-
- Dapson, Janet Crookham, and Richard Dapson. Hazardous Materials in the Histopathology Laboratory: Regulations, Risks, Handling, and Disposal. 4th ed. Battle Creek, MI: Anatech, 2005. 150, 265-266.
- Garvey, Winsome. “Modified Elastic Tissue-Trichrome Stain.” Stain Technology 3 (1984): 213-216.
- Landas, Steve, M.T. Maher Strum and Karen Ellison. “Rapid Convenient Elastachrome Stain.” The Journal of Histotechnology 14.3 (1991): 191-192.
- Modifications developed by Newcomer Supply Laboratory.
(use: Masson or McLetchie Trichrome Stain.)
(use: Brown-Hopps mod. Gram Stain.)
(use: Brown-Brenn mod. Gram Stain. Can be used for Brown-Hopps)
CI 42500
- Shelf Life is 4 years from date of manufacture.
(use: Fluorescent dye.)
![]()
SOLUTION:
| 250 ml | 500 ml | 1 Liter | |
| Aminoalkylsilane Slide Adhesive | Part 1007A | Part 1007B | Part 1007C |
For storage requirements and expiration date refer to individual bottle labels.
APPLICATION:
Newcomer Supply Aminoalkylsilane Slide Adhesive is a working adhesive solution used to treat non-adhesive glass microscope slides and provide exceptionally strong tissue adhesion properties for paraffin and frozen tissue sections, while leaving very minimal or no background staining.
METHOD:
Technique: Paraffin or frozen sections
Solutions: All solutions are manufactured by Newcomer Supply, Inc.
PROCEDURE:
-
- Fill slide rack(s) with clean dry slides.
-
- If necessary, clean racked slides in 4-5 dips of Acetone (Part 10014) prior to treating.
-
- Shake bottle of Aminoalkylsilane Slide Adhesive before use. Pour solution into an appropriate size staining dish.
-
- Use sufficient solution to completely cover slides.
- Keep solution covered to avoid evaporation.
-
- Soak slides in the Aminoalkylsilane Slide Adhesive for 2 minutes.
-
- See Procedure Notes #1 and #2.
-
- Rinse slides well in three changes of distilled water; 5 dips each.
-
- Thorough rinsing removes excess adhesive and reduces occurrence of background staining.
-
- Drain slides. Blot and tap excess water to prevent water spotting.
- Dry slides in a 60°C oven for a minimum of 30 minutes or overnight at room temperature.
- Store dried treated slides in a clean slide box at room temperature.
-
- Slides will adhere together if not thoroughly dried before storing.
-
- Wash emptied slide racks after use to ensure adhesive is removed.
- Fill slide rack(s) with clean dry slides.
PROCEDURE NOTES:
-
- Store used Aminoalkylsilane Slide Adhesive in a separate well sealed container; reuse for up to three weeks.
- 250 ml of Aminoalkylsilane Slide Adhesive will treat 400 slides.
- Aminoalkylsilane Slide Adhesive is initially clear or light amber in color and may become cloudy and turn darker in color as it ages.
-
- Adhesive effectiveness will not diminish if these changes occur.
-
- Tissue section will strongly adhere to treated slide from first contact, position section carefully.
- To prevent formation of water blisters trapped between paraffin section and glass, drain and dry sectioned slides in a vertical position.
REFERENCES:
- Carson, Freida L., and Christa Hladik. Histotechnology: A Self-Instructional Text. 3rd ed. Chicago, Ill.: American Society of Clinical Pathologists, 2009. 70.
- Henderson, Colin. “Aminoalkylsilane: An Inexpensive Simple Preparation for Slide Adhesion.” The Journal of Histotechnology2 (1989): 123-124.
- Modifications developed by Newcomer Supply Laboratory.
CI 42780
- Shelf Life is 4 years from date of manufacture.
![]()
Tech Memo 1: Trichrome Stain, Masson, Aniline Blue
SOLUTION:
| 250 ml | 500 ml | |
| Aniline Blue Stain, Aqueous | Part 10072B | Part 10072C |
Additionally Needed:
| Trichrome, Liver Control Slides OR Trichrome, Multi-Tissue Control Slides |
Part 4690 OR Part 4693 |
| Xylene, ACS | Part 1445 |
| Alcohol, Ethyl Denatured, 100% | Part 10841 |
| Alcohol, Ethyl Denatured, 95% | Part 10842 |
| Bouin Fluid | Part 1020 |
| Hematoxylin Stain Set, Weigert Iron | Part 1409 |
| Biebrich Scarlet-Acid Fuchsin Stain, Aqueous | Part 10161 |
| Phosphomolybdic-Phosphotungstic Acid, Aqueous | Part 1332 |
| Acetic Acid 0.5%, Aqueous | Part 100121 |
| Coplin Jar, Plastic | Part 5184 (for microwave modification) |
For storage requirements and expiration date refer to individual bottle labels.
APPLICATION:
Newcomer Supply Trichrome Stain, Masson, Aniline Blue procedure, with included microwave modification, is used to differentially demonstrate connective tissue elements, collagen and muscle fibers.
METHOD:
Fixation: Formalin 10%, Phosphate Buffered (Part 1090)
Technique: Paraffin sections cut at 5 microns
-
- See Procedure Note #1.
Solutions: All solutions are manufactured by Newcomer Supply, Inc.
All Newcomer Supply stain procedures are designed to be used with Coplin jars filled to 40 ml following the staining procedure provided below.
STAINING PROCEDURE:
- Preheat Bouin Fluid (Part 1020) to 56-60°C in oven or water bath.
(Skip if using overnight method or microwave procedure.)
- Deparaffinize sections thoroughly in three changes of xylene, 3 minutes each. Hydrate through two changes each of 100% and 95% ethyl alcohols, 10 dips each. Wash well with distilled water.
- See Procedure Notes #2 and #3.
- Mordant in preheated Bouin Fluid for one hour at 56-60°C or overnight at room temperature. Cool at room temperature for 5-10 minutes.
- Skip Step #3 if tissue was originally Bouin fixed.
Microwave Modification: See Procedure Note #4.
- Place slides in a plastic Coplin jar containing Bouin Fluid and microwave for 5 minutes at 60°C. Allow slides to sit an additional 10 minutes in solution.
- Wash well in running tap water; rinse in distilled water.
- Prepare fresh Weigert Iron Hematoxylin; combine and mix well.
- Solution A: Ferric Chloride, Acidified 20 ml
- Solution B: Hematoxylin 1%, Alcoholic 20 ml
- Stain slides in fresh Weigert Iron Hematoxylin for 10 minutes.
- Wash in running tap water for 10 minutes; rinse in distilled water.
- See Procedure Note #5.
- Place slides in Biebrich Scarlet-Acid Fuchsin Stain, Aqueous for 2 minutes.
- Rinse in distilled water.
- Place slides in Phosphomolybdic-Phosphotungstic Acid, Aqueous for 10 to15 minutes.
- Transfer slides directly into Aniline Blue Stain, Aqueous for 5 minutes.
- Rinse in distilled water.
- Place slides in Acetic Acid 0.5%, Aqueous for 3 to 5 minutes.
- Dehydrate in two changes each of 95% and 100% ethyl alcohol. Clear in three changes of xylene, 10 dips each; coverslip with compatible mounting medium.
RESULTS:
| Collagen and mucin | Blue |
| Muscle fibers, cytoplasm and keratin | Red |
| Nuclei | Blue/black |
PROCEDURE NOTES:
- Using ammonium hydroxide to soak or face tissue blocks will alter the pH of tissue sections and greatly diminish trichrome staining.
- Drain staining rack/slides after each step to prevent solution carry over.
- Do not allow sections to dry out at any point during staining procedure.
- The suggested microwave procedure has been tested at Newcomer Supply using an “EB Sciences”, 850 watt microwave oven with temperature probe and agitation tubes. This procedure is reproducible in our laboratory. It is nonetheless a guideline and techniques should be developed for your laboratory which meet the requirements of your situation. Microwave devices should be placed in a fume hood or vented into a fume hood, according to manufacturer’s instructions, to prevent exposure to chemical vapors.
- If Weigert Iron Hematoxylin is not completely washed from tissue sections, nuclear and cytoplasmic staining may be compromised.
- If using a xylene substitute, closely follow the manufacturer’s recommendations for deparaffinization and clearing steps.
REFERENCES:
- Brown, Richard. Histologic Preparations: Common Problems and Their Solutions. Northfield, Ill.: College of American Pathologists, 2009. 95-101.
- Carson, Freida L., and Christa Hladik. Histotechnology: A Self-Instructional Text. 3rd ed. Chicago, Ill.: American Society of Clinical Pathologists, 2009. 162-165.
- Sheehan, Dezna C., and Barbara B. Hrapchak. Theory and Practice of Histotechnology. 2nd ed. St. Louis: Mosby, 1980. 191-192.
- Vacca, Linda L. Laboratory Manual of Histochemistry. New York: Raven Press, 1985. 308-310.
- Modifications developed by Newcomer Supply Laboratory.
Tech Memo 2: Trichrome Stain, McLetchie, Aniline Blue
SOLUTION:
| 250 ml | 500 ml | |
| Aniline Blue Stain, Aqueous | Part 10072B | Part 10072C |
Additionally Needed:
| Trichrome, Liver Control Slides OR Trichrome, Multi-Tissue Control Slides |
Part 4690 OR Part 4693 |
| Xylene, ACS | Part 1445 |
| Alcohol, Ethyl Denatured, 100% | Part 10841 |
| Alcohol, Ethyl Denatured, 95% | Part 10842 |
| Biebrich Scarlet-Acid Fuchsin Stain, Aqueous | Part 10161 |
| Iodine, Weigert & Lugol, Aqueous | Part 12092 |
| Phosphotungstic Acid 2%, Alcoholic | Part 13342 |
For storage requirements and expiration date refer to individual product labels.
APPLICATION:
Newcomer Supply Trichrome Stain, McLetchie, Aniline Blue procedure is useful for the demonstration of collagen and muscle fibers, has excellent staining results with bone marrow and renal biopsies and provides time effective trichrome results. This modified protocol differs from a standard trichrome procedure by not using a Bouin Fluid mordant or a hematoxylin nuclear stain.
METHOD:
Fixation: Formalin 10%, Phosphate Buffered (Part 1090)
Technique: Paraffin sections cut at 5 microns
- See Procedure Note #1.
Solutions: All solutions are manufactured by Newcomer Supply, Inc.
All Newcomer Supply stain procedures are designed to be used with Coplin jars filled to 40 ml following the staining procedure provided below.
STAINING PROCEDURE:
- Deparaffinize sections thoroughly in three changes of xylene, 3 minutes each. Hydrate through two changes each of 100% and 95% ethyl alcohols, 10 dips each. Wash well with distilled water.
- See Procedure Notes #2 and #3.
- Place slides in Biebrich Scarlet-Acid Fuchsin Stain, Aqueous (Part 10161) for 5 minutes.
- Rinse slides in several changes of distilled water.
- Place slides in Iodine, Weigert & Lugol, Aqueous (Part 12092) for 2 minutes.
- Rinse slides in several changes of distilled water.
- Differentiate slides one at a time in Phosphotungstic Acid 2%, Alcoholic (Part 13342) for 15-30 seconds. Gently agitate slides once.
- To deter over-differentiation do not exceed the 30 second timing in Phosphotungstic Acid 2%, Alcoholic.
- If sections are over-differentiated, wash slides well in distilled water and repeat Steps #2 through #6.
- Rinse slides immediately in several changes of distilled water.
- Place slides in Aniline Blue Stain, Aqueous for 1-3 minutes.
- Rinse slides in several changes of distilled water.
- Dehydrate in two changes each of 95% and 100% ethyl alcohol. Clear in three changes of xylene, 10 dips each; coverslip with compatible mounting medium.
RESULTS:
| Collagen | Blue |
| Muscle fibers, cytoplasm and keratin | Magenta to red |
| Nuclei | Dark red |
PROCEDURE NOTES:
- Using ammonium hydroxide to soak or face tissue blocks will alter the pH of tissue sections and greatly diminish trichrome staining.
- Drain staining rack/slides after each step to prevent solution carry over.
- Do not allow sections to dry out at any point during staining procedure.
- The nuclear detail with this method is dark red with crisp definition.
- If using a xylene substitute, closely follow the manufacturer’s recommendations for deparaffinization and clearing steps.
REFERENCES:
- Carson, Freida, Histotechnology: A Self-Instructional Text. 2nd ed. Chicago: ASCP Press, 1997. 134-136.
- McLetchie, Norman G.B. “Trichrome McLetchie Modification”. Laboratory Procedure: Lakes Region General Healthcare, Laconia, NH.
- Modifications developed by Newcomer Supply Laboratory.
(use: Reticulum, Gordon & Sweets; Lester King, Bielschowsky.)
(FYI: No ketone and less Isopropyl.)
See also Ethyl Alcohol Denatured.
(FYI: No ketone and less Isopropyl.)
See also Ethyl Alcohol Denatured.