

(FYI: No ketone and less Isopropyl.)
See also Ethyl Alcohol Denatured.
(FYI: No ketone and less Isopropyl.)
See also Ethyl Alcohol Denatured.
CI 74240
- Shelf Life is 4 years from date of manufacture.
(use: Gram Stain Brown-Brenn)
(use: Brown-Brenn & Brown-Hopps Gram Stains.)
(use: Various, including Brown-Brenn & Hucker-Twort Gram Stains.)
(use: Warthin-Starry Method.)
(use: H&E, AFB, Brown-Brenn, PAS & Fite Stains.)
Why pay for sharpening when they’re so affordable!!!

3’x5′, 7/8 inch
2’x3′, 7/8 inch

SOLUTION:
| 30 cc Bottle | |
| Mount-Quick Aqueous | Part 6271A |
For storage requirements and expiration date refer to individual product label.
APPLICATION:
Newcomer Supply Mount-Quick Aqueous is a ready-to-use liquid mounting medium for histological techniques that require an aqueous based mounting medium and when dehydrating and clearing agents will adversely affect the stain, such as: lipid/fat stains, crystal violet stains and solvent soluble immunoperoxidase chromogenic procedures.
Mount-Quick Aqueous mounting medium is not recommended for use in immunofluorescence procedures.
METHOD:
Technique: Paraffin or frozen sections
PROCEDURE:
-
- Initial use of Mount-Quick Aqueous; with a clean blade, slice open the bottle tip at a slight angle in order to allow a controlled flow of mounting medium and minimal development of air bubbles.
-
- Keep Mount-Quick Aqueous tightly capped when not in use to avoid evaporation and maintain solution viscosity.
-
- Complete staining procedure and final rinsing step; blot excess water from slide edges.
- Apply Mount-Quick Aqueous mounting medium to flow over and fully cover the tissue section.
- Install coverglass, one edge first, allowing air bubbles to escape as the opposite edge is lowered to slide.
-
- See Procedure Note #1.
-
- Wipe off excess mounting medium from sides and bottom of slide.
-
- See Procedure Note #2.
-
- Dry slide in a horizontal position. Edges of the coverslip will dry sufficiently to hold the coverslip in place.
- Prevent dried edges and accumulation of extraneous air bubbles that may form due to evaporation and long-term storage by sealing coverglass edges with a thin coat of clear nail polish/lacquer. Allow sealed slide to dry thoroughly before filing.
- Initial use of Mount-Quick Aqueous; with a clean blade, slice open the bottle tip at a slight angle in order to allow a controlled flow of mounting medium and minimal development of air bubbles.
PROCEDURE NOTES:
-
- In lipid staining procedures, use minimal pressure when applying coverslip or fat/lipid staining may be displaced.
- To remove trapped air bubbles under coverslip; soak slide in warm water until coverslip is easily removed. Blot excess water from slide and remount with new coverslip and Mount-Quick Aqueous.
- Mount-Quick Aqueous refractive index (1.41) is close to that of glass (1.52).
REFERENCES:
-
- Bancroft, John D., and Marilyn Gamble. Theory and Practice of Histological Techniques. 6th ed. Oxford: Churchill Livingstone Elsevier, 2008. 693.
- Carson, Freida L., and Christa Hladik Cappellano. Histotechnology: A Self-Instructional Text. 4th ed. Chicago: ASCP Press, 2015. 131-132, 183-185.
- Modifications developed by Newcomer Supply Laboratory.
The stainless steel racks have an improved design that allows for the slides to be placed into them with more ease.
We have designed and developed an embedding tissue tamper that techs can now easily hold with their fingers or forceps and have complete control of the tamper! Other tampers on the market are designed solely for operating it with your fingers or a forceps, but not both.
At Newcomer Supply we understand the dilemma, because we have our own histology lab for control slide production. When embedding, different techs have different styles of how they want to use the tampers. Some like to keep the embedding forceps in their hands throughout the process and don’t like the idea of putting them down to tamper the tissue in the base molds. Other techs like the feel and control of holding the tamper with their fingers and don’t like the tampers that can only be used with forceps.
Our solution was to design a single piece aluminum tamper with a handle that extends 24mm above the tamper base. This allows for great control for techs that like to use their forceps when tampering the tissues, but also affords those that prefer holding the tamper with their fingers the same luxury! The extended handle with a vinyl cap also allows the surface, where a tech would hold it, to remain cool to the touch!
For a finishing touch, there is also an anodized colored surface on the tamper that makes it more durable and corrosion-resistant. The colors signify size and give it an artful design.
These embedding tissue tampers are a must have for any grossing lab!
AVAILABLE IN:
- 10mm x 10mm base size (orange) for smaller base molds
- 16mm x 19mm base size (green) for larger base molds
- Combo pack including 1 of each size – 10mm x 10mm and 16mm x 19mm
See your embedding in a whole new light! These lighted forceps ease identification and location of otherwise undetectable tissue fragments, while reducing embedding time. Increases visibility of specimen through paraffin during embedding, allowing for more accurate orientation. Made of German stainless steel, are submersible and light longevity approx. 20,000 hours. (Each kit includes: one instrument, power pack & battery charger)
SOLUTIONS:
| 250 ml | 500 ml | |
| Ferric Chloride 1%, Aqueous | Part 10855A | Part 10855B |
| Potassium Ferricyanide 1%, Aqueous | Part 13390A | Part 13390B |
Additionally Needed:
| Melanin Control Slides | Part 4430 |
| Nuclear Fast Red Stain, Kernechtrot | Part 1255 |
| Xylene, ACS | Part 1445 |
| Alcohol, Ethyl Denatured, 100% | Part 10841 |
| Alcohol, Ethyl Denatured, 95% | Part 10842 |
For storage requirements and expiration date refer to individual product labels.
APPLICATION:
Newcomer Supply Schmorl Melanin Stain demonstrates sites of reduction activity in tissue sections. A positive reaction indicates the presence of melanin and other reducing substances such as; argentaffin, chromaffin, bile and formalin pigment.
METHOD:
Fixation: Formalin 10%, Phosphate Buffered (Part 1090)
Technique: Paraffin sections cut at 4 microns
Solutions: All solutions are manufactured by Newcomer Supply, Inc.
All Newcomer Supply stain procedures are designed to be used with Coplin jars filled to 40 ml following the provided staining procedure.
STAINING PROCEDURE:
-
- If necessary, heat dry tissue sections/slides in oven.
- Deparaffinize sections thoroughly in three changes of xylene, 3 minutes each. Hydrate through two changes each of 100% and 95% ethyl alcohols, 10 dips each. Wash well with distilled water.
-
- See Procedure Notes #1 and #2.
-
- Prepare Ferric Chloride-Potassium Ferricyanide Working Solution; combine and mix well.
-
- Ferric Chloride 1%, Aqueous 30 ml
- Potassium Ferricyanide 1%, Aqueous 10 ml
-
- Place in Ferric Chloride-Potassium Ferricyanide Working Solution for 5 to 10 minutes.
-
- See Procedure Note #3.
-
- Wash well in running tap water.
- Counterstain in Nuclear Fast Red Stain, Kernechtrot (Part 1255) for 5 minutes.
-
- Shake solution well before use; do not filter.
-
- Rinse well in distilled water.
-
- See Procedure Note #4.
-
- Dehydrate quickly through two changes each of 95% and 100% ethyl alcohol. Clear in three changes of xylene, 10 dips each; coverslip with compatible mounting medium.
RESULTS:
| Melanin & other reducing substances | Blue |
| Nuclei | Pink-red |
| Cytoplasm | Pale pink |
PROCEDURE NOTES:
-
- Drain slides after each step to prevent solution carry over.
- Do not allow sections to dry out at any point during procedure.
- Melanin will react quicker than other reducing substances; adjust reaction time accordingly.
- Wash well after Nuclear Fast Red Stain, Kernechtrot to avoid cloudiness in dehydration steps.
- If using a xylene substitute, closely follow the manufacturer’s recommendations for deparaffinization and clearing steps.
REFERENCES:
-
- Bancroft, John D., and Marilyn Gamble. Theory and Practice of Histological Techniques. 6th ed. Oxford: Churchill Livingstone Elsevier, 2008. 243-244.
- Carson, Freida L., and Christa Hladik. Histotechnology: A Self-Instructional Text. 3rd ed. Chicago, Ill.: American Society of Clinical Pathologists, 2009. 259-260.
- Sheehan, Dezna C., and Barbara B. Hrapchak. Theory and Practice of Histotechnology. 2nd ed. St. Louis: Mosby, 1980. 223.
- Modifications developed by Newcomer Supply Laboratory.
SOLUTION:
| 250 ml | 500 ml | |
| Fouchet Reagent | Part 1095A | Part 1095B |
Additionally Needed:
| Bile Control Slides | Part 4060 |
| Van Gieson Stain | Part 1404 |
| Xylene, ACS | Part 1445 |
| Alcohol, Ethyl Denatured, 100% | Part 10841 |
| Alcohol, Ethyl Denatured, 95% | Part 10842 |
For storage requirements and expiration date refer to individual product labels.
APPLICATION:
Newcomer Supply Bile Stain, Hall’s Method is for the demonstration of bile (bilirubin) substances in tissue sections and to distinguish bile pigments from other tissue pigments. The acidity of Fouchet Reagent works to oxidize bilirubin to biliverdin, resulting in a green color development with the Van Gieson Stain serving as a complimentary counterstain.
METHOD:
Fixation: Formalin 10%, Phosphate Buffered (Part 1090)
Technique: Paraffin sections cut at 4 microns
Solutions: All solutions are manufactured by Newcomer Supply, Inc.
All Newcomer Supply stain procedures are designed to be used with Coplin jars filled to 40 ml following the provided staining procedure.
PRESTAINING PREPARATION:
- If necessary, heat dry tissue sections/slides in oven.
- Filter Fouchet Reagent with Grade 1 filter paper prior to use.
STAINING PROCEDURE:
- Deparaffinize sections thoroughly in three changes of xylene, 3 minutes each. Hydrate through two changes each of 100% and 95% ethyl alcohols, 10 dips each. Wash well with distilled water.
- See Procedure Notes #1 and #2.
- Place slides in freshly filtered Fouchet Reagent for 5 minutes.
- Wash in three changes of tap water; rinse in distilled water.
- Stain sections in Van Gieson Stain (Part 1404) for 5 minutes.
- Rinse quickly in 95% ethyl alcohol.
- Dehydrate in two changes each of 95% and 100% ethyl alcohol. Clear in three changes of xylene, 10 dips each; coverslip with compatible mounting medium.
RESULTS:
| Bile/bilirubin | Emerald green to olive drab |
| Connective tissue | Pink to red |
| Background | Yellow |
PROCEDURE NOTES:
- Drain slides after each step to prevent solution carry over.
- Do not allow sections to dry out at any point during procedure.
- If using a xylene substitute, closely follow the manufacturer’s recommendations for deparaffinization and clearing steps.
REFERENCES:
- Carson, Freida L., and Christa Hladik. Histotechnology: A Self-Instructional Text. 3rd ed. Chicago, Ill.: American Society of Clinical Pathologists, 2009. 268-269.
- Sheehan, Dezna C., and Barbara B. Hrapchak. Theory and Practice of Histotechnology. 2nd ed. St. Louis: Mosby, 1980. 219.
- Modifications developed by Newcomer Supply Laboratory.
SOLUTIONS:
| 100 ml | 250 ml | 500 ml | |
| Methenamine 3%, Aqueous | Part 12239A | Part 12239B | |
| Silver Nitrate 5%, Aqueous | Part 13805A | Part 13805B | |
| Sodium Borate 5%, Aqueous | Part 13826B | ||
| Gold Chloride 0.25%, Aqueous | Part 11287A | Part 11287B | |
| Sodium Thiosulfate 2.5%, Aqueous | Part 13889A | Part 13889B | |
| Light Green SF Yellowish Stain 0.2%, Aqueous | Part 12202A | Part 12202B |
Additionally Needed:
| Urates Control Slides | Part 4700 |
| Hydrochloric Acid 5%, Aqueous | Part 12086 (for acid cleaning glassware) |
| Xylene, ACS | Part 1445 |
| Alcohol, Ethyl Denatured, 100% | Part 10841 |
| Alcohol, Ethyl Denatured, 95% | Part 10842 |
For storage requirements and expiration date refer to individual product labels.
APPLICATION:
Newcomer Supply Urate Stain, Gomori Methenamine Silver Method is designed to demonstrate urates in tissue sections. With abnormal accumulations found around joints and in soft tissues, this disturbance in uric acid metabolism is known as gout, with collections of urate crystals referred to as gouty tophi.
Calcium pyrophosphate crystals or pseudogout may also be demonstrated. When viewed with a polarizing filter and red compensator filter, gout and pseudogout can be distinguished.
METHOD:
Fixation: Urate crystals are soluble in aqueous solutions. Fix in 100% ethyl alcohol; a minimum of two changes, 4 hours each.
Processing: Transfer from 100% ethyl alcohol fixative to xylene for 1 hour; proceed with equal parts xylene/paraffin at 58°C for 2 hours. Infiltrate with paraffin for a minimum of 1 hour; embed.
Technique: Chill paraffin blocks in 100% ethyl alcohol; cut sections at 4 microns with minimal water bath exposure.
Solutions: All solutions are manufactured by Newcomer Supply, Inc.
All Newcomer Supply stain procedures are designed to be used with Coplin jars filled to 40 ml following the provided staining procedure.
PRESTAINING PREPARATION:
-
- If necessary, heat dry tissue sections/slides in oven.
- All glassware/plasticware must be acid cleaned prior to use.
-
- See Procedure Notes #1 and #2.
-
- Prepare Methenamine Silver Stock Solution.
-
- Methenamine 3%, Aqueous (Part 12239) 50 ml
- Silver Nitrate 5%, Aqueous (Part 13805) 5 ml
- Slowly add silver nitrate; mix to clear milky precipitate.
- Store clear stock solution at 2°C-8°C for up to 2 months.
-
- Prepare fresh Methenamine Silver Working Solution; mix well.
-
- Methenamine Silver Stock Solution 25 ml
- Distilled Water 25 ml
- Sodium Borate 5%, Aqueous (Part 13826) 3 ml
-
- Preheat fresh Methenamine Silver Working Solution to 60°C in a water bath.
STAINING PROCEDURE:
-
- Deparaffinize sections thoroughly in three changes of xylene, 3 minutes each. Rinse in two changes of 100% ethyl alcohol, 10 dips each.
-
- Do not use 95% ethyl alcohol or distilled water steps.
- See Procedure Notes #3 and #4.
-
- Deparaffinize sections thoroughly in three changes of xylene, 3 minutes each. Rinse in two changes of 100% ethyl alcohol, 10 dips each.
-
- Incubate slides in preheated Methenamine Silver Working Solution in a 60°C water bath for 30 minutes.
-
- Remove control slide, rinse in warm distilled water, check microscopically for adequate silver development. Crystals should be dark brown/black.
- If not sufficiently dark, return to warm silver solution.
- Recheck at 2-3-minute intervals for desired intensity.
-
- Rinse well in distilled water.
- Tone in Gold Chloride 0.25%, Aqueous (Part 11287) until brown colorization disappears; 5 to 30 seconds.
- Rinse well in distilled water.
- Place in Sodium Thiosulfate 2.5%, Aqueous (Part 13889); 2-3 minutes.
- Wash well in running tap water for 3 minutes; rinse in distilled water.
- Counterstain in Light Green SF Yellowish Stain 0.2%, Aqueous (Part 12202) for 1-2 minutes.
- Dehydrate in two changes each of 95% and 100% ethyl alcohol. Clear in three changes of xylene, 10 dips each; coverslip with compatible mounting medium.
- Incubate slides in preheated Methenamine Silver Working Solution in a 60°C water bath for 30 minutes.
RESULTS:
| Light Field Microscopy: | ||
| Gout/urate crystals | Black | |
| Background | Green | |
| Polarized/Red Compensator Filter: (long axes aligned parallel) | ||
| Gout/urate crystals | Yellow, long & needle shaped | |
| Pseudogout crystals | Blue, shorter & rhomboidal | |
PROCEDURE NOTES:
-
- Acid clean all glassware/plasticware (Part 12086) and rinse thoroughly in several changes of distilled water.
- Plastic (Part 5500), plastic-tipped, or paraffin coated metal forceps must be used with any silver solution to prevent precipitation of silver salts. No metals of any kind should be in contact with any silver solution. Only glass thermometers should be used.
- Drain slides after each step to prevent solution carry over.
- Do not allow sections to dry out at any point during procedure.
- If using a xylene substitute, closely follow the manufacturer’s recommendations for deparaffinization and clearing steps.
REFERENCES:
-
- Carson, Freida L., and Christa Hladik. Histotechnology: A Self-Instructional Text. 3rd ed. Chicago, Ill.: American Society of Clinical Pathologists, 2009.255-256, 267-268.
- Luna, Lee G. Manual of Histologic Staining Methods of the Armed Forces Institute of Pathology. 3rd ed. New York: Blakiston Division, McGraw-Hill, 1968. 187-188.
- Sheehan, Dezna C., and Barbara B Hrapchak. Theory and Practice of Histotechnology. 2nd ed. St. Louis: Mosby, 1980. 225-226.
- Modifications developed by Newcomer Supply Laboratory.
SOLUTIONS:
| 250 ml | 500 ml | 1 Liter | |
| Silver Nitrate 5%, Aqueous | Part 13805A | Part 13805B | |
| Sodium Thiosulfate 5%, Aqueous | Part 1389A | Part 1389B | |
| Nuclear Fast Red Stain, Kernechtrot | Part 1255A | Part 1255C | Part 1255B |
Additionally Needed:
| Calcium Control Slides | Part 4100 |
| Hydrochloric Acid 5%, Aqueous | Part 12086 (for acid cleaning glassware) |
| Xylene, ACS | Part 1445 |
| Alcohol, Ethyl Denatured, 100% | Part 10841 |
| Alcohol, Ethyl Denatured, 95% | Part 10842 |
For storage requirements and expiration date refer to individual product labels.
APPLICATION:
Newcomer Supply Von Kossa Calcium Stain is an indirect staining method for the demonstration of calcium or calcium salt in tissue sections. This technique is not specific for calcium. Other reducing substances, such as formalin pigment and melanin, will also give a positive reaction.
METHOD:
Fixation: Alcohol or Formalin 10%, Phosphate Buffered (Part 1090)
Technique: Paraffin sections cut at 4 microns
Solutions: All solutions are manufactured by Newcomer Supply, Inc.
All Newcomer Supply stain procedures are designed to be used with Coplin jars filled to 40 ml following the provided staining procedure.
PRESTAINING PREPARATION:
-
- If necessary, heat dry tissue sections/slides in oven.
- All glassware/plasticware must be acid cleaned prior to use.
-
- See Procedure Notes #1 and #2.
-
STAINING PROCEDURE:
-
- Deparaffinize sections thoroughly in three changes of xylene, 3 minutes each. Hydrate through two changes each of 100% and 95% ethyl alcohols, 10 dips each. Wash well with distilled water.
-
- See Procedure Notes #3 and #4.
-
- Place in Silver Nitrate 5%, Aqueous (Part 13805) according to the following timings and conditions.
-
- Direct sunlight or ultraviolet light for 10-30 minutes.
- In front of a 60-100 watt light bulb for 1 hour or longer.
- See Procedure Note #5.
-
- Check slides periodically and remove from light source when control slide shows black-brown deposits macroscopically.
- Rinse well in several changes of distilled water.
- Place in Sodium Thiosulfate 5%, Aqueous (Part 1389) for 2 minutes.
- Rinse well in several changes of distilled water.
- Counterstain in Nuclear Fast Red Stain, Kernechtrot (Part 1255) for 5 minutes.
-
- Shake solution well before use; do not filter.
-
- Rinse well in distilled water.
-
- See Procedure Note #6.
-
- Dehydrate in two changes each of 95% and 100% ethyl alcohol; 10 dips each. Clear in three changes of xylene, 10 dips each; coverslip with compatible mounting medium.
- Deparaffinize sections thoroughly in three changes of xylene, 3 minutes each. Hydrate through two changes each of 100% and 95% ethyl alcohols, 10 dips each. Wash well with distilled water.
RESULTS:
| Calcium salts | Black to brown/black |
| Nuclei | Red |
| Cytoplasm | Light pink |
PROCEDURE NOTES:
-
- Acid clean all glassware/plasticware (Part 12086) and rinse thoroughly in several changes of distilled water.
- Plastic (Part 5500), plastic-tipped, or paraffin coated metal forceps must be used with any silver solution to prevent precipitation of silver salts. No metals of any kind should be in contact with any silver solution.
- Drain slides after each step to prevent solution carry over.
- Do not allow sections to dry out at any point during procedure.
- Direct sunlight is the preferred method. If procedure is carried out in minimal sunlight increased incubation time will be necessary.
- Wash well after Nuclear Fast Red Stain, Kernechtrot to avoid cloudiness in dehydration steps.
- If using a xylene substitute, closely follow the manufacturer’s recommendations for deparaffinization and clearing steps.
REFERENCES:
-
- Carson, Freida L., and Christa Hladik. Histotechnology: A Self-Instructional Text. 3rd ed. Chicago, Ill.: American Society of Clinical Pathologists, 2009. 269-270.
- Sheehan, Dezna C., and Barbara B. Hrapchak. Theory and Practice of Histotechnology. 2nd ed. St. Louis: Mosby, 1980. 226-227.
- Modifications developed by Newcomer Supply Laboratory.
The Infinity Microtome Blade was designed for histotechs that use the Accu-Edge and Feather microtome blades. It performs in the same manner, but lasts longer and costs less!
It is coated with a special Teflon-like substance that consistently provides a smooth and precise section in microtomes and cryostats. Its unique combination of durability and precision competes well against all blades, and is specifically designed to outperform the Feather S35 & R35 and Thermo mx35 blades.
FEATURES OF THE INFINTY MICROTOME BLADES:
- Triple faceted, 35° cutting edge
- 80mm length blade
- Incredible longevity and performance
- Ideal for all general paraffin and cryostat use!
INIFINITY DISPOSABLE MICROTOME BLADES AVAILABLE IN:
- Low Profile
- High Profile
DIMENSIONS:
- Low Profile – 80mm x 8mm x 0.25mm
- High Profile – 80mm x 14mm x 0.30mm
Infinity Disposable Microtome Blades are Made in the USA
The C.L. Sturkey Select Disposable Microtome blade edges are coated with a teflon finish to provide smooth, wrinkle-free tissue sections.
SELECT DISPOSABLE MICROTOME BLADES ARE IDEAL FOR:
-
- General Paraffin Sectioning
- Cryostat Use
SELECT DISPOSABLE MICROTOME BLADES ARE AVAILABLE IN:
-
- Low Profile
- High Profile
The Select disposable microtome blade model is available in the standard 50 blade dispenser. The High Profile Select microtome blade is manufactured to the industry standard 0.012″ thickness (C.L. Sturkey’s thinnest high profile blade).
Select Disposable Microtome Blades are Made in the USA
MONARCH DISPOSABLE MICROTOME BLADES ARE IDEAL FOR:
-
-
- All general paraffin cutting including: soft tissue, hard tissue, decalcified bone, small biopsies and large tissue.
-
MONARCH DISPOSABLE MICROTOME BLADES ARE AVAILABLE IN:
-
-
- Low Profile, 50 blade dispenser
-
DIMENSIONS:
-
-
- 76mm x 8mm x .25mm (H x W x D)
-
Monarch Disposable Microtome Blades are Made in the USA
The C.L. Sturkey Extremus disposable microtome blade edges are coated with the hardest of the nitride line coatings. Extremus high performance disposable microtome blades offer the longest edge life and you can expect to cut two to three times as many sections as other blades on the market today!
EXTREMUS DISPOSABLE MICROTOME BLADES ARE IDEAL FOR:
- General purpose needs for a variety of cutting conditions
- Hard Tissue Sections
- Longevity of a disposable microtome blade
EXTREMUS DISPOSABLE MICROTOME BLADES ARE AVAILABLE IN:
- Low Profile
- High Profile
Extremus Disposable Microtome Blades are Made in the USA
The CL Sturkey Silver disposable microtome blade edges are coated with a nitride and copolymer finish to provide smooth, wrinkle-free tissue sections. They are durable, long lasting and a great choice for a general purpose disposable microtome blade!
SILVER DISPOSABLE MICROTOME BLADES ARE IDEAL FOR:
- General paraffin sections
- Cryostat use
SILVER DISPOSABLE MICROTOME BLADES ARE AVAILABLE IN:
- Low Profile
- High Profile
Silver Disposable Microtome Blades are Made in the USA
Our most popular 15cm ruler is now available in a clear plastice!
Flexible plastic with metric on top & bottom sides and flush cut at zero and 15cm mark. Ideal for making precise measurements and being able to view the tissue that is directly beneath the ruler.
Designed by PAs for the PAs! Flush cut at zero, bold markings every 1/2 cm for easy reads. Identical printing on both top and bottom edges to accomodate both top and bottom readers AND printed identically on both sides. Each side is a working side!
Instructions for Aligning the Chuck and Blade Holder
Always wear gloves when working on a Cryostat
.jpg)
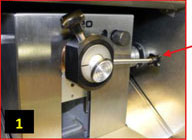
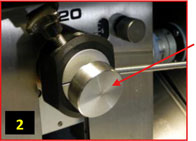
Chuck is out of alignment.
Loosen clamping adjustment knob and remove tissue chuck.
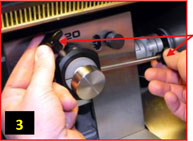
Replace tissue chuck with CryoAligner tool.
Loosen both the orienting & clamping adjustment knobs to position tool.
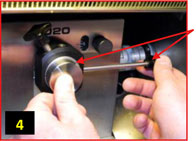
Press the CryoAligner tool flush against back surface and tighten the clamping adjustment knob.
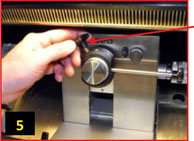
Tighten the orienting adjustment knob to lock in new alignment.
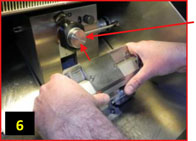
Position blade (w/out blade) to start moving towards CryoAligner’s front flat surface.Remove blade from blade holder before proceeding with this step.
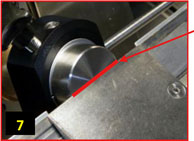
GENTLY bring the blade holder surface against the CryoAligner tool’s surface so that it is perfectly aligned & flush.Be very careful when bringing the blade holder’s metal surface to the Cryo-Aligner’s surface to prevent any possible damage.
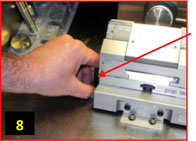
Tighten placement knob to secure aligned position of the blade holder to the CryoAligner tool.
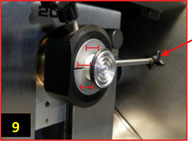
Loosen clamping adjustment knob and remove the CryoAligner tool and replace it with the tissue chuck. Tighten the clamping adjustment knob & the tissue check will be in perfect alignment to the base assembly.
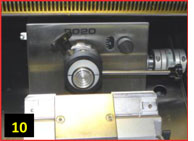
Tissue Chuck & Blade Holder in PERFECT ALIGNMENT!
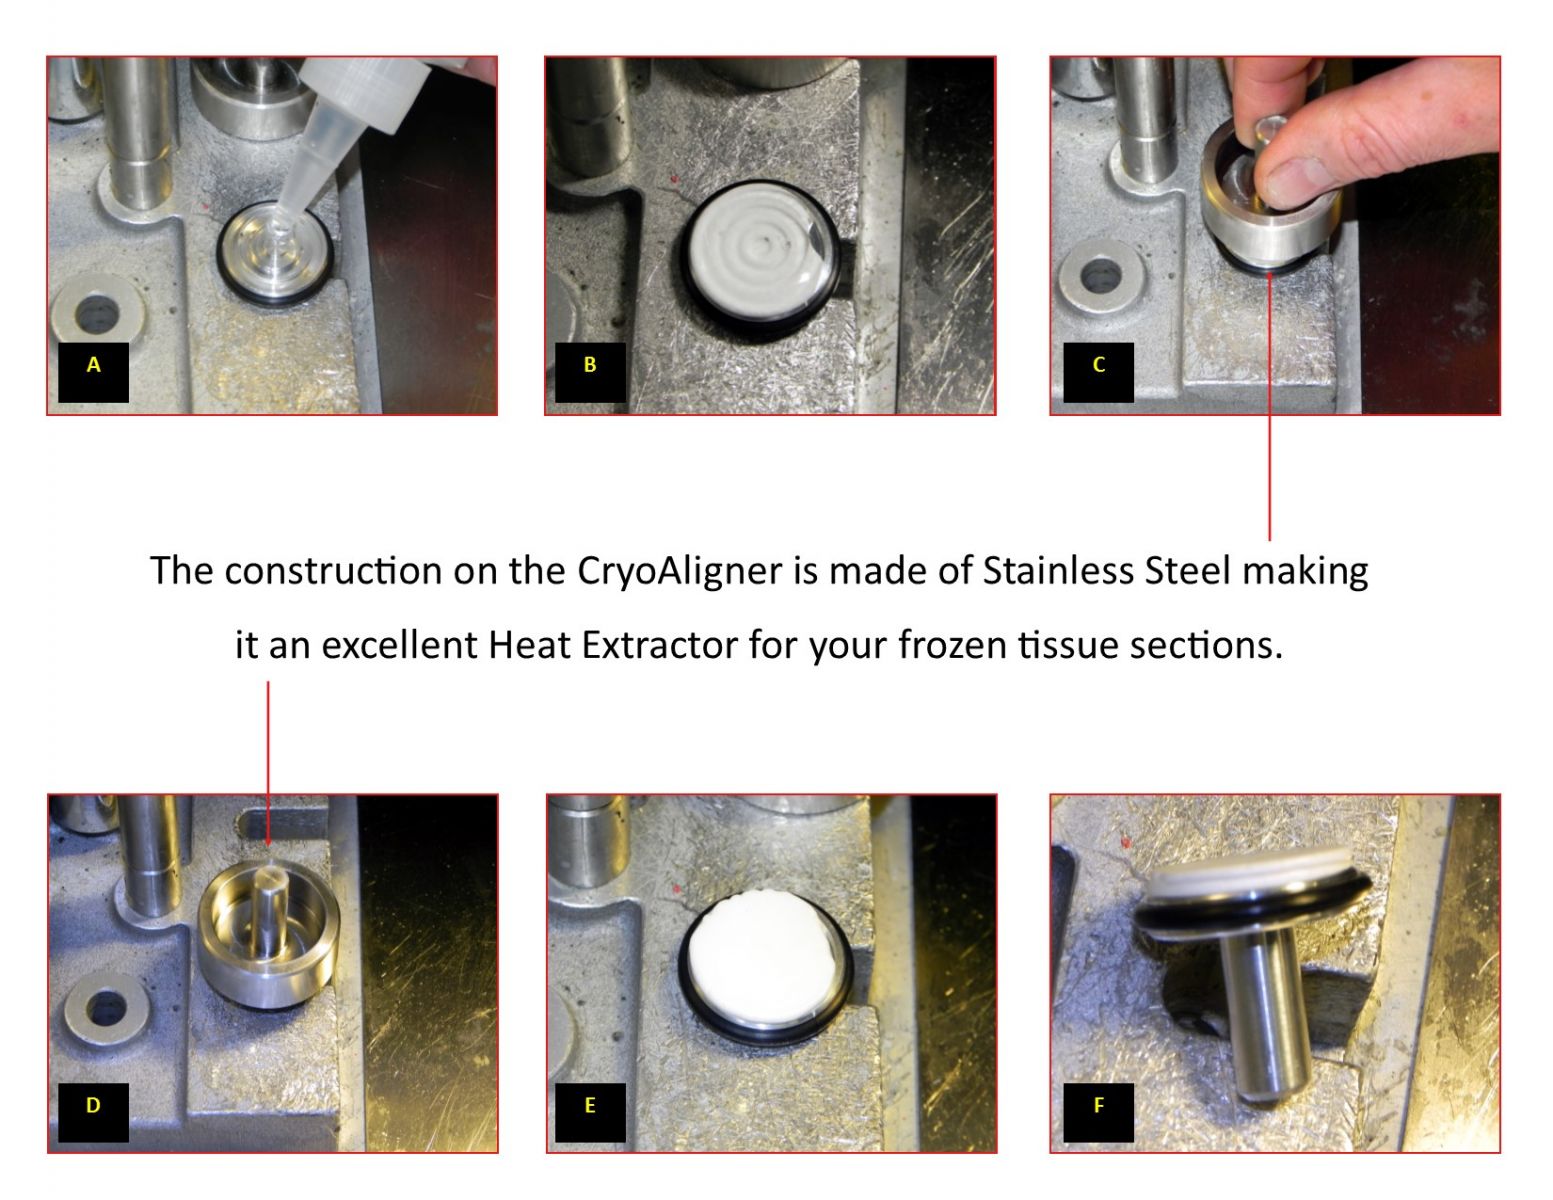
Every microtome can be ready to do recuts on those precious biopsies! So simple & quick to use, you will be amazed. Only one Universal Microtome Aligner tool needed for ALL models, and it will last forever.
MICROTOME ALIGNER INSTRUCTION MANUAL
- Remove blade from knife holder.
- Move microtome specimen head all the way back to the “home” position.
- Insert the Universal Microtome Aligner tool into the specimen head clamp with the bubble level facing up (see Figure #1).
Figure #1
.jpg)
- Release orientation head locking lever so that the orientation head can be adjusted.
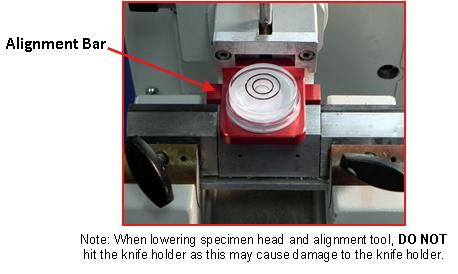
- Slowly move specimen head forward from “home” position until alignment bar on the Universal Microtome Aligner tool is almost touching the backside of the knife holder (see Figure #2). You may need to manually lower the specimen head with hand wheel to match up the alignment bar with the back side of the knife holder (see Figure #2).
Figure #2
- Adjust the gap between knife holder and alignment bar so the left and the right side of alignment bar has the same amount of gap. You may need to advance or retract specimen head to get the best position. This will adjust the “Z” axis alignment (see Figure #3).
Figure #3
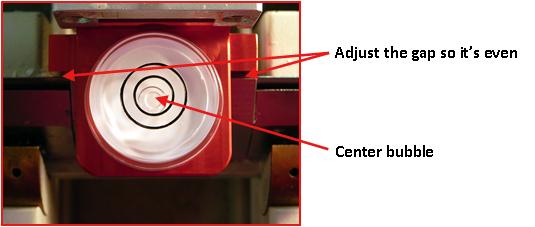
- Center the bubble in circle level by adjusting the “X” and “Y” axis (see Figure #3).
- Once the bubble in the level is centered, lock orientation head with locking lever.
- Re-check the alignment bar gap (steps 5 & 6).
- Your microtome orientation head should now be aligned!
NOTE: To receive optimal performance from this Universal Microtome Aligner tool, your microtome MUST BE level and your specimen head clamp must be free of any debris.
If the bench or the microtome is found not to be level, here are some suggestions to try and accommodate for this issue:
- Purchase different types and/or sizes of rubber or felt feet from a local hardware store for adjusting the level foundation beneath the microtome.
- Use shims of metal or wood to level the base of the microtome.
- Have your bench top leveled by a maintenance ace or carpenter.
- If your microtome had adjustable feet, manipulate them to bring your microtome to level.
If you cannot level the bench and/or the microtome with the above suggestions, here is a way to work around a non-level surface;
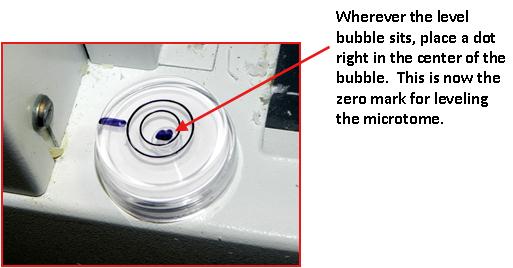
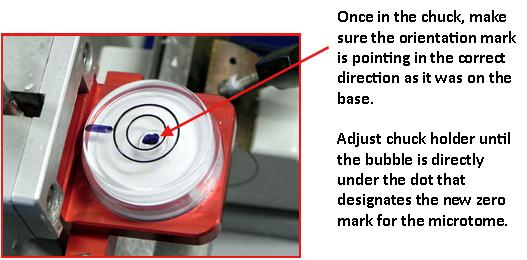
- Match the offset of your microtome or your bench top by physically marking the actual offset on the aligner level. The new marking becomes the “zero” target mark. (See diagrams below)
.jpg)
Superfrost Plus Adhesive Coated Slides are a general purpose adhesive slide.
RECOMMENDED USE:
- Histo & IHC Autostainers
- Roche/Ventana Autostainer
- Demanding IHC with antigen retrieval
- Difficult Tissue
- Frozen Tissues
SPECIFICATIONS OF THE SUPERFROST PLUS ADHESIVE COATED SLIDES:
- Size: 75 x 25mm, 1mm thick
- Edge Treatment: 90° Corner
- Packaged Approx. 72 slides/box, 20 boxes/case
- Available color: White
.jpg)
An excellent pad to gross on that will absorb & neutralize the formalin from your specimen.
FAN PAD ULTRA BENEFITS:
- Dense enough to provide excellent knife suppression
- Soft enough to reduce wear on dissecting blades
- Destroys harmful formalin vapors while you gross
- Use for vapor control in storage of formalin or formalin fixed tissue containers
FAN PAD ULTRA LIST OF USES:
- Specimen transport
- Surgery
- Specimen receiving
- Labor & Delivery
- Specimen Storage Areas
- Autopsy
ABSORBING/NEUTRALIZING CAPACITY OF THE FAN PAD ULTRA:
- 8″ x 11″ – will abosrb & neutralize up to 100ml of 10% formalin
- 11″ x 15″ – will absorb & neutralize up to 200ml of 10% formalin
Just one of those little necessities that has to be replaced. Good quality with an even better price.
SOLUTION:
| 250 ml | 500 ml | |
| Carbol Fuchsin Stain, Kinyoun | Part 1031A | Part 1031B |
Additionally Needed:
| Acid Fast Bacteria (AFB) Control Slides | Part 4011 |
| Acid Alcohol 1% | Part 10011 |
| Methylene Blue Stain 0.14%, Alcoholic | Part 12401 |
| Xylene, ACS | Part 1445 |
| Alcohol, Ethyl Denatured, 100% | Part 10841 |
| Alcohol, Ethyl Denatured, 95% | Part 10842 |
For storage requirements and expiration date refer to individual product labels.
APPLICATION:
Newcomer Supply Carbol Fuchsin Stain, Kinyoun is used in the Kinyoun AFB Stain to demonstrate the presence of acid-fast mycobacteria in tissue sections. Carbol Fuchsin Stain, Kinyoun is a concentrated phenol and basic fuchsin solution that works to permeate the lipoid capsule of acid-fast organisms, rendering them resistant to acid alcohol decolorization.
METHOD:
Fixation: Formalin 10%, Phosphate Buffered (Part 1090)
Technique: Paraffin sections cut at 4 microns
Solutions: All solutions are manufactured by Newcomer Supply, Inc.
All Newcomer Supply stain procedures are designed to be used with Coplin jars filled to 40 ml following the provided staining procedure.
PRESTAINING PREPARATION:
-
- If necessary, heat dry tissue sections/slides in oven.
- Filter Carbol Fuchsin Stain, Kinyoun with filter paper before use.
STAINING PROCEDURE:
-
- Deparaffinize sections thoroughly in three changes of xylene, 3 minutes each. Hydrate through two changes each of 100% and 95% ethyl alcohols, 10 dips each. Wash well with distilled water.
-
- See Procedure Notes #1 and #2.
-
- Stain in freshly filtered Carbol Fuchsin Stain, Kinyoun for 15 minutes at room temperature. Keep solution covered.
-
- See Procedure Note #3.
-
- Wash in running tap water for 2 to 3 minutes.
- Differentiate in Acid Alcohol 1% (Part 10011) until color no longer runs off the slide and sections are pale pink; 3 to 10 rapid dips.
- Wash in running tap water 3 to 5 minutes; rinse in distilled water.
- Counterstain in Methylene Blue Stain 0.14%, Alcoholic (Part 12401); 3-6 dips.
-
- See Procedure Note #4.
-
- Wash in running tap water for 1 minute; rinse in distilled water.
- Dehydrate quickly in two changes each of 95% and 100% ethyl alcohol. Clear in three changes of xylene, 10 dips each; coverslip with compatible mounting medium.
- Deparaffinize sections thoroughly in three changes of xylene, 3 minutes each. Hydrate through two changes each of 100% and 95% ethyl alcohols, 10 dips each. Wash well with distilled water.
RESULTS:
| Acid-fast bacteria | Bright red |
| Background | Pale blue |
PROCEDURE NOTES:
-
- Drain slides after each step to prevent solution carry over.
- Do not allow sections to dry out at any point during procedure.
- Sections can remain in Carbol Fuchsin Stain, Kinyoun for up to 60 minutes without adverse effect. Additional differentiation may be required in Step #6.
- If preferred, Light Green SF Yellowish Stain 0.1%, Aqueous (Part 12203) can be used as a counterstain in place of Methylene Blue.
-
- Stain for 3-6 dips.
- Rinse with one quick dip in distilled water or proceed directly to Step #10 without a distilled water rinse.
-
- If using a xylene substitute, closely follow the manufacturer’s recommendations for deparaffinization and clearing steps.
REFERENCES:
-
- Carson, Freida L., and Christa Hladik. Histotechnology: A Self-Instructional Text. 3rd ed. Chicago, Ill.: American Society of Clinical Pathologists, 2009. 224-226.
- J.J. “A Note on Uhlenhuths Method for Sputum Examination, for Tubercle Bacilli.” American Journal of Public Health 5.9 (1915). 867-870.
- Sheehan, Dezna C., and Barbara B. Hrapchak. Theory and Practice of Histotechnology. 2nd ed. St. Louis: Mosby, 1980. 236-237.
- Modifications developed by Newcomer Supply Laboratory.
Technical Memo 1: Toluidine Blue Stain for Mast Cells
SOLUTION:
| 250 ml | 500 ml | 1 Gallon | |
| Toluidine Blue Stain 0.1%, Aqueous | Part 14027A | Part 14027B | Part 14027D |
Additionally Needed:
| Mast Cell Control Slides OR Mast Cell, Animal Control Slides |
Part 4410 OR Part 4412 |
| Xylene, ACS | Part 1445 |
| Alcohol, Ethyl Denatured, 100% | Part 10841 |
| Alcohol, Ethyl Denatured, 95% | Part 10842 |
For storage requirements and expiration date refer to individual product labels.
APPLICATION:
Newcomer Supply Toluidine Blue Stain for Mast Cells is for the demonstration of mast cells, characterized as cells filled with basophilic granules, associated with inflammation and allergic reactions, which stain metachromatically with toluidine blue.
METHOD:
Fixation: Formalin 10%, Phosphate Buffered (Part 1090)
Technique: Paraffin sections cut at 5 microns
Solutions: All solutions are manufactured by Newcomer Supply, Inc.
All Newcomer Supply stain procedures are designed to be used with Coplin jars filled to 40 ml following the staining procedure provided below.
STAINING PROCEDURE:
- Deparaffinize sections thoroughly in three changes of xylene, 3 minutes each. Hydrate through two changes each of 100% and 95% ethyl alcohols, 10 dips each. Wash well with distilled water.
- See Procedure Notes #1 and #2.
- Place slides in Toluidine Blue Stain 0.1%, Aqueous for 10 minutes.
- Rinse well in distilled water.
- Dehydrate quickly through two changes each of 95% and 100% ethyl alcohol. Clear in three changes of xylene, 10 dips each; coverslip with compatible mounting medium.
- See Procedure Note #3.
RESULTS:
| Mast cells | Deep blue-violet |
| Background | Blue |
PROCEDURE NOTES:
- Drain staining rack/slides after each step to prevent solution carry over.
- Do not allow sections to dry out at any point during staining procedure.
- Metachromasia of mast cell granules is stable and staining will be maintained during dehydration steps.
- If using a xylene substitute, closely follow the manufacturer’s recommendations for deparaffinization and clearing steps.
REFERENCES:
- Broome, Michelle and Beth Villarreal. “Differential Staining of Mast Cells with Toluidine Blue”. The Journal of Histotechnology 35.1 (2012): 27-30.
- Carson, Freida L., and Christa Hladik. Histotechnology: A Self-Instructional Text. 3rd ed. Chicago, Ill.: American Society of Clinical Pathologists, 2009.188.
- Modifications developed by Newcomer Supply Laboratory.
Technical Memo 2: Toluidine Blue Stain for Mohs Technique
SOLUTION:
| 250 ml | 500 ml | 1 Gallon | |
| Toluidine Blue Stain 0.1%, Aqueous | Part 14027A | Part 14027B | Part 14027D |
Additionally Needed:
| Alcohol, Ethyl Denatured, 70% | Part 10844 |
| Alcohol, Ethyl Denatured, 95% | Part 10842 |
| Alcohol, Ethyl Denatured, 100% | Part 10841 |
| Xylene, ACS | Part 1445 |
For storage requirements and expiration date refer to individual bottle labels.
APPLICATION:
Newcomer Supply Toluidine Blue Stain for Mohs Technique provides a rapid staining method for Mohs micrographic surgery (MMS), useful when evaluating frozen skin samples for basal cell carcinoma (BCC). Toluidine Blue imparts an identifiable staining pattern if BCC is present that will highlight islands of blue staining basal cell carcinoma and metachromatically stain surrounding mucopolysaccharides/stroma pink.
METHOD:
Fixation: 70% Ethyl Alcohol (Part 10844)
Technique: Frozen sections cut at 5-7 microns on adhesive slides
Solutions: All solutions are manufactured by Newcomer Supply, Inc.
All Newcomer Supply stain procedures are designed to be used with Coplin jars filled to 40 ml following the staining procedure provided below.
STAINING PROCEDURE:
- Fix tissue sections in 70% Ethyl Alcohol for 30-60 seconds.
- See Procedure Note #1.
- Wash well in distilled water to remove excess fixative.
- Stain slides in Toluidine Blue Stain 0.1%, Aqueous for 30-60 seconds, depending on preference of stain intensity.
- Wash gently in distilled water to remove excess stain.
- Dehydrate quickly through one change of 95% ethyl alcohol; 1 quick dip and then two changes 100% ethyl alcohol. Clear in three changes of xylene, 10 dips each; coverslip with compatible mounting medium.
- See Procedure Note #2.
RESULTS:
| Islands of basal cell carcinoma | Deep blue to purple |
| Surrounding mucopolysaccharides/stroma | Pink to magenta |
| Background | Blue |
| Nuclei | Dark blue |
PROCEDURE NOTES:
- Section thickness and fixation timing may affect staining quality.
- Alcohol will work as a differentiator. Proceed quickly through dehydration steps to maintain Toluidine Blue stain.
- If using a xylene substitute, closely follow the manufacturer’s recommendation for clearing step.
REFERENCES:
- Arnon, Ofer, Ronald Rapini, Adam Mamelak, and Leonard Goldberg. “Mohs Micrographic Surgery: Current Techniques.” IMAJ 12 (2010): 431-35.
- Gross, Kenneth G. Mohs Surgery: Fundamentals and Techniques. St. Louis: Mosby, 1999. 125-138.
- Modifications developed by Newcomer Supply Laboratory.
Human lung tissue reactive Anaplastic Lymphoma Kinase (ALK, CD246). Image stained with clone ALK1
Excellent for difficult tissues, frozen sections and special stains (esp. Silvers). Imprinted “ADHESIVE”.
- Size: 75 x 25, 1mm thick
- Packaged Approx. 72/box
Allows for Stat nuclear counter and special staining in 10 seconds. Specially developed for IHC stains. Mountable with xylene and aqueous based mounting media. Stain does not fade with time, no precipitation,no filtration. Usable to the last drop. Shelf life 4 years. Store at 4°C.
Permanent Aqueous Mounting Media
The H&E Mount mounting media is a newly formulated aqueous based permanent mounting media designed for coverslipping H&E stains from water. The use of H&E aqueous mounting media eliminates the need for alcohol dehydration and xylene clearing pre-treatment steps, slides are simply mounted from water post hematoxylin and eosin staining. The H&E Mount provides permanent preservation of H&E stained tissue sections, cell smears and cyto-spins for indefinite storage.
H&E stained slides mounted with H&E Mount do not display any loss of eosin or hematoxylin staining that is often observed when H&E slides are mounted from alcohol and xylene. Therefore, when mounting with H&E Mount, less number of dips (5-10) in eosin is recommended.
H&E MOUNTING MEDIA APPLICATION:
H&E Mounting Media is intended for the mounting and preservation of hematoxylin and eosin (H&E) stained biological specimen. It is intended to be applied with coverslips.
FEATURES OF H&E MOUNTING MEDIA:
- Mount directly from water or alcohol.
- No dehydration or xylene clearing steps required prior to mounting.
- Alcohol differentiation of eosin may be performed prior to mounting.
- Permanent.
- No fading of eosin or hematoxylin.
- Sets in 10 minutes, ready for microscopic examination.
- Excellent for photography.
- Simple soaking in water removes coverslip.
H&E STAINING PROGRESSIVE METHOD:
For paraffin sections: Deparaffinize slides and rinse slides in tap water.
For frozen sections: Cut sections, fix in 40% formaldehyde for 10 seconds and rinse well with tap water.
-
- Immerse in STAT Aqua Hematoxylin (NB305) for 2-5 minutes. STAT Aqua Hematoxylin does not require post treatment of slides with Ammonia water, slides stained with STAT Aqua Hematoxylin turn blue with tap water rinse alone.
OR
Immerse in Harris hematoxylin for 1-3 minutes, rinse with Ammonia water until slides turn blue (rinse sections well with tap water, too much ammonia carry over will decrease eosin staining).
-
- Rinse in tap water until water runs clear.
- Stain in eosin with 5-10 dips.
- Rinse in tap water.
- Blot as much water as possible from the surface of the slides and proceed as below with coverslipping.
H&E MOUNTING & DRYING PROTOCOL:
The following is a recommended technique for coverslipping slide specimens. Other techniques that achieve the same basic result are equally acceptable.
- Take the slides from the final wash (for best results water is quite suitable).
- Remove excess water by tapping the slides on a paper towel, for best results, blot most of the water or let slides air dry for 1-2 minutes.
- Place the slides down, face up on a flat surface and apply 1-2 drops (or as needed) of H&E Mount on the lower edge of the coverslip.
- Bring the slide up to the edge of the coverslip and invert the slide so that the mounting media touches the slide. Gently complete inversion.
- Mounted slides with H&E mounting media are ready in 10 minutes for microscopic examination.
- Mounted slides should be properly stored following the microscopic examination. Slides are best stored in the dark and free of dust.
SECOND CHANCE COVERSLIPPING:
If for any reason you end up with an unsatisfactory mounted slide such as one with some air bubbles, remount slides as follows:
- Allow the coverslip to slip off the end of the slides by holding the slide at a slight vertical angle.
- Remove excess media as if it were excess water on a slide.
- Re-apply mounting media and coverslip.
- Mounted slides should be properly stored following the microscopic examination.
COVERSLIP REMOVAL:
When desired, coverslips mounted with H&E Mount may be removed by soaking the slides in warm water. The length required depends on the age of the mounted slides and may vary from 10 minutes to overnight. After softening the mounting media, slowly and gently pull back on the corner of the coverslip until it releases. Then rinse off the remaining mounting media by agitating the un-slipped slide in the warm water for a few moments.
5X Concentrate
(For amplifying Fast Red, BCIP/NBT, Innovex Brown & other substrate chromogens for alkaline phosphatase enzyme staining.)
Store multiple 20 place slide trays for easy retrieval.
- Holds five 20-place slide trays (not included)
- Includes 5 colored clasps for easy identification
- Portable
- Refrigerator safe
- Stackable
The Stirring Hot Plate has the ability to heat and stir simultaneously or perform each function separately.
FEATURES OF THE STIRRING HOT PLATE:
- Stainless steel heating surface
- Includes temperature probe
- LED display can show either “Set” or “Actual” Temperature
- Includes one 9 x 38mm magnetic stir bar
- Stirring power: 30W
- Temperature range: Room temp. to 300° C
- Stirring Speed: Start-up to 2,000 rpm
DIMENSIONS OF THE STIRRING HOT PLATE:
- Working surface diameter of 6″
- Overall size 11″ x 6.3″ x 4″
- Shipping Weight of 9lbs.
The manufacturer warrants this instrument to be free from defects in material and workmanship under normal use for one year from the date of purchase. It does not cover damage resulting from abuse or misuse, repairs or alterations performed by other than authorized repair technicians, or damage occurring in transit.
The dishes are made of a heavy glass with snug fit lids. They come in three different sizes to accommodate the 20, 30 and 60 place slide racks.
Polyethylene pipet with large bulb. Pipet graduated from 0.5 to 3.0ml.
Lung infected with acid fast bacteria (AFB).
The Form Zero product will produce excess sulfite once the reaction has been completed for neutralizing the formalin waste. These test strips will test for any residual sulfite that is in the treated solution. Upon confirming a positive response on the test strip means the neutralization on the formalin waste is complete and now can be safely sewer disposed
PRODUCT:
| 30 cc Tube | |
| Mount-Quick Mounting Media | Part 6270 |
Additionally Needed for Tissue/Cell Transfer Procedure:
| Xylene, ACS | Part 1445 |
| HistoTec™ Pen | Part 5725 |
| Scalpels, Finger OR Scalpels, Flat Edge |
Part 6810 OR Part 5545 |
| Superfrost Plus Slides OR NewSilane Adhesive Slides |
Part 6203W OR Part 5070 |
| Alcohol, Ethyl Denatured, 100% | Part 10841 |
| Alcohol, Ethyl Denatured, 95% | Part 10842 |
APPLICATION:
Newcomer Supply Mount-Quick Mounting Media is a multi-use product with applications as a standard mounting media and as a liquid coverslip (coverglass free) mounting media.
Mount-Quick Mounting Media can also be used in tissue transfer procedures to transfer tissue sections or cell preparations from a prepared slide when specimen availability is limited, and additional diagnostic workup is necessary. Examples when tissue transfer with Mount-Quick Mounting Media is applicable include:
-
- Paraffin sections of small biopsies/minimal tissue
- Biopsies with a small foci of neoplasm
- Paraffin block is unavailable
- Cytology preparations, fine needle aspirates (FNA)
- Transfer of tissue from an uncharged slide to charged slide(s)
- Preparing multiple slides from a single slide preparation
- Salvaging/restoring broken slides back to a whole mount
This tissue/cell transfer procedure takes time to obtain a well-prepared end product. Reduced timings/short cuts should not be taken. Practicing the technique prior to performing on limited specimens is suggested. Staining quality of tissues will not be affected and histochemical, immunohistochemistry (IHC) and cytochemical procedures can be performed on transferred samples with reliable results.
METHOD:
Coverslipping: Paraffin or frozen sections
Tissue/Cell Transfer: Stained and unstained paraffin sections, cytology preparations and smears.
COVERSLIPPING PROCEDURE:
-
- Complete staining procedure: dehydrate, clear with xylene, blot excess xylene from slide edges.
- Apply Mount-Quick Mounting Media to flow over and fully cover the tissue section(s).
-
- Standard coverglass; install one edge first, allowing air bubbles to escape as opposite edge is lowered to slide.
- Liquid coverglass (coverglass free); allow to dry flat for 30 minutes before handling and viewing microscopically.
-
- Dry slides a minimum of 24-48 hours before filing.
TISSUE/CELL TRANSFER PROCEDURE:
-
- Mark designated tissue area(s) to be the focus of the tissue transfer on underside of the original slide with a HistoTec Pen.
- For previously stained sections:
-
- Soak slide in xylene until coverslip is easily removed without damage to tissue section.
- Run slide through several changes of xylene to ensure removal of residual mounting media.
- Do not proceed through alcohol steps.
- See Procedure Note #1.
-
- For unstained paraffin sections or smears:
-
- Soak slides in several changes of xylene, a minimum of 10 minutes. Do not proceed through alcohol steps.
-
- Spread Mount-Quick Mounting Media on xylene-coated slides with an applicator stick. Use sufficient Mount-Quick to form a meniscus over entire tissue section or cell preparation.
-
- Slide must be xylene coated and not allowed to dry out.
-
- Place slide in a flat horizontal position in a 60°C oven for 90 minutes to 2 hours or in a 37°C oven overnight until meniscus hardens.
-
- See Procedure Note #2.
-
- Mark the surface of the hardened mounting media meniscus to corresponding areas marked on underside of the slide (Step #1) with HistoTec Pen to maintain tissue orientation in transfer process.
- Immerse the slide in a Coplin jar of water warmed in a 45°- 60°C water bath; soak for 90 minutes to 3 hours.
- Slowly pry meniscus off at the edges with a scalpel blade. If the mounting media does not peel off easily, return to warm Coplin jar and continue soaking.
-
- See Procedure Note #3.
-
- Moisten the charged slides that will receive the transferred segments with water.
- Divide transferred segment into multiple sections: once media section is removed from the original slide, cut section with a water moistened scalpel blade into desired segments as marked on mounting media surface.
-
- Place each cut segment, meniscus side up, onto a moistened charged slide in sequential order.
-
- To transfer one intact segment of tissue: place on moistened charged slide, meniscus side up.
- Soak gauze in warm water, place gauze over tissue section. Using thumb, press gauze flat transferring water to the section, flattening edges and sealing transferred section to slide.
-
- If a transferred section is placed meniscus down, the specimen will not adhere and will be lost in further steps.
-
- Place slides in a 37°- 60°C oven in a flat horizontal position for 1 hour or longer to securely adhere transferred section to slide.
- Soak slides in four changes of xylene for 10 minutes each or longer until all Mount-Quick compound is completely dissolved.
-
- See Procedure Note #4.
-
- Re-hydrate through two changes each of 100% and 95% ethyl alcohols, 10 dips each. Wash well with distilled water.
- Specimen is ready for histochemical, IHC or cytochemical staining.
PROCEDURE NOTES:
-
- If any residual mounting medium remains on the slide, tissue transfer and staining may be compromised.
- The meniscus of Mount-Quick Mounting Media must thoroughly harden (but still remain pliable) on the slide before proceeding. To avoid brittleness do not exceed 60°C during the hardening process.
- If a hotplate was used to initially dry slides or melt paraffin after original sectioning, it will be difficult to remove an entire intact section from the slide. Extended soaking of mounting media and tissue section does not improve results.
- If Mount-Quick is not completely dissolved from the tissue section(s), subsequent staining may be compromised.
- The use of xylene substitutes has not been tested with this product.
REFERENCES:
-
- Gill, Gary. Cytopreparation: Principles & Practice, Essentials in Cytopathology. New York: Springer Science and Business Media, 2013. 393-395.
- Kubier, Patty and Rodney Miller. “Tissue Protection Immunohistochemistry.” American Journal of Clinical Pathology 117 (2002): 194-198.
- Miller, Rodney and Patty Kubier. “Immunohistochemistry on Cytologic Specimens and Previously Stained Slides (When No Paraffin Block is Available).” The Journal of Histotechnology4 (2002): 251-257.
- Sherman ME, D Jimenez-Joseph, MD Gangi and RR Rojas-Corona. “Immunostaining of Small Cytologic Specimens. Facilitation with Cell Transfer.” Acta Cytologica1 (1994): 18–22.
- Zu, Youli, Maryann Gangi, and Grace Yang, “Ultrafast Papanicolaou Stain and Cell-Transfer Technique Enhance Cytologic Diagnosis of Hodgkin Lymphoma.” Diagnostic Cytopathology 5 (2002): 308-311.
- Modifications developed by Newcomer Supply Laboratory.
Out/In Cards mark where a slide has been removed for easy replacement.
Tech Memo 1: May-Grunwald Giemsa Stain for Paraffin Sections
SOLUTIONS:
| 500 ml | 1 Liter | |
| Jenner Stock Stain | Part 1210A | Part 1210B |
| Giemsa Stock Stain, Wolbach | Part 1121A | Part 1121B |
Additionally Needed:
| Giemsa Control Slides | Part 4240 |
| Xylene, ACS | Part 1445 |
| Alcohol, Ethyl Denatured, 100% | Part 10841 |
| Alcohol, Ethyl Denatured, 95% | Part 10842 |
| Alcohol, Methanol Anhydrous, ACS | Part 12236 |
| Acetic Acid 1%, Aqueous | Part 10012 |
For storage requirements and expiration date refer to individual product labels.
APPLICATION:
Newcomer Supply May-Grunwald Giemsa (MGG) Stain procedure for paraffin sections, is used for differential staining of hematopoietic tissue as well as demonstration of some microorganisms.
May-Grunwald refers to a combined stain of eosin and methylene blue; the Jenner Stock Stain. Giemsa refers to a mixture of methylene blue, eosin and Azure B; the Giemsa Stock Stain, Wolbach. The use of Jenner Stock Stain and Giemsa Stock Stain, Wolbach, provides intense colorization results in the MGG Stain.
METHOD:
Fixation: According to protocol for hematopoietic tissue
- See Procedure Note #1.
Technique: Paraffin sections cut at 5 microns
Solutions: All solutions are manufactured by Newcomer Supply, Inc.
All Newcomer Supply stain procedures are designed to be used with Coplin jars filled to 40 ml following the staining procedure provided below.
STAINING PROCEDURE:
- Deparaffinize sections thoroughly in three changes of xylene, 3 minutes each. Hydrate through two changes each of 100% and 95% ethyl alcohols, 10 dips each. Wash well with distilled water.
- See Procedure Notes #2 and #3.
- Rinse in two changes of Methanol (Part 12236); 3 minutes each.
- Prepare fresh Working Jenner Stain just prior to use; combine and mix well.
- Jenner Stock Stain 20 ml
- Distilled Water 20 ml
- Place slides in fresh Working Jenner Stain for 6 minutes.
- Prepare fresh Working Giemsa Stain just prior to use; combine and mix well.
- Giemsa Stock Stain, Wolbach 3 ml
- Distilled Water 47 ml
- Place slides, without rinsing, directly from Working Jenner Stain into fresh Working Giemsa Stain for 45 minutes.
- Rinse quickly in distilled water.
- Differentiate each slide individually in Acetic Acid 1%, Aqueous (Part 10012); 6-10 dips.
- Check microscopically for well differentiated nuclei.
- Rinse in distilled water.
- Dehydrate in two changes each of 95% and 100% ethyl alcohol. Clear in three changes of xylene, 10 dips each; coverslip with
RESULTS:
| Nuclei | Blue/violet |
| Cytoplasm | Pink/rose to lighter blue shades |
| Bacteria | Blue |
PROCEDURE NOTES:
- Zenker Fixative, Modified, Zinc Chloride (Part 1461) and B-5 Fixative Modified, Zinc Chloride (Part 1015) are the preferred fixatives for hematopoietic tissue; Formalin 10%, Phosphate Buffered (Part 1090) or other well fixed tissue is acceptable.
- Drain staining rack/slides after each step to prevent solution carry over.
- Do not allow sections to dry out at any point during staining procedure.
- The color range of the stained cells may vary depending upon fixation and degree of differentiation.
- If using a xylene substitute, closely follow the manufacturer’s recommendations for deparaffinization and clearing steps.
REFERENCES:
- Carson, Freida L., and Christa Hladik Cappellano. Histotechnology: A Self-instructional Text. 4th ed. Chicago: ASCP Press, 2015. 130-131.
- Luna, Lee G. Manual of Histologic Staining Methods of the Armed Forces Institute of Pathology. 3rd ed. New York: Blakiston Division, McGraw-Hill, 1968. 121-122.
- Shapiro, Stanley H., and Hilda Laufer. “Observations on Fixation and Staining of Bone Marrow Biopsies.” The Journal of Histotechnology 11.3 (1988): 145-47.
- Sheehan, Dezna C., and Barbara B. Hrapchak. Theory and Practice of Histotechnology. 2nd ed. St. Louis: Mosby, 1980. 157.
- Modifications developed by Newcomer Supply Laboratory.
Tech Memo 2: May-Grunwald Giemsa Stain for Smears
SOLUTIONS:
| 500 ml | 1 Liter | |
| Jenner Stock Stain | Part 1210A | Part 1210B |
| Giemsa Stock Stain, Wolbach | Part 1121A | Part 1121B |
Additionally Needed:
| Alcohol, Methanol Anhydrous, ACS | Part 12236 |
For storage requirements and expiration date refer to individual bottle labels.
APPLICATION:
Newcomer Supply May-Grunwald Giemsa (MGG) Stain procedure for smears, is used for differential staining and morphological inspection of peripheral blood smears and bone marrow smears/films.
May-Grunwald refers to a combined stain of eosin and methylene blue; the Jenner Stock Stain. Giemsa refers to a mixture of methylene blue, eosin and Azure B; the Giemsa Stock Stain, Wolbach. The use of the Jenner Stock Stain and Giemsa Stock Stain, Wolbach provides intense colorization results in the MGG Stain.
METHOD:
Technique: Coplin jar or flat staining rack method
Solutions: All solutions are manufactured by Newcomer Supply, Inc.
STAINING PROCEDURE:
- Prepare within an accepted time frame, a well-made blood smear or bone marrow smear/film per your laboratories protocol, with a focus on uniform cell distribution.
- Allow smear(s) to thoroughly air-dry prior to staining.
- Fix smears by flooding slides with Methanol (Part 12236) for 10-30 seconds.
- Prepare fresh Working Jenner Stain just prior to use; combine and mix well.
- Jenner Stock Stain 20 ml
- Distilled Water 20 ml
- Or prepare lesser volumes as needed.
- Place slides in fresh Working Jenner Stain for 5-6 minutes.
- Prepare fresh Working Giemsa Stain just prior to use; combine and mix well.
- Giemsa Stock Stain, Wolbach 5 ml
- Distilled Water 45 ml
- Or prepare lesser volumes as needed.
- Place slides, without rinsing, directly from Working Jenner Stain into fresh Working Giemsa Stain for 30 minutes.
- Rinse smears well in distilled water to completely differentiate.
- Air-dry slides in a vertical position; examine microscopically.
RESULTS:
| Erythrocytes | Light pink to light purple |
| Platelets | Granules – Reddish purple |
| Lymphocytes/monocytes | Nuclei – Dark purple |
| Cytoplasm – Sky blue | |
| Neutrophils | Nuclei – Dark blue |
| Granules – Reddish purple | |
| Cytoplasm – Pale pink | |
| Eosinophils | Nuclei – Blue |
| Granules – Red/orange red | |
| Cytoplasm – Blue | |
| Basophils | Nuclei – Dark blue |
| Granules – Purple |
PROCEDURE NOTES:
- The timings provided in this procedure are suggested ranges. Optimal staining times will depend upon staining intensity preference.
- Drain slides after each step to prevent solution carry over.
REFERENCES:
- Carson, Freida L., and Christa Hladik Cappellano. Histotechnology: A Self-instructional Text. 4th ed. Chicago: ASCP Press, 2015. 130-131.
- McPherson, Richard and Matthew Pincus. Henry’s Clinical Diagnosis and Management by Laboratory Methods. 22nd ed. Philadelphia: Elsevier Saunders, 2011. 522-531.
- Sheehan, Dezna C., and Barbara B. Hrapchak. Theory and Practice of Histotechnology. 2nd ed. St. Louis: Mosby, 1980. 157.
- Modifications developed by Newcomer Supply Laboratory.
If you have ever wished for a larger surface area on adhesive slides to accommodate the larger sections, your wish has come true! We now offer a “double-wide” adhesive slide with a white painted end. This slide offers a total of 55 x 50mm of an unobstructed surface for your tissue to lie down on.
(We also have a custom coverslip glass for this slide that is 55 x 50mm! see part number 62308 in coverslips)
Click Here for part number and pricing for the 55 x 50mm coverslip
Slides 75 x 50 x 1 mm, “DOUBLE WIDE“, approx 72/box.
BioSavers™ Biopsy Specimen Wraps are a quality lens paper biopsy wrap that allow optimal infiltration while helping to prevent loss of specimen.
SPECIFICATIONS OF BIOSAVERS™ BIOPSY SPECIMEN WRAPS:
- Dimensions: 2″ x 3″ sheets
- Available in white, pink and blue
- Colors of BioSavers™ Biopsy Wraps sharply contrast to biopsies stained with IPC Blue™ allowing better visualization during embedding & cutting.
BIOSAVERS™ BIOPSY SPECIMEN WRAPS MATERIAL BY COLOR:
White & Pink BioSavers™:
-
-
- Traditional woven lens paper
- More rigid
- Able to hold a folded shape that is applied to the biopsy wrap
-
Blue BioSavers™:
-
-
- Non-woven lens paper
- Slightly less dense & less rigid
- Easier to manipulate into different shapes.
- Does not hold hard folds that are applied to the biopsy wrap.
-
BIOSAVERS™ BIOPSY SPECIMEN WRAPS INSTRUCTIONS FOR USE:
- Place tissue in the middle of the wrap with plenty of space around all sides.
- Fold the biopsy specimen wrap in thirds with a slight (about 1/8”) lip of wrap over one edge. (This makes it much easier for the person embedding to open)
- Fold the remaining ends over to make a closed “envelope” to allow it to fit comfortably in the cassette.
SOLUTIONS:
| 500 ml | 1 Liter | 1 Gallon | |
| Hematoxylin Stain, Mayer Modified | Part 1202A | Part 1202B | Part 1202C |
| Eosin Y Working Solution | Part 1072A | Part 1072B | Part 1072C |
Additionally Needed For H&E Staining:
| Hematoxylin & Eosin (H&E) Control Slides | Part 4278 |
| Xylene, ACS | Part 1445 |
| Alcohol, Ethyl Denatured, 100% | Part 10841 |
| Alcohol, Ethyl Denatured, 95% | Part 10842 |
| Lithium Carbonate, Saturated Aqueous OR Scott Tap Water Substitute |
Part 12215 OR Part 1380 |
| Alcohol, Ethyl Denatured, 70% | Part 10844 |
For storage requirements and expiration date refer to individual product labels.
APPLICATION:
Newcomer Supply Hematoxylin & Eosin (H&E) Progressive Stain is used for screening specimens in anatomic pathology, as well as for research, smears, touch preps and other applications. In progressive staining, tissue is left in the hematoxylin solution just long enough to reach the proper endpoint. It may be necessary to examine the slides at different timed intervals to determine when staining is optimal.
Hematoxylin Stain, Mayer Modified is a ready-to-use progressive hematoxylin that does not require filtering and does not contain chloral hydrate or alcohol. Due to the progressive staining nature of Mayer hematoxylin, over-staining is less likely and an acid alcohol differentiation step is not required in the staining process.
Eosin Y Working Solution is a ready-to-use counterstain with the ability to distinguish between the cytoplasm of different types of cells by staining cytoplasmic components differing shades and intensities of pink to red.
Quality Control: Since hematoxylin and eosin staining is the foundation of the diagnostic process, maintaining quality is of critical importance. Change staining solutions on a regular basis according to laboratory protocol. Procedures will vary between laboratories depending upon volume of slides, automation vs manual staining, chemical hygiene and solution integrity. The longevity of hematoxylin and eosin depend upon these factors and stain quality should be regularly screened with the use of an H&E control slide.
METHOD:
Fixation: Formalin 10%, Phosphate Buffered (Part 1090)
Technique: Paraffin sections cut at 5 microns
Solutions: All solutions are manufactured by Newcomer Supply, Inc.
STAINING PROCEDURE:
- Deparaffinize sections thoroughly in three changes of xylene, 3 minutes each. Hydrate through two changes each of 100% and 95% ethyl alcohols, 10 dips each. Wash well with distilled water.
- See Procedure Notes #1 and #2.
- Stain with Hematoxylin Stain, Mayer Modified, 10-20 minutes, depending on preference of nuclear stain intensity.
- Wash well in tap water for 3 minutes.
- Blue slides in Lithium Carbonate, Saturated Aqueous (Part 12215) or Scott Tap Water Substitute (Part 1380) for 10 dips.
- See Procedure Note #3.
- Wash in three changes of tap water; rinse in distilled water.
- Drain excess water from rack/slides; proceed to 70% alcohol for 10 dips.
- Counterstain in Eosin Y Working Solution for 30 seconds to 3 minutes, depending on preference of intensity.
- Dehydrate in two changes of 95% ethyl alcohol for 1 minute each and two changes of 100% ethyl alcohol, 10 dips each. Clear in three changes of xylene, 10 dips each; coverslip with compatible mounting medium.
RESULTS:
| Nuclei | Blue |
| Erythrocytes and eosinophilic granules | Bright pink to red |
| Cytoplasm and other tissue elements | Various shades of pink |
PROCEDURE NOTES:
- Drain staining rack/slides after each step to prevent solution carry over.
- Do not allow sections to dry out at any point during staining procedure.
- Some laboratory tap water may be alkaline enough to accomplish satisfactory bluing, allowing the elimination of Step #4.
- If using a xylene substitute, closely follow the manufacturer’s recommendations for deparaffinization and clearing steps.
REFERENCES:
- Carson, Frieda, Histotechnology: A Self-Instructional Text. 3rd ed. Chicago: ASCP Press, 2009. 114-115.
- Luna, Lee G. Manual of Histologic Staining Methods of the Armed Forces Institute of Pathology. 3rd ed. New York: Blakiston Division, McGraw-Hill, 1968. 36-38.
- Modifications developed by Newcomer Supply Laboratory.
SOLUTIONS:
| 500 ml | 1 Liter | 1 Gallon | |
| Hematoxylin Stain, Harris | Part 12013A | Part 12013B | Part 12013C |
| Eosin Y Working Solution | Part 1072A | Part 1072B | Part 1072C |
Additionally Needed For H&E Staining:
| Hematoxylin & Eosin (H&E) Control Slides | Part 4278 |
| Xylene, ACS | Part 1445 |
| Alcohol, Ethyl Denatured, 100% | Part 10841 |
| Alcohol, Ethyl Denatured, 95% | Part 10842 |
| Acid Alcohol 1% | Part 10011 |
| Lithium Carbonate, Saturated Aqueous OR Scott Tap Water Substitute |
Part 12215 OR Part 1380 |
| Alcohol, Ethyl Denatured, 70% | Part 10844 |
For storage requirements and expiration date refer to individual product labels.
APPLICATION:
Newcomer Supply Hematoxylin & Eosin (H&E) Regressive Stain is used for screening specimens in anatomic pathology, as well as for research, smears, touch preps and other applications. In regressive staining, tissue sections are deliberately overstained then further differentiated with dilute acid until the optimal endpoint is reached.
Hematoxylin Stain, Harris is a ready to use high quality regressive hematoxylin that does not require filtering, is completely mercury-free and does not contain glacial acetic acid or ethylene glycol.
Eosin Y Working Solution is a ready-to-use counterstain with the ability to distinguish between the cytoplasm of different types of cells by staining cytoplasmic components differing shades and intensities of pink to red.
Quality Control: Since hematoxylin and eosin staining is the foundation of the diagnostic process, maintaining quality is of critical importance. Change staining solutions on a regular basis according to laboratory protocol. Procedures will vary between laboratories depending upon volume of slides, automation vs manual staining, chemical hygiene and solution integrity. The longevity of hematoxylin and eosin depend upon these factors and stain quality should be regularly screened with the use of an H&E control slide
METHOD:
Fixation: Formalin 10%, Phosphate Buffered (Part 1090)
Technique: Paraffin sections cut at 5 microns
Solutions: All solutions are manufactured by Newcomer Supply, Inc.
STAINING PROCEDURE:
- Deparaffinize sections thoroughly in three changes of xylene, 3 minutes each. Hydrate through two changes each of 100% and 95% ethyl alcohols, 10 dips each. Wash well with distilled water.
- See Procedure Notes #1 and #2.
- Stain with Hematoxylin Stain, Harris, 1 to 5 minutes, depending on preference of nuclear stain intensity.
- Wash well in three changes of tap water.
- Differentiate quickly in Acid Alcohol 1% (Part 10011).
- See Procedure Note #3.
- Rinse immediately in three changes of tap water.
- Blue slides in Lithium Carbonate, Saturated Aqueous (Part 12215) or Scott Tap Water Substitute (Part 1380) for 10 dips.
- Wash in three changes of tap; rinse in distilled water.
- Drain excess water from rack/slides; proceed to 70% alcohol for 10 dips.
- Counterstain in Eosin Y Working Solution for 30 seconds to 3 minutes, depending on preference of intensity.
- Dehydrate in two changes of 95% ethyl alcohol for 1 minute each and two changes of 100% ethyl alcohol, 10 dips each. Clear in three changes of xylene, 10 dips each; coverslip with compatible mounting medium.
RESULTS:
| Nuclei | Blue |
| Erythrocytes and eosinophilic granules | Bright pink to red |
| Cytoplasm and other tissue elements | Various shades of pink |
PROCEDURE NOTES:
- Drain staining rack/slides after each step to prevent solution carry over.
- Do not allow sections to dry out at any point during staining procedure.
- Differentiate for a length of time to suit preference of nuclear stain intensity. Check slides microscopically to assure hematoxylin intensity is satisfactory. Nuclei should be distinct and the background very light to colorless.
- If using a xylene substitute, closely follow the manufacturer’s recommendations for deparaffinization and clearing steps.
REFERENCES:
- Bancroft, John D., and Marilyn Gamble. Theory and Practice of Histological Techniques. 6th ed. Oxford: Churchill Livingstone Elsevier, 2008. 123-126.
- Carson, Frieda, Histotechnology: A Self-Instructional Text. 2nd ed. Chicago: ASCP Press, 1997. 91-96.
- Luna, Lee G. Histopathologic Methods and Color Atlas of Special Stains and Tissue Artifacts. Gaitheresburg, MD: American Histolabs, 1992. 86-87, 91-92.
- Sheehan, Dezna C., and Barbara B. Hrapchak. Theory and Practice of Histotechnology. 2nd ed. St. Louis: Mosby, 1980. 143-144, 153-154.
- Modifications developed by Newcomer Supply Laboratory.
Tech Memo 1: Wright-Giemsa Stain, Modified for Tissue Sections
SOLUTIONS:
| 500 ml | 1 Liter | 1 Gallon | |
| Wright Stain, Modified | Part 1421A | Part 1421B | Part 1421C |
| Stock Stain | Part 1120A | Part 1120B |
Additionally Needed:
| Control Slides | Part 4240 |
| Xylene, ACS | Part 1445 |
| Alcohol, Ethyl Denatured, 100% | Part 10841 |
| Alcohol, Ethyl Denatured, 95% | Part 10842 |
| Alcohol, Methanol Anhydrous, ACS | Part 12236 |
For storage requirements and expiration date refer to individual product labels.
APPLICATION:
Newcomer Supply Wright-Giemsa Stain, Modified for Tissue Sections combines a modified Wright’s formula with a Giemsa Stain Solution for differential staining of hematopoietic tissue and demonstration of bacteria that may be present in the sections. This procedure is applicable for either hand or automated staining processes.
METHOD:
Fixation: Recommended for hematopoietic tissue:
Technique: Paraffin sections cut at 4 microns
Solutions: All solutions are manufactured by Newcomer Supply, Inc.
All Newcomer Supply stain procedures are designed to be used with Coplin jars filled to 40 ml following the provided staining procedure.
PRESTAINING PREPARTION:
-
- If necessary, heat dry tissue sections/slides in oven.
- Prepare fresh Working Giemsa Stain:
- Distilled Water 40 ml
- Giemsa Stock Stain (Part 1120) 5 ml
STAINING PROCEDURE:
-
- Deparaffinize sections thoroughly in three changes of xylene, 3 minutes each. Hydrate through two changes each of 100% and 95% ethyl alcohols, 10 dips each. Stop at 95% ethyl alcohol.
-
- See Procedure Notes #1 and #2.
-
- Treat slides in two changes of Methanol (Part 12236); 3 minutes each.
- Stain in Wright Stain, Modified for 6 minutes.
- Stain in fresh Working Giemsa Stain (Step #2); 60°C oven for 60 minutes.
- Dehydrate in two changes each of 95% and 100% ethyl alcohol. Clear in three changes of xylene, 10 dips each; coverslip with compatible mounting medium.
- Deparaffinize sections thoroughly in three changes of xylene, 3 minutes each. Hydrate through two changes each of 100% and 95% ethyl alcohols, 10 dips each. Stop at 95% ethyl alcohol.
RESULTS:
| Nuclei | Blue |
| Cytoplasm | Pink to red |
| Bacteria | Blue |
PROCEDURE NOTES:
-
- Drain slides after each step to prevent solution carry over.
- Do not allow sections to dry out at any point during
- The color range of stained cells may vary depending upon fixation.
- If using a xylene substitute, closely follow the manufacturer’s recommendations for deparaffinization and clearing steps.
REFERENCES:
-
- Shapiro, Stanley H., and Hilda Laufer. “Observations on Fixation and Staining of Bone Marrow Biopsies.” The Journal of Histotechnology3 (1988): 145-47.
- Sheehan, Dezna C., and Barbara B. Hrapchak. Theory and Practice of Histotechnology. 2nd ed. St. Louis: Mosby, 1980. 155-156.
- Modifications developed by Newcomer Supply Laboratory.
Tech Memo 2: Wright Stain, Modified for Smears
SOLUTION:
| 500 ml | 1 Liter | 1 Gallon | |
| Wright Stain, Modified | Part 1421A | Part 1421B | Part 1421C |
Additionally Needed:
| Alcohol, Methanol Anhydrous, ACS | Part 12236 |
| Wright Stain Buffer, pH 6.8 | Part 1430 |
For storage requirements and expiration date refer to individual bottle labels.
APPLICATION:
Newcomer Supply Wright Stain, Modified for Smears, provides a concentrated Wright’s formula for differential staining of cell types in peripheral blood smears and bone marrow smears/films. This procedure is applicable for either hand or automated staining processes.
METHOD:
Technique: Flat staining rack method
Solutions: All solutions are manufactured by Newcomer Supply, Inc.
PRESTAINING PREPARTION:
-
- Prepare within an accepted time frame, a well-made blood smear or bone marrow smear/film per your laboratories protocol, with a focus on uniform cell distribution.
- Allow slides to thoroughly air-dry prior to staining.
- Filter Wright Stain, Modified prior to use with quality filter paper.
-
- Filter sufficient stain to allow 1 ml of stain per slide.
-
STAINING PROCEDURE:
-
- Place slides on flat staining rack suspended over sink.
- Fix by flooding slides with Methanol (Part 12236); 10-30 seconds.
- Drain off
- Flood each slide with 1 ml of filtered Wright Stain, Modified for 3-5 minutes.
-
- See Procedure Notes #1 and #2.
-
- Retain Wright Stain, Modified on slides.
- Directly add 1 ml of Wright Stain Buffer, pH 6.8 (Part 1430) to each slide; agitate gently to mix with retained Wright Stain.
- Stain for an additional 6-10 minutes.
- Wash well in distilled water; rinse thoroughly in running tap water.
- Air-dry slides in a vertical position; examine microscopically.
- If coverslip is preferred, allow slides to air-dry and coverslip with compatible mounting medium.
RESULTS:
| Erythrocytes | Pink |
| Granules – Purple | |
| Eosinophils | Granules – Pink |
| White blood cells | Chromatin – Purple |
| Lymphocytes | Cytoplasm – Blue |
| Cytoplasm- Blue | |
| Bacteria | Deep Blue |
PROCEDURE NOTES:
-
- Timings provided are suggested ranges. Optimal times will depend upon staining intensity preference.
- Smears containing primarily normal cell populations require minimum staining time; immature cells and bone marrow smears/films may require longer staining times.
- The color range of stained cells may vary depending on buffer pH and pH of rinse water.
-
- Alkalinity is indicated by red blood cells being blue-grey and white blood cells only blue.
- Acidity is indicated by red blood cells being bright red or pink and lack of proper staining in white blood cells.
- If necessary, adjust buffer pH accordingly to 6.8 +/ – 0.2.
-
REFERENCES:
-
- Lillie, R. D., and Harold Fullmer. Histopathologic Technic and Practical Histochemistry. 4th ed. New York: McGraw-Hill, 1976. 747-748.
- McPherson, Richard and Matthew Pincus. Henry’s Clinical Diagnosis and Management by Laboratory Methods. 22nd ed. Philadelphia: Elsevier Saunders, 2011. 522-532.
- Sheehan, Dezna C., and Barbara B. Hrapchak. Theory and Practice of Histotechnology. 2nd ed. St. Louis: Mosby, 1980. 154-155.
- Modifications developed by Newcomer Supply Laboratory.
SOLUTIONS:
| 500 ml | 1 Liter | 1 Gallon | ||
| Alcian Blue Stain, Alcoholic | Part 1004A | |||
| Sodium Sulfate 1%, Aqueous | Part 1388A | |||
| Acetic Acid, Glacial, ACS | Part 10010A | |||
| Picric Acid, Saturated Alcoholic | Part 1337A | Part 1337B | Part 1337C | |
| Borax (Sodium Borate) 5%, Saturated Alcoholic | Part 1019A | Part 1019B | ||
| Hematoxylin Stain Set, Weigert Iron | Part 1409B | Part 1409A | ||
| Van Gieson Stain | Part 1404A | Part 1404B | ||
Additionally Needed:
| Alcohol, Ethyl Denatured, 95% | Part 10842 |
| Alcohol, Ethyl Denatured, 80% | Part 10843 |
| Xylene, ACS | Part 1445 |
| Alcohol, Ethyl Denatured, 100% | Part 10841 |
For storage requirements and expiration date refer to individual bottle labels.
APPLICATION:
Newcomer Supply Sulfated Alcian Blue (SAB) Stain assists in identifying the extraneous protein deposits of amyloidosis, specifically in myocardial and renal biopsy specimens.
METHOD:
Fixation: Formalin 10%, Phosphate Buffered (Part 1090)
Technique: Paraffin sections cut at 8-10 microns
Solutions: All solutions manufactured by Newcomer Supply Inc.
All Newcomer Supply stain procedures are designed to be used with Coplin jars filled to 40 ml following the staining procedure provided below.
STAINING PROCEDURE:
- Prepare the following three fresh solutions:
- SAB Staining Solution
Alcian Blue Stain, Alcoholic (Part 1004) 22 ml
Sodium Sulfate 1%, Aqueous (Part 1388) 22 ml
Acetic Acid, Glacial, ACS (Part 10010) 5 ml
Allow to stand for 30 minutes before use.
- Acetic Acid/Alcohol Solution
Alcohol, Ethyl Denatured, 95% 44 ml
Distilled Water 44 ml
Acetic Acid, Glacial, ACS 10 ml
- Picric Acid 2%, Alcoholic Working Solution
Alcohol, Ethyl Denatured, 80% 30 ml
Picric Acid, Saturated Alcoholic (Part 1337) 10 ml
- Deparaffinize sections thoroughly in three changes of xylene, 3 minutes each. Hydrate through two changes each of 100% and 95% ethyl alcohols, 10 dips each. Wash well with distilled water.
- See Procedure Notes #1 and #2.
- Place in Acetic Acid/Alcohol Solution (Step #1b) for 2 minutes.
- Place slides in SAB Staining Solution (Step #1a) for 2 hours.
- Transfer directly to fresh Acetic Acid/Alcohol Solution (Step #1b) for 2 minutes.
- Wash well in tap water; rinse in distilled water.
- Alkalinize slides in Borax (Sodium Borate) 5%, Saturated Alcoholic (Part 1019) for 30 minutes.
- Wash well in tap water; rinse in distilled water.
- Prepare Working Hematoxylin Stain, Weigert Iron (Part 1409); combine and mix well.
- Solution A: Ferric Chloride, Aqueous 20 ml
- Solution B: Hematoxylin 1%, Alcoholic 20 ml
- Stain in Working Hematoxylin Stain, Weigert Iron for 5 minutes.
- Wash in tap water for 10 minutes; rinse in distilled water.
- Differentiate each slide individually; dip in Picric Acid 2%, Alcoholic Working Solution (Step #1c) for 20 seconds.
- Rinse briefly in tap water; 2-3 dips.
- Counterstain with Van Gieson Stain (Part 1404) for 3 minutes.
- Dehydrate quickly in two changes each of 95% and 100% ethyl alcohol. Clear in three changes of xylene, 10 dips each; coverslip with compatible mounting medium.
RESULTS:
| Amyloid deposits | Shades of green; pale to brilliant jade |
| Fibrin, muscle, cytoplasm | Yellow |
| Collagen, stroma | Red |
| Nuclei | Black |
Note: Green staining tissues other than amyloid are distinguishable on morphological grounds. Tissue mast cells stain a dense bright green, showing typical cytoplasmic granularity. Red blood cells occasionally appear very pale green; calcium deposits stain a dirty blue/green.
PROCEDURE NOTES:
- Drain staining rack/slides after each step to prevent solution carry over.
- Do not allow sections to dry out at any point during staining procedure.
- If using a xylene substitute, closely follow the manufacturer’s recommendations for deparaffinization and clearing steps.
REFERENCES:
- Lendrum, A. C., W. Slidders, and D. S. Fraser. “Renal Hyalin: A Study of Amyloidosis and Diabetic Fibrinous Vasculosis with New Staining Methods.” Journal of Clinical Pathology 25 (1972): 373-96.
- Pomerance, Ariela, Gerard Slavin, and Josephine McWatt. “Experience with the Sodium Sulphate-Alcian Blue Stain for Amyloid in Cardiac Pathology.” Journal of Clinical Pathology, 29 (1976): 22-26.
- Modifications developed by Newcomer Supply Laboratory.
SOLUTION:
| 500 ml | 1 Liter | |
| Giemsa Stock Stain, Wolbach | Part 1121A | Part 1121B |
Additionally Needed:
| Giemsa Control Slides | Part 4240 |
| Xylene, ACS | Part 1445 |
| Alcohol, Ethyl Denatured, 100% | Part 10841 |
| Alcohol, Ethyl Denatured, 95% | Part 10842 |
| Acid Alcohol 1% | Part 10011 |
| Alcohol, Methanol Anhydrous, ACS | Part 12236 |
| Rosin 10%, Alcoholic | Part 13398 |
For storage requirements and expiration date refer to individual product labels.
APPLICATION:
Newcomer Supply Wolbach Giemsa Stain is used for differential staining of hematopoietic tissue and demonstration of bacteria and rickettsia that may be present in the sections.
METHOD:
Fixation: Recommended for hematopoietic tissue:
Technique: Paraffin sections cut at 4 microns
Solutions: All solutions are manufactured by Newcomer Supply, Inc.
All Newcomer Supply stain procedures are designed to be used with Coplin jars filled to 40 ml following the provided staining procedure.
PRESTAINING PREPARATION:
-
- If necessary, heat dry tissue sections/slides in oven.
- Prepare fresh Working Wolbach Giemsa Stain Solution; combine and mix well.
-
- Distilled water 50 ml
- Giemsa Stock Stain, Wolbach 2 ml
- Methanol (Part 12236) 2 ml
-
STAINING PROCEDURE:
-
- Deparaffinize sections thoroughly in three changes of xylene, 3 minutes each. Hydrate through two changes each of 100% and 95% ethyl alcohols, 10 dips each. Wash well with distilled water.
-
- See Procedure Notes #1 and #2.
-
- Treat slides with Acid Alcohol 1% (Part 10011) Solution for 5 minutes.
-
- See Procedure Note #3.
-
- Wash in running tap water for 5 minutes.
- Stain in fresh Working Wolbach Giemsa Stain Solution (Step #2) for 60 minutes at room temperature.
-
- See Procedure Note #4.
-
- Differentiate each slide individually in Rosin 10%, Alcoholic until sections are purplish-pink; 5-10 dips. Check microscopically.
-
- Rinse in 100% ethyl alcohol to stop differentiation.
-
- Dehydrate in two changes of 100% ethyl alcohol. Clear in three changes of xylene, 10 dips each; coverslip with compatible mounting medium.
-
- Do not use a 95% ethyl alcohol dehydration step.
-
- Deparaffinize sections thoroughly in three changes of xylene, 3 minutes each. Hydrate through two changes each of 100% and 95% ethyl alcohols, 10 dips each. Wash well with distilled water.
RESULTS:
| Nuclei | Blue/violet |
| Cytoplasm | Pink/rose to lighter blue shades |
| Bacteria | Blue |
| Rickettsia, inclusions | Reddish-purple |
PROCEDURE NOTES:
-
- Drain slides after each step to prevent solution carry over.
- Do not allow sections to dry out at any point during procedure.
- Acid Alcohol treatment ensures an acid pH and improved staining.
- For increased staining, stain in Working Giemsa Stain Solution at 60°C for 60 minutes. Additional differentiation may be required.
- The color range of cells may vary depending on fixative and degree of differentiation.
- If using a xylene substitute, closely follow the manufacturer’s recommendations for deparaffinization and clearing steps.
REFERENCES:
-
- Luna, Lee G. Manual of Histologic Staining Methods of the Armed Forces Institute of Pathology. 3rd ed. New York: Blakiston Division, McGraw-Hill, 1968. 119-120.
- Sheehan, Dezna C, and Barbara B. Hrapchak. Theory and Practice of Histotechnology. 2nd ed. St. Louis: Mosby, 1980. 156-157.
- Wolbach, S. Burt, and John Todd. The Etiology and Pathology of Typhus. S.l.: Harvard University Press, 1922. 13-14.
- Modifications developed by Newcomer Supply Laboratory.
APPLICATION:
Newcomer Supply Hydrosorb-X™ water absorption packets are designed to eliminate water contamination in xylenes/xylene substitutes used in staining processes that can occur due to carry-over and/or high humidity environments. Hydrosorb-X™ maintains high quality staining xylenes and ensures stains are not compromised from water contamination.
-
- Extends life of clearing solutions and reduces disposal costs.
- Multiple sizes available to fit most dishes and containers.
- Color change indicator signals when to replace packet.
- Effective for xylene and aliphatic hydrocarbons (xylene substitutes).
- Compatible for both manual and automated staining set-ups.
HYDROSORB-X™ PROCEDURE:
-
- Individual Hydrosorb-X™ packets are double vacuum sealed to prevent moisture absorption from the air; keep sealed until use.
-
- See Procedure Note #1.
-
- Start with fresh xylene with each new Hydrosorb-X™ packet used.
- Use Hydrosorb-X™ in coverslipping dish to maintain clean xylene.
- Packet turns blue to pink when exhausted and ready to replace.
-
- See Procedure Note #2.
-
- For disposal, allow Hydrosorb-X™ packets to dry under ventilation hood and dispose with xylene waste.
- Individual Hydrosorb-X™ packets are double vacuum sealed to prevent moisture absorption from the air; keep sealed until use.
For Xylenes/Xylene Substitutes in Manual Staining:
-
- Place one Hydrosorb-X™ packet in xylene dishes.
-
- Do not place in first xylene for deparaffinization.
- Do not place in first xylene after dehydration process.
-
- Remove Hydrosorb-X™ packets from containers prior to staining.
-
- See Procedure Notes #3 and #4.
-
- Place one Hydrosorb-X™ packet in xylene dishes.
For Xylenes/Xylene Substitutes on Automated Stainers:
-
- Hydrosorb-X™ packets are to be used in xylenes only when the automated stainer is not in operation.
- Place one Hydrosorb-X™ packet in xylene containers.
-
- Do not place in first xylene for deparaffinization.
- Do not place in first xylene for dehydration process.
-
- Remove Hydrosorb-X™ packets from containers prior to staining.
-
- See Procedure Notes #3 and #4.
-
PROCEDURE NOTES:
-
- Keep Hydrosorb-X™ packets in vacuum sealed bags or stored in xylene for maximum use. Extended air exposure reduces longevity.
- Exposing Hydrosorb-X™ packets to alcohol will inactivate the color change indicator.
- Hydrosorb-X™ packets left in containers during staining may dislodge or displace staining racks.
- Store removed packets in separate xylene/xylene substitute filled dish designated “storage only”. These packets can be placed back in xylenes when staining is completed.
REFERENCES:
-
- Dapson, Janet Crookham, and Richard W. Dapson. Hazardous Materials in the Histopathology Laboratory: Regulations, Risks, Handling and Disposal. 4th Battle Creek, MI: Anatech, 2005. 278.
- Modifications developed by Newcomer Supply Laboratory.
-
-
- Aminosilane Coated Slides
- Available in Blue, Green, Pink, White and Yellow
- Sold by the case
- Great pricing!
-
Out/In Cards mark where a cassette has been removed for easy replacement.
.jpg)
Eliminates Harmful Vapors in Minutes!
PolyForm-F™ Formalin/Formaldehyde Neutralizer is a free granule spill product for the safe and rapid control of harmful vapors from formaldehyde, formaldehyde-based embalming solutions, glutaraldehyde, 10% buffered formalin and other aldehydes, including: Cidex, Cidex-OPA, Metracide, Wavacide & OmniCide.
POLYFORM-F™ FORMALIN/FORMALDEHYDE NEUTRALIZER:
- Harmful vapors are eliminated in 2 to 3 minutes
- Formaldehyde & other aldehydes are neutralized & irreversibly polymerized
- Reaction leaves a non-hazardous biodegradable polymer
- End product is safe & simple for personnel to clean-up & dispose
USES OF POLYFORM-F™ FORMALIN/FORMALDEHYDE NEUTRALIZER:
- Hospital & Medical Labs
- Histology & Pathology Labs
- Operating Rooms
- Morgues & Autopsy Suites
- Medical Schools & Universities
- Specimen Transportation
- Shipping & Receiving Areas
- Wherever aldehydes are used
DIRECTIONS OF USE FOR POLYFORM-F™ FORMALIN/FORMALDEHYDE NEUTRALIZER:
- Consult SDS for the spilled chemical solution, to become familiar with its chemical properties and health & safety requirements.
- Select and wear proper personnel protective equipment as recommended or noted on the SDS for the spilled chemical solution.
- Evacuate area as necessary to ensure safety of personnel.
- Eliminate all sources of ignition and insure there is adequate ventilation in the area of the spill.
- Add PolyForm-F™ Formalin/Formaldehyde Neutralizer around the perimeter of the spill to dike the liquid and prevent spreading. From the upwind side, cover the entire area from edge to edge at a ratio of approximately one-to-one, completely covering the spill and taking care to avoid vapors and splashing.
- Once PolyForm-F™ Formalin/Formaldehyde Neutralizer is applied, DO NOT MIX, allow to stand for approximately 12 to 15 minutes.
- Cleanup spill residue by using a plastic dust-pan and disposable towels, then place the collected spill residue in adequate waste bag.
- After spill residue has been removed from spill area, wipe up the spill area with cold tap water, using a towel, sponge or mop.
- “Post-Cleanup” the spill area with mild detergent solution recommended by your facility for the final floor and/or counter cleanup.
- In most cases, the PolyForm-F™ Formalin/Formaldehyde Neutralizer treated spill residue may be disposed of as a non-hazardous waste.
- If the spilled solutions contain heavy metals, then the material must be handled as a potential hazardous waste.
- If human or animal tissue has been in contact with the spilled formalin, then the spill residue material may be handled as a potential bio-medical waste.
- Always dispose of all spill residue waste in accordance with users’ facility recommendations and follow all Federal, State and Local environmental regulations.
“The first line of control for most accidental releases of corrosive materials.”
This unique flowable powder was developed to facilitate the rapid and immediate control of spilled corrosive materials by:
- Solidifying and neutralizing on contact.
- Immediately stopping the spread of hazardous chemicals.
- Reducing hazardous fumes and vapors.
- Reducing the corrosiveness of spilled materials, which reduces chemical attack on floors and other surfaces, as well as on the environment.
- Producing a controlled chemical reaction, rather than the usual violent reaction associated with the neutralization of strong corrosives.
- Eliminating the disposal problems typically associated with generic sorbents.
- Producing a dry powder which can be cleaned up and disposed of as a nonhazardous waste.
Directions for Base Control Spill Powder:
- Consult SDS of spilled material to become familiar with its chemical properties and safety and health requirements.
- Select and wear proper personal protective equipment for the spilled material.
- Evacuate area as necesary to ensure the safety of all personnel.
- Eliminate all sources of ignition and ensure that there is adequate ventilation before applying product.
- Apply Base Control™ to the spill area, working from the upwind side and start from the outside of spill and working toward the center. If the spilled liquid is running, then apply product downstream of the spill to form a dam.
- Carefully mix with a non-reactive paddle or shovel until all liquid is solidified.
- Determine level of neutralization by using a pH test kit.
- Let solidified/neutralized material cool prior to clean up.
- Follow final clean up procedures established by your facility or company.
- Dispose of neutralized waste in accordance with Federal, State and Local environmental regulations.
| DO Use on the Following Bases: |
DO NOT Use on the following: |
| Ammonium Hydroxide = aqua ammonia | Chlorine |
| Anhydrous Ammonia | Hydrogen Peroxide |
| Monoethanolamine | Oxidizers |
| Morpholine | Sodium Amide |
| Potassium Hydroxide = caustic potash | Sodium Hypochloride |
| Triethylalamine | Sulfurous Fluoride |
| Sodium Hydroxide = caustic soda | |
| Sodium Metasilicate Solution | |
| Most Alkali Detergents |
* The lists given herein are general and do not necessarily include all the materials Acid Handler™, Polyform-F™, Base Control™, and Solvent Handler™ can or cannot be used on. If you would like an exotic species tested, or have questions as to application of the products, call Newcomer Supply or American Bio-Safety, Inc. We will try applying our products to your substance and determine a suitable procedure for spill situations.
“The first line of control for most accidental releases of corrosive materials.”
This unique flowable powder was developed to facilitate the rapid and immediate control of spilled corrosive materials by:
- Solidifying and neutralizing on contact.
- Immediately stopping the spread of hazardous chemicals.
- Reducing hazardous fumes and vapors.
- Reducing the corrosiveness of spilled materials, which reduces chemical attack on floors and other surfaces, as well as on the environment.
- Producing a controlled chemical reaction, rather than the usual violent reaction associated with the neutralization of strong corrosives.
- Eliminating the disposal problems typically associated with generic sorbents.
- Producing a dry powder which can be cleaned up and disposed of as a nonhazardous waste.
Directions for Acid Handler Spill Powder:
- Consult SDS of spilled material to become familiar with its chemical properties and safety and health requirements.
- Select and wear proper personal protective equipment for the spilled material.
- Evacuate area as necessary to ensure the safety of all personnel.
- Eliminate all sources of ignition and ensure that there is adequate ventilation before applying product.
- Apply Acid Handler™ to the spill area, working from the upwind side and start from the outside of spill and working toward the center. If the spilled liquid is running, then apply product downstream of the spill to form a dam.
- Carefully mix with a non-reactive paddle or shovel until all liquid is solidified.
- Determine level of neutralization by using a pH test kit.
- Let solidified/neutralized material cool prior to clean up.
- Follow final clean up procedures established by your facility or company.
- Dispose of neutralized waste in accordance with Federal, State and Local environmental regulations.
| DO Use on the Following Acids: |
DO NOT Use on the following: |
| Acetic Acid | Chlorine |
| Acetic Anhydride | Concentrated Hydrofluoric Acid |
| Acetyl Chloride | Hydrogen Peroxide |
| Aluminum Chloride | Iodic Acid |
| Chlorosulfonic Acid | Oxidizers |
| Chromic Acid Solutions-Chromium Waste Haz | Pentrafluoride (“Super-Acids”) |
| Citric Acid | Picric Acid |
| Dodecylbensylsulfonic Acid | Sodium Amide |
| Formic Acid | Sulfurous Fluoride Antimony |
| Glacial Acetic Acid | |
| Hydrochloric Acid | |
| Muriatic Acid | |
| Hydrofluosilic Acid | |
| Nitric Acid | |
| Perchloric Acid | |
| Phosphoric Acid | |
| Phosphoric Anhydride | |
| Phophorous Pentoxide | |
| Phophorous Trichloride | |
| Sulfonic Acid | |
| Sulfuric Acid | |
| 54% Hydrofluoric Acid Solution |
CLICK HERE for BORAX, cata #1019 in Reagents, Chemicals & Buffers Section.
Solution for setting tissue marking dye in special situations. Spray onto dyed tissue as needed for better adherence through solutions. Can be helpful on fatty tissues.
Hold glass slides with ease. (You’ll have to hide these to keep them.) LOVE ‘EM